-
Scam Alert. Members are reminded to NOT send money to buy anything. Don't buy things remote and have it shipped - go get it yourself, pay in person, and take your equipment with you. Scammers have burned people on this forum. Urgency, secrecy, excuses, selling for friend, newish members, FUD, are RED FLAGS. A video conference call is not adequate assurance. Face to face interactions are required. Please report suspicions to the forum admins. Stay Safe - anyone can get scammed.
You are using an out of date browser. It may not display this or other websites correctly.
You should upgrade or use an alternative browser.
You should upgrade or use an alternative browser.
Truing work in the 4 jaw chuck
- Thread starter 140mower
- Start date
Dunno about others, I do it solely because it puts where I am adjusting, directly in line with where the indicator reads,
Makes sense.
For me, a lot of my work is with tailstock mounted indicators and axial concentricity. A rear mounted indicator would be a pain in the keester. So I've learned to deal with it on top for regular setups too.
For this discussion, I have no problem doing it either way. It's the same objective after all.
Oh heck. Just realized I replied to your other post over in that thread. Will say here too though, I don't much care for the method shown in the link you provided.
Centering Work in a 4-Jaw Chuck
I've always struggled with centering work in a 4J. Some times it would take me over an hour in order to get something even remotely close. These instructions work, and work great. https://littlemachineshop.com/images/gallery/PDF/centering4-jawchuck.pdf Now if I could only find something...canadianhobbymetalworkers.com
Makes sense.
For me, a lot of my work is with tailstock mounted indicators and axial concentricity. A rear mounted indicator would be a pain in the keester. So I've learned to deal with it on top for regular setups too.
For this discussion, I have no problem doing it either way. It's the same objective after all.
I have mounted an indicator on a QCTP holder, and left it set up in the holder for long periods of time. Having one indicator in a holder, and another on a decent Mag Base, can be a lifesaver too.
curmudgeon
(Steve)
Grizzly G0602 - https://www.manualslib.com/manual/635397/Grizzly-G0602.htmlIf you had power cross feed, it works the same way. Light touch till it engages.
What model Griz do you have? I'll skim the manual so I know what you are dealing with.
Mine is an '09 vintage and that manual version is for 11/12 but I have not been able to find an earlier version.
Funny true story!
Apprentice is swearing. He is trying to center a block up in a 4 jaw chuck. I go see what's up.
He has 4 separate little postage stamp sized pieces of shim stock, protecting his part. Every time he adjusts a jaw, one or more of them head in to the chip pan.
Remember the Three Stooges, when one of the guys would get all frustrated and walk away slapping at his own face in a temper fit? The guy looked just about exactly like that, when I asked him why he did not simply cut a strip of the shim stock, and wrap it around the part!
My Myford Super Seven uses the half nuts for the long feed too. No cross feed on that one!Grizzly G0602 - https://www.manualslib.com/manual/635397/Grizzly-G0602.html
Mine is an '09 vintage and that manual version is for 11/12 but I have not been able to find an earlier version.
140mower
Don
Got to love this time of the year, bored the pulley until I was just past the keyway, then dug through my pile of bits and bobs and found this little piece that I only had to remove .038" from the od to give a .002" interference and left me with just enough to grip. Put the pulley on the woodstove, stuck the little slug in the freezer and went and made ham and eggs. Pushed in the slug and took it outside to cool.
....... Just scanning the shop to see if I want anything anealed while it's in season.
My Myford Super Seven uses the half nuts for the long feed too. No cross feed on that one!
My lathe has power cross feed and long feed. It also has separate feed lever and half nut.
Ya, I know........ I SUCK....
Sometimes I forget how lucky I am.
Funny true story!
Apprentice is swearing. He is trying to center a block up in a 4 jaw chuck. I go see what's up.
He has 4 separate little postage stamp sized pieces of shim stock, protecting his part. Every time he adjusts a jaw, one or more of them head in to the chip pan.
Remember the Three Stooges, when one of the guys would get all frustrated and walk away slapping at his own face in a temper fit? The guy looked just about exactly like that, when I asked him why he did not simply cut a strip of the shim stock, and wrap it around the part!
I had a similar experience but not with an apprentice. I was watching a very experienced machinist Centering some round stock in a four jaw with copper shims. He spent a lot of time making them and bending them to fit the Jaws. Even so, they kept falling into the swarf just like your apprentice.
I asked him why he didn't just cut a piece out of copper pipe, cut it so it can expand and slip it over the stock. He thought I was crazy. But I've done it that way myself ever since. It's a piece of cake. I also keep a little tray of split copper rings of different sizes beside my lathe for that very purpose.
I have mounted an indicator on a QCTP holder, and left it set up in the holder for long periods of time. Having one indicator in a holder, and another on a decent Mag Base, can be a lifesaver too.
I do exactly the same thing. It's still there and stays there. I put it there ages ago and I don't think I've ever taken it out of the tool holder. That's where it lives 24/7/52
The last shop I worked in, had a wonderful, if somewhat underappreciated, Schaublin 150 lathe, that had no half nuts at all, it used a ball screw for the threading feed, and you were expected to simply bang the lathe into reverse and back right back out the way you went in. Was a bit...different, to get the nerve worked up to try it without pulling the tool out! But it worked!My lathe has power cross feed and long feed. It also has separate feed lever and half nut.
Ya, I know........ I SUCK....
Sometimes I forget how lucky I am.
It had one of the slickest four way long and cross feed controls, too, with some experience, you could do some basic turning all under power feed.
Most of the lathes smaller than a South Bend 9, rarely seem to have a long feed, and only the SB9A's had power cross feeds.
Just hit undo… oh wait that does not work in real life!!
One thing I've found helpful with centering a 4 jaw chuck is having 2 chuck keys. It is much easier and more intuitive with 2 keys and seeing the movement immediately on the indicator. ( sorry if someone has already mentioned this and I missed it and am repeating).
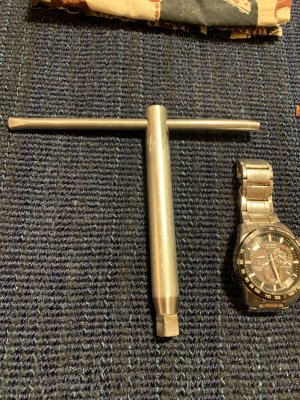
Recent project 2nd chuck key. Used the rose index to set the rotation for milling the square end.
140mower
Don
You might want to PM @trevj about that before making wishes that can't be undone.... He and I have been known to block isles in the stores and traveled lanes of parking lots swapping lies and living up to our reputations of being grumpy old men holding people back from their busy lives........ Once in a while reminding folks that the older we get, the less of a deterrent a "life sentence" becomes... You sure you want that down the street from you?I really do wish we lived closer. You are hilarious.
C'mon! I can't claim to have never been a grumpy old prick, for a young fella, anyways(!) but I DO try not to block the Grocery Aisles!You might want to PM @trevj about that before making wishes that can't be undone.... He and I have been known to block isles in the stores and traveled lanes of parking lots swapping lies and living up to our reputations of being grumpy old men holding people back from their busy lives........ Once in a while reminding folks that the older we get, the less of a deterrent a "life sentence" becomes... You sure you want that down the street from you?
Really! 1965 was a pretty good year to be born!
Neither does the "Mute" button.Just hit undo… oh wait that does not work in real life!!
The things we learn when married, eh?
Former Member
Guest
You're a young pup compared to me '64.C'mon! I can't claim to have never been a grumpy old prick, for a young fella, anyways(!) but I DO try not to block the Grocery Aisles!
Really! 1965 was a pretty good year to be born!
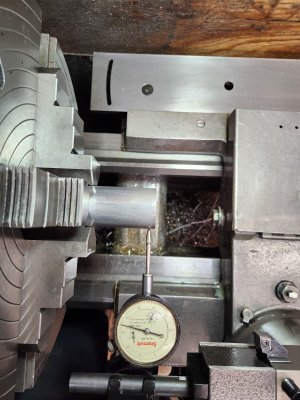
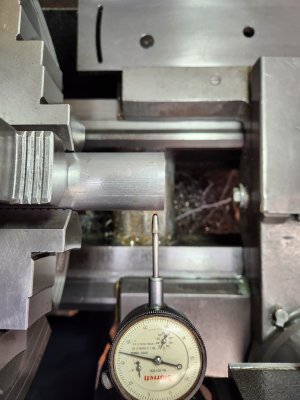
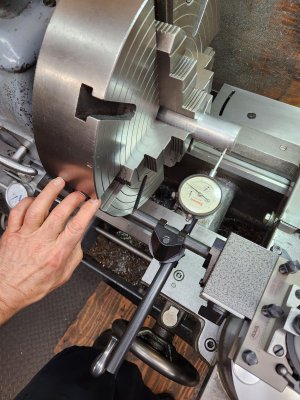
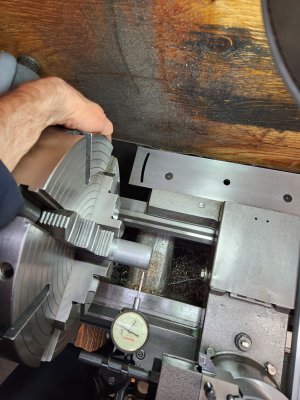
I just put my 4-jaw on, so I'll try to show how I dial in stock.
Obviously, put in neutral!!
-I position the part loosely in the chuck, and the jaws front/back, top/bottom.
-Move the dial indicator in, but not touch.
-I stick my finger into the adjusting screw closest to me
-looking from above, take note how far away the indicator tip is from the part.
-with my finger still in the screw, swing the chuck 180degrees. How far away is the tip now? Adjust as needed until the distance is the same on both sides.
-just work on one pair of opposing jaws.
-now do the other set same way.
Now, we're pretty close. This should have taken less than 1 minute.

