• Scam Alert. Members are reminded to NOT send money to buy anything. Don't buy things remote and have it shipped - go get it yourself, pay in person, and take your equipment with you. Scammers have burned people on this forum. Urgency, secrecy, excuses, selling for friend, newish members, FUD, are RED FLAGS. A video conference call is not adequate assurance. Face to face interactions are required. Please report suspicions to the forum admins. Stay Safe - anyone can get scammed.

Tool Surface plate height gauge recommendations

Tool
The first photo is mine. There is no curved base, you use ball at the bottom the mast - that's what it is for. I've never understood people set about modifying height gauges when most probably everyone as a surface gauge with this feature already built in.

AHA! Never noticed the ball end. And I likely would have dismissed it as a decorative touch.

re the coincidental picture, kind of freaky that my so called random Googling search landed on your project.
Alexa is getting uncomfortably close, invading my personal relationship boundaries LOL
 
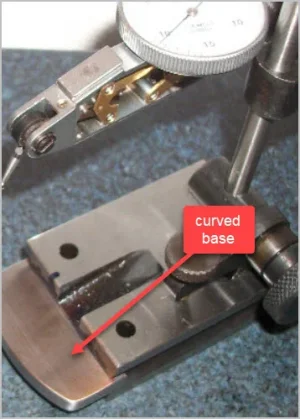
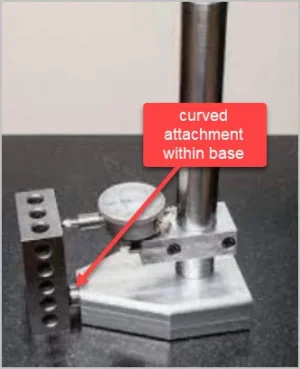
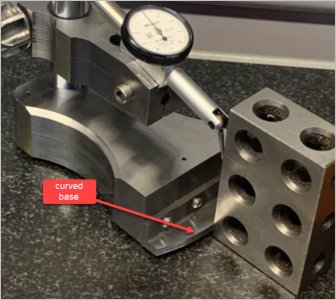
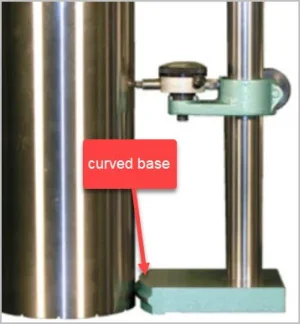
I don't know what you mean by a curved base in your description. Do you have a photo of that? What is that for?
Can you describe what it is that you want to know or what it is that you are trying to do? Or is this one of your learning exercises that goes way beyond the obvious?
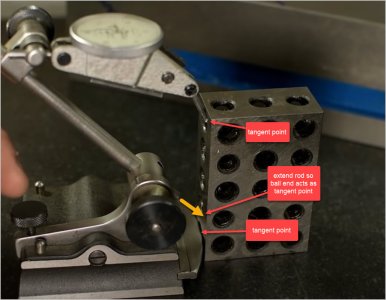
Hopefully subsequent @Mcgyver post clarified, but just for completeness this is what I'm talking about
 

Attachments

  • EDT-2022-10-29 6.49.45 PM.jpg
    EDT-2022-10-29 6.49.45 PM.jpg
    56.5 KB · Views: 22
  • EDT-2022-10-29 6.50.49 PM.webp
    EDT-2022-10-29 6.50.49 PM.webp
    11.2 KB · Views: 20
  • EDT-2022-10-29 6.51.42 PM.webp
    EDT-2022-10-29 6.51.42 PM.webp
    27.3 KB · Views: 17
  • EDT-2022-10-29 6.52.21 PM.webp
    EDT-2022-10-29 6.52.21 PM.webp
    13.9 KB · Views: 21
Hopefully subsequent @Mcgyver post clarified, but just for completeness this is what I'm talking about

Yes, @Mcgyver s post is perfect and makes total sense to me. Unfortunately, yours does not - at least not right this moment. But at least now I know what curve you are referring to. My indicator stands don't have your curve, they have @Mcgyver s ball. So your previous discussion led me to believe the curve was in the vertical plane. At least now I'm on the right page thanks to your photos and markup.

I am assessing all of this in my head so I might be making some fundamental errors here. Please bear with me.

The major difference between what @Mcgyver is doing and yours is the radius of the "ball". A small ball dramatically reduces cosine errors. It's the same issue that you explained a few months ago to someone. Unless the indicator is perfectly centered on the curved surface you don't get the same reading. That's the reason for sliding the cylinder against a flat reference that the indicator is mounted to and finding the high spot.

I think you could do the same with your bottom curve by rotating the stand to find the high spot. But "I suspect" that this doesn't work when comparing two different shapes. A small ball dramatically reduces this comparison error.

I say "suspect" because again, I am doing this in my mind. A physical test might show that I have a hyperactive imagination!
 
I recently found this video while researching vises - Cheap Milling Machine Vise...
At the 14:00, and more specifically 18:00 minute mark he gives a great explanation of how to use the surface gauge to determine squareness.

First post BTW, Tom from Toronto, happy to have found this forum.

Welcome!

Normally, web links are not allowed till you have been active on the forum for a while. I approved yours because it's clearly not advertizing or spam.

Consider posting in the new member introductions so other members can learn a little about you!
 
@TMToronto thanks for the Tony video. I've watched them all but sadly I totally forgot about it. He did say he modified his base by adding the curved shoe & maybe that's what was deep in my cranial cobwebs. I wonder if his rod end is either not balled & why he made the mod. Or it is balled & he is similarly not aware of its intended use now that we know its not for decoration. Anyway hopefully everyone is on the same page now.

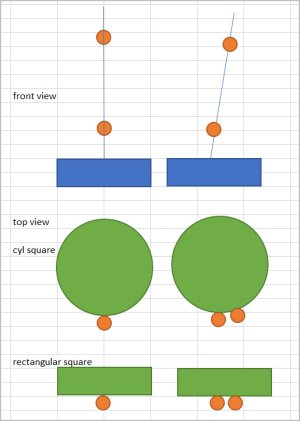
Well maybe... I may have to retract my initial assumption that a cylindrical square may be suitable for the initial calibration. I can see a situation where the upper & lower tangent points are not in the same plane. For example the DTI could be swiveled a bit. This would make no difference to a planar faced square like Tony's 123 block or granite square. But I think it would not work the same on a cylindrical surface square because the upper indicator ball would be reading 'further away' which would be a false indication of reference squareness. I have to noodle this some more. Initially I thought that's why there was a large equivalent radius to the shoe and/or you are supposed to sweep to look for needle maximum as opposed to just bring the DTI to the reference surface. I'm sure all this stuff was worked out 100 years ago & I'm just late to the party.
 

Attachments

  • EDT-2022-10-30 10.06.08 AM.jpg
    EDT-2022-10-30 10.06.08 AM.jpg
    78.6 KB · Views: 8
  • SNAG-2022-10-30 11.02.42 AM.jpg
    SNAG-2022-10-30 11.02.42 AM.jpg
    33.9 KB · Views: 9
Last edited:
The major difference between what @Mcgyver is doing and yours is the radius of the "ball". A small ball dramatically reduces cosine errors. It's the same issue that you explained a few months ago to someone. Unless the indicator is perfectly centered on the curved surface you don't get the same reading. That's the reason for sliding the cylinder against a flat reference that the indicator is mounted to and finding the high spot.

I think you could do the same with your bottom curve by rotating the stand to find the high spot. But "I suspect" that this doesn't work when comparing two different shapes. A small ball dramatically reduces this comparison error.
Maybe we are saying something similar regarding vertical plane. But what do you mean by 'the' ball? There are 2 in the gage setup, the lower one (rod end) and the upper one (dial indicator ball) which is even smaller diameter & typically always remain about that size.
 
If you guys are working to square a block with .0001 or even .0005 tolerances, along with trying keeping the shop temp at 70 for measuring purposes then I would say its time for CMM.

As far as I know, and that isn't much at times lol..

No height gauge set up with indicator/scriber, cylinder or roll/ball checks on a shop floor surface plate will get you to .0001 to where a CMM...mmm perhaps could,,, in a closed temperature controlled inspection room. Even at that point.... you will find error. Be it operator, surface finish etc.
In rare cases like that, back in the day when everyone thought that tight tolerances were good.. we used mylar strips to compensate for error in order to get a good CMM report;)

Just my .02
 
Last edited:
I guess you have never scraped anything, have you? Its very convincing when you can get things so the needle on a tenths indicator doesn't ficker 1/2 a graduation. You do not need a temperature controlled room unless your temperature is varying widely. Different with a CMM as they are comparatively gangly.

With a Grade A plate, good indicator its not only not impossible, its not that crazy difficult. The CMM makes things easy, not necessarily more accurate.

Grinding same thing, but not everyone has a grinder.
 
Last edited:
No, I don't scrape anything. I agree, nothing is crazy difficult if you have the proper set-up.
Would you say, a fly cut block on a good indicated manual mill will get your blocks squared up to within tenths, without grinding stoning or scraping if you like?
With a grade A surface plate, gauge blocks, angle plate, or roll check, or whichever approach you take for measuring, could you indicate squareness to within tenths before or after scraping?
Without a surface grinder, would you recommend scraping over stoning at that point?
 

Attachments

  • stone.webp
    stone.webp
    8.1 KB · Views: 9
Last edited:
The first photo is mine. There is no curved base, you use ball at the bottom the mast - that's what it is for. I've never understood people set about modifying height gauges when most probably everyone as a surface gauge with this feature already built in. With a good swiss tenths indicator and plate, its how you work to tenth in the home shop.

btw, this a technique that can create squares from nothing, either via grinding or scraping. The key is the two opposing sides have to be parallel (not hard to do by grinding or scraping). Indicate each and you can figure out how out of square they are to the bottom surface.

here's a shot that shows it better....and the finished block, everything parallel to a tenth via scraping and square to a tenth over 6". All done via comparison, i.e. you don't need anything square to create this


View attachment 27508


View attachment 27509

I have to say, my hat is off to you for being able to scrape a block without grinding or stoning and hold it to within a tenth squareness over 6". My hand work skills couldn't pull it off haha..
My tenths Interapid indicator jumps a half a grad if I'm too close to it and happen to breath on it lol.
As long as its working for you then its all good!
 
Would you say, a fly cut block on a good indicated manual mill will get your blocks squared up to within tenths, without grinding stoning or scraping if you like?

Flycutter? I wonder if you are trolling? No one mills to a that accuracy, that is grinding or scraping when its needed.
No height gauge set up with indicator/scriber, cylinder or roll/ball checks on a shop floor surface plate will get you to .0001 to where a CMM...mmm perhaps could

Your wiggle room is "shop floor plate" Otherwise I'd say baloney as I have done so many times; grind or scrape to a tenth. Frankly if you pull a piece off the grinder its not within a tenth (parallel) or pretty close to, you've got grinder trouble. A CMM is not going to be any more accurate than I can get with my setup. I've also got 1/100,000 indicators and comparator and have played with interferometers, point being I not being flippant about the challenges of small distances. A tenth is small and elusive and you don't strive for it unless you need to (smaller than that, things gets silly....I have no practical use for it or interest in making gauge blocks.)

Indicating for squareness isn't done before or after scraping, its during. Its an iterative process. There are lots of times when scraping is better approach and for those without a grinder its the only approach. Its just as accurate but bloody time consuming...which one I use depends on the task at hand.
 
Last edited:
Welcome!

Normally, web links are not allowed till you have been active on the forum for a while. I approved yours because it's clearly not advertizing or spam.

Consider posting in the new member introductions so other members can learn a little about you!
Thanks @TMToronto .
The video describing how to use a height gauge with a rounded front detail to ‘compare’ squareness to an ‘accurate‘ 1-2-3 block . . . does clear up a few questions I had about the discussion.
A good Circular Square would also be useful, I will keep an eye out @Susquatch .
 
I have to say, my hat is off to you for being able to scrape a block without grinding or stoning and hold it to within a tenth squareness over 6". My hand work skills couldn't pull it off haha..
My tenths Interapid indicator jumps a half a grad if I'm too close to it and happen to breath on it lol.
As long as its working for you then its all good!

Sure you could, any one who scrapes can achieve that...standard stuff. A key thing to understand is that the DOC when finish scraping is less than a tenth. It's comparative process, with many iterations. What that means from low spot on the scraped piece to the high spot is the DOC - less than a tenth. So if you are scraping a to plate, what you scrape could have no more than 1/2 tenth a deviation from the topography of the plate.

If you don't know scraping and are thinking 1/2 thou is a challenge, it might not make a lot of sense. View it like grinding....same or better accuracy (depending). Its not hand skills, brilliance or artistic flare its just a process, the keys of which are the very small DOC (determined by the geometry of the scraper) and the accuracy of what you are comparing the work to.
 
Last edited:
Maybe we are saying something similar regarding vertical plane. But what do you mean by 'the' ball? There are 2 in the gage setup, the lower one (rod end) and the upper one (dial indicator ball) which is even smaller diameter & typically always remain about that size.

I meant the lower one. The one on the indicator is so small that such errors don't really mean much at all unless you are close to an edge or something like that. Certainly for large surfaces it's pretty much meaningless (assuming a good setup of course).

And yes, we are using different words but I think we are on the same page.

Personally, I prefer to use the straight edge of a precision block and put my indicator base on the block with a magnet, and slide whatever I am measuring along the edge starting with a cylinder square. To find the vertical and then use the part I want to measure. There are a gazzilion way to do it though.
 
Flycutter? I wonder if you are trolling? No one mills to a that accuracy, that is grinding or scraping when its needed.

No trolling here.
I'm just trying to wrap my head around how you guys go from a manual milled squared up block , lets say for argument sake.. out of squareness by .0015 over 6" per side... to scraping the block to size within a tenth over 6".
I could be so far out their that my only go to option is a surface grinder or stone at that point. Measuring to within a tenth over that distance boggles me as well on any surface plate even with a swiss indicator. I never knew machinist's actually do that, even a home set-up to be honest.
I couldn't imagine how you would hit them tolerances with a scraper on heat treated tool steels, or do you use stones at that point?
It appears as thou the block you posted in the pic looks to be heat treated? What material did you scrape to .0001 over 6" in the above post?
 
Last edited:
If you guys are working to square a block with .0001 or even .0005 tolerances, along with trying keeping the shop temp at 70 for measuring purposes then I would say its time for CMM.

Notwithstanding the discussion after your post, I agree with @Mcgyver. It's not that hard to achieve that kind of accuracy on a surface plate with precision instruments and precision gauge blocks.

What is hard is moving that precision to the mill. Which is why I don't bother scribing on my surface plate. Scribing is not a precision process. At least not for me anyway.

I'll stay out of the scraping discussion other than to say that I have zero doubt about @Mcgyver 's skills in that arena. Basically, I accept his comments as fact. Any and all scraping I have done was on damaged parts or wood. I don't have the patience or the skills to scrape a large metal surface properly.

I must also say that my CMM experience differs from yours dramatically. In fact, I'd say we are on opposite pages! LOL!

In my own experience, CMM machines are good for measuring BIG things to decent precision considering the size of the part and equipment. But the darn things are just so Orwellian (think octopus on tippy toes) that the errors stack up fast. Which is ok considering the size of the part, the effect of temperature as part size goes up, non-uniform stresses, etc etc. They have their place and can do things you can't do with a conventional gauge setup.

Funny story - my daughter worked in the quality lab at a big automotive supplier. The guy who ran the CMM up and quit one day. After others gave up, she was given the assignment to figure out why the numbers never made sense. She discovered that the guy who quit had been using a translation matrix to transpose the results to make them reasonable. In other words, the numbers were so wrong he had to correct them within the reporting system! Boy was management ever pissed! LOL!
 
Notwithstanding the discussion after your post, I agree with @Mcgyver. It's not that hard to achieve that kind of accuracy on a surface plate with precision instruments and precision gauge blocks.

What is hard is moving that precision to the mill. Which is why I don't bother scribing on my surface plate. Scribing is not a precision process. At least not for me anyway.

I'll stay out of the scraping discussion other than to say that I have zero doubt about @Mcgyver 's skills in that arena. Basically, I accept his comments as fact. Any and all scraping I have done was on damaged parts or wood. I don't have the patience or the skills to scrape a large metal surface properly.

I must also say that my CMM experience differs from yours dramatically. In fact, I'd say we are on opposite pages! LOL!

In my own experience, CMM machines are good for measuring BIG things to decent precision considering the size of the part and equipment. But the darn things are just so Orwellian (think octopus on tippy toes) that the errors stack up fast. Which is ok considering the size of the part, the effect of temperature as part size goes up, non-uniform stresses, etc etc. They have their place and can do things you can't do with a conventional gauge setup.
I'm not saying I doubt Mcgyvers technique when using a scraper. I have several Starrett scrapers for deburring actually. I just never considered buying 1 for squaring blocks to within a tenth.
Perhaps our CMM experience differs, That's ok. Our CMM checks some very small parts as well, both internally and externally, also measuring from tooling balls.
I will back out of this thread now.
I hope I didn't ruffle anyone's feathers here, I just haven't heard of scraping blocks to within a tenth in all my years of machining.
 
Back
Top