• Scam Alert. Members are reminded to NOT send money to buy anything. Don't buy things remote and have it shipped - go get it yourself, pay in person, and take your equipment with you. Scammers have burned people on this forum. Urgency, secrecy, excuses, selling for friend, newish members, FUD, are RED FLAGS. A video conference call is not adequate assurance. Face to face interactions are required. Please report suspicions to the forum admins. Stay Safe - anyone can get scammed.

Brent Builds!!

I have.
Tried again.
I don’t get or see that option button.
Not working for me or i’m just to f-n old and / or tech hopeless

I might (likely will) try ‘Resize It” but i can't imagine anything being simpler than ‘Image Size’

OK. Let's make a note of it and try it together next time I see you. I'll also watch for people around me who have iPhones and ask them if i can try it on theirs.

In the meantime, it seems like you and @Brent H are both happy. I'll wait to hear from @Ironman.
 
Hey Guys,

So I have an iphone 15 and I have been trying - the camera mode seems to only allow a 12MP photo as the smallest. My only option is to download the pictures to my laptop or email them to myself at a reduced size, then go and add them. I can’t do this as easily as just posting from the phone - which I prefer - the pic’s are then fresh and I can put some information down right then (like measurements, cutting speeds etc). I will head over to the laptop and get some pictures coming.
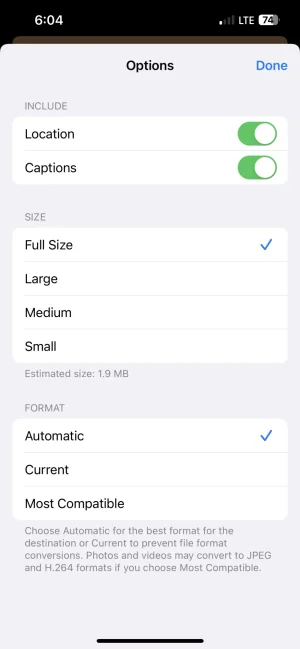
When you use your phone to attach a photo, you should get the option of selecting the photo size by selecting “Options” in the lower left corner.
IMG_1472.jpeg
Then select the image size that is under 2mb.
IMG_1473.webp
 
“Options” in the lower left corner
Ok for you - good. But my iPhone doesn’t give me that option.

“Image Size” does it for me - easy - i would prefer a simpler option like you describe above, but ‘Image Size’ is easy enough for me.
 
@CWret - Apparently, you are not the only one missing this option. I searched iPhone support and found many iPhone users who used to have the option that are reporting it missing after the latest update.
 
Last edited:
Great Brent to see all that you have done and are doing at your new maritime home. Well done!! The pictures greatly add to the story.
Sorry that this thread keeps (sort-a) sliding off topic and changes topic to photo file size and posting pics on the forum.
 
IMG_2578.jpeg

So here is the basic layout for the shop extension. Metal shop will be about 22 x 24 and should be a nice space for a mill, 2 lathes, a sharpener/cutter grinder, a metal bandsaw and an area for welding/ table etc.

Original wood shop has 100 amp service so I will pop in another panel for the machine shop. Biggest tool draw will be the welder (40 amp) and air compressor (shared with wood shop). Since it will be mostly a one man show the electrical should be fine.

Heating for the metal shop is radiant floor (propane) and there will be a couple windows and an 8’ garage door with windows.
 
So here we go!!
The shop in the picture is 24 x 40 and full of both wood working and metal working tools. The dream is to have 2 shops that support both endeavours with out tripping over all the machines. first step was to clear out the stumps and rocks and loam from a very busy tree cutting spring. We cleared a run about 30 x 90 feet and then an additional space behind the shop about 30 x 40 feet.
View attachment 50336
View attachment 50337
View attachment 50338

The area behind the shop was excavated down about 5 to 6 feet and gravel back filled with a packer going every 6 to 8 inches
View attachment 50339

The area pictured above is now suitable for a cement truck to drive to the back of the shop to pour the new pad.

Next picture is the new packed area for the shop extension.
View attachment 50340

Starting to form things up and get the pad set. Sides are 12" deep and the floor will be insulated with 2" foam board, sealed with spray foam and then vapour barrier (6 mil)
View attachment 50341
View attachment 50342

15M rebar around the perimeter topped with 6 x 6 wire mesh and 15M rebar drilled into the existing pad every 2 feet
View attachment 50343

Radiant floor heating tubing installed and zip tied to the mesh 12" on center. Each run is about 250 feet 1/2" PEX type tubing (radiant floor specific, O2 barrier etc.) 2 runs to cover the 21 x 24 foot pad.
View attachment 50344

Poured the pad Friday in blistering 32 degree heat. things set up fast and probably not my best finish on a floor but it is flat and will do a fine job for a machine shop. I don't like a power trowelled floor in the shop as it can get really slippery - especially if you have an oil spill etc.
View attachment 50345

I watered the floor about 5 times as it cured. Lumber package will be ordered this week and the trusses are due September ish. The "Addition" will be approximately 22 x 24 with 9 foot ceiling (to match the existing shop) and the trusses will be attic type so there will be an 11 foot wide by 24 foot long storage location. One garage door in the far side and a couple windows and a 3 foot door facing the house. Inside the existing shop will be a 4 foot wide access so I can roll the mill, lathes, sharpener, welding table etc etc into the new "Machine Shop" hopefully around the end of September
View attachment 50346

Lots on the go here in New Brunswick with landscaping and getting things in order. We cleared out a great number of dead trees and now have a sweet view of the pond in the back. I cleared out, back filled and leveled out more of a yard at the back of the house and we planted grass, lawn rolled things and it is looking quite nice!

View attachment 50347

A few more weeks of grass growing and some clearing at the pond side and things will be quite lovely!

Nice to hear from you and see your projects!

Any reason for not digging down a bit to get a flush pad to grade?
 
framing is all set for the walls. Tied in nicely to the original walls so that is nice. Trusses arrive early September so just getting things purchased and ready.

IMG_2584.jpeg
IMG_2598.jpeg
IMG_2590.jpeg
IMG_2597.jpeg


Here is a basic layout (to scale) of what is going in. A 60 amp panel will be going in for service. Air compressor will be in the attic and can then run air lines to wood and metal shop.
IMG_2601.jpeg


Feel free to offer suggestions- space is 21 x 23 feet and the above drawing is to reasonable machine scale. 1/4” = 1 foot.
 
Looks good, you're giving us "shop" envy, ;).

I'm guessing you will plumb the compressor tank drain down to where you can reach it easily.

What is the "unit" to the right of the walk in door in front of the peg board?

If you can do it I think a 100Amp panel would be better. Just a welder can take up 60amps and then you have room for any future add ins.

Isn't retirement relaxing. LOL
 
So relaxing @YotaBota !! Hahaha busy as I want but busy is good!!

So “unit” is just a dewalt stand that has a drawer and work top. Plus a back peg board. ($300 at Crappy Tire) holds lots of milling tools ( rotary table etc)

100 amp is the wood shop panel and splitting off a 60 amp. Wood tools are around 30 amps 240 max with me being solo user. 60 amp to the metal shop - Welder is max tool amp 36 and the plasma is 30 max.

Yes! Expansion could require MORE POWER - but, I think right now, if I want to “go big” I would have to put in an additional service.

Working on dropping the house draw by additional propane (no natural gas here)

Compressor will have a nice drain outside and be quiet in the attic. Attic “storage” is 11’ x 24’ and 7’ high. Access by the drop ladder.
 
Feel free to offer suggestions- space is 21 x 23 feet and the above drawing is to reasonable machine scale. 1/4” = 1 foot.

I thought Miss Metric liked to be to the left of Mr Imperial....... There won't be any dancing in there if you don't fix that......
 
Back
Top