• Scam Alert. Members are reminded to NOT send money to buy anything. Don't buy things remote and have it shipped - go get it yourself, pay in person, and take your equipment with you. Scammers have burned people on this forum. Urgency, secrecy, excuses, selling for friend, newish members, FUD, are RED FLAGS. A video conference call is not adequate assurance. Face to face interactions are required. Please report suspicions to the forum admins. Stay Safe - anyone can get scammed.

4140 crankshaft modifications - propeller hub build

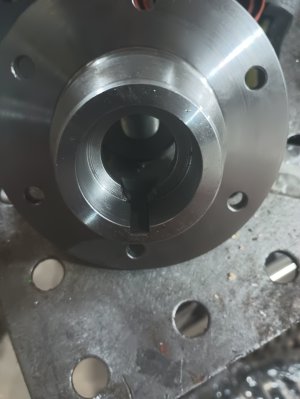
Arg, 1 pass through and the broach broke, lubed and tight bushing, gladly I bought this through amazon, returning it

still need to make another pass, maybe I will order another one, if it makes one pass and breaks then I will return that one and will have made the keyway for free

View attachment 53704View attachment 53705
So does it seem to be pushing/cutting hard because of the material or are you thinking it is solely because of a defective/poor quality broach?
 
I’ve had luck with Amazon broaches in mystery steel, never known 4140.

How did it break there? Was it bending/binding?
 
I think it was a poor quality broach/defect, seemed to be cutting just fine, it was half way through before i heard *tink* a few more pumps (it was moving just fine, not bound) and another *tink*

it broke INSIDE the bushing/piece, where it was fully supported, so no sideways loading, i pushed the whole broach through and 2 pieces came out, i was able to push it through using a piece of 1/4" round bar held between my fingers, so no excessive pressure or im sure it would have shot that round bar out of my fingers
 
Oops!

How long is your broach guide?

It needs to be at least as long (preferably longer than) as the depth of the key way you are broaching so the back of the broach is well supported as it exits the cut.

I make my broach guides between 1/4” to 1/2” longer than the cut.

I don’t have and arbour press either, so I use either a 12 ton bench top or the 40 ton floor hydraulic press.

Once the broach engages, I give it a little pump, back off the ram, re-engage the broach with the ram and give it a little more of a push. It is very slow, but works well in though materials.

+1 on @Ironman ‘s idea of reducing the shim thickness for tough material.

Speaking of shims: they too must be the full length of the broach guide, else the broach snaps like a spaghetti (don’t ask me how I found out…).
 
The bushing is the full length of the keyway, but not longer, i could throw it back in the lathe and make it extend beyond, there is enough material to go .200-.300 beyond

i only made one pass through, so no shim yet, i will make sure the shim is the full length of the bushing, i can see how that would snap the broach, not having support on the back

im using the 40t press, i did come off it a few times during the process to let off any possible side loading that was happening, but it broke inside of the bushing so i dont think that was the problem, i imagine it would snap above the bushing with excessive side loading

Im not entirely sold on reducing the shim thickness, each tooth that cuts sees the same doc no matter the shim, its only cutting less because you are using less teeth, i suppose that makes the broach effectively shorter, a definite benefit for side loading
 
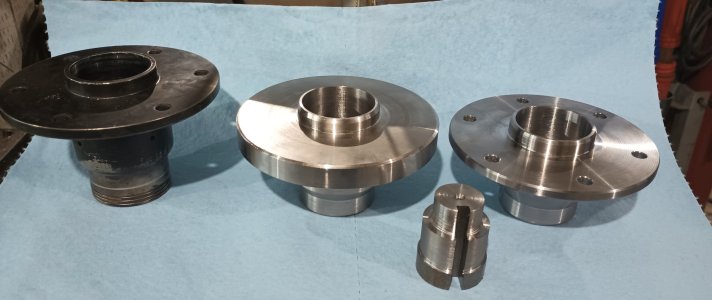
Well forging ahead with the magic of the dro, did up the bolt holes, chamfered, and turned the bushing so that it sticks past 2.250

the step in the bushing is to accommodate the through hole, it is relieved at the through hole for the broach to pass through

Left is the keyway and 4 holes through the barrel for a cotter pin

The hub gets shorter through the iterations, it doesn't need to be as long as the original, in fact it looks silly on the a/c, shorter is less material to remove, less weight, and less stress on the crankshaft and front bearing


IMG_20241102_173532657~2.jpg
 
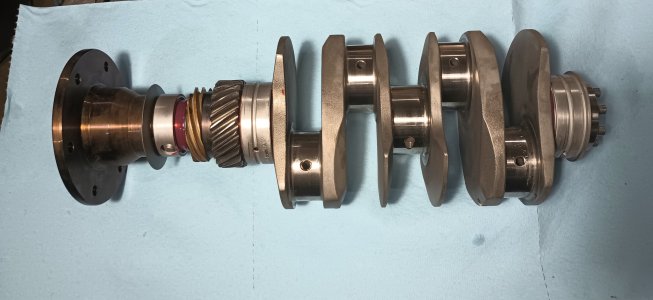
She's done, broach came today, finished it off after some long overdue welding machine maintenance

Cleaned up the garage, I will try to put the crank together this week, I need to clean all of the oil passages, loctite the plugs (set screws) and install some other heat shrink parts (timing gear, cam gear)

I think I will grab 10lbs of dry ice the day I go to install the hub, give myself that extra second or two

IMG_20241103_180208642.jpg
 
Thanks @Perry, i did see that, and thought about it, even messaged the guy, but he knows 0 about it. I didnt think it was worth the money for a core, dont even know what the prop hub dimensions are, i think if he was asking 500 or less i would be more inclined

I was putting the motor together last weekend, but hit a snag, the rod bearings although the right size, were to tight, i have another set of bearings here on my desk and will see about putting that together tonight, hopefully they are better
 
Back
Top