-
Scam Alert. Members are reminded to NOT send money to buy anything. Don't buy things remote and have it shipped - go get it yourself, pay in person, and take your equipment with you. Scammers have burned people on this forum. Urgency, secrecy, excuses, selling for friend, newish members, FUD, are RED FLAGS. A video conference call is not adequate assurance. Face to face interactions are required. Please report suspicions to the forum admins. Stay Safe - anyone can get scammed.
You are using an out of date browser. It may not display this or other websites correctly.
You should upgrade or use an alternative browser.
You should upgrade or use an alternative browser.
Product Princess Auto tool box quality
- Thread starter David
- Start date
Product
Grizzly Adams
Active Member
The base I built for my mini mill, but then I'm a wood worker first.Maybe for mini mill with a bit reinforced top. But its sheet metal ... so your mill will ... float. Maybe mini mill will be OK, but not much bigger.
Better idea is to get one of these industrial tables and put one of these cabinets under it for parts. With table top of say 1/2" steel you should be able to place most table top mills without any issues.

Grizz
Sorry for being a bit late to the party. Just saw this today.
Did you get the mill yet? PA tool box?
Have you started to construct the stand?
I ask because i built a mill stand and incorporated a Crappy Tire 26” tool box which is of similar quality as the AP box. I built it 9 months ago and it continues to perform perfectly with my 1,000 lb mill on top. Yes i would do it again.
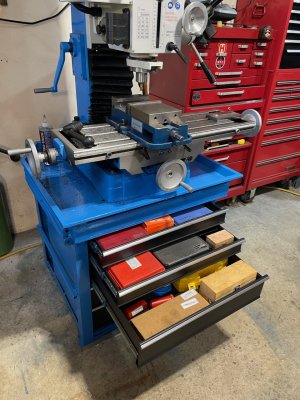
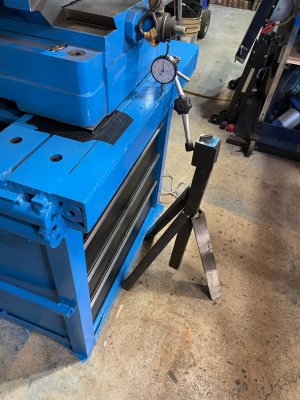
But i probably went overboard with a very beefy and HD stand construction. Here’s a pic of the end result. I measured deflection of the front and back beams and added more bracing and an auxiliary front beam to get deflection under 0.001” (set up an indicator and measured deflection when the mill was lowered into place, achieved 0.0006” or less at front and back.) I wanted a very low deflection since i was measuring static load but concerned about dynamic loads.
I cut the top and bottom off of the tool box to lower the stand height by 3”. It’s bolted to the floor. The stand leg lengths were made to suite the sloped floor so that no height adjusting legs were needed.
Attachments
Mill isn't here yet, due at the end of the month.Sorry for being a bit late to the party. Just saw this today.
Did you get the mill yet? PA tool box?
Have you started to construct the stand?
I ask because i built a mill stand and incorporated a Crappy Tire 26” tool box which is of similar quality as the AP box. I built it 9 months ago and it continues to perform perfectly with my 1,000 lb mill on top. Yes i would do it again.
But i probably went overboard with a very beefy and HD stand construction. Here’s a pic of the end result. I measured deflection of the front and back beams and added more bracing and an auxiliary front beam to get deflection under 0.001” (set up an indicator and measured deflection when the mill was lowered into place, achieved 0.0006” or less at front and back.) I wanted a very low deflection since i was measuring static load but concerned about dynamic loads.
I cut the top and bottom off of the tool box to lower the stand height by 3”. It’s bolted to the floor. The stand leg lengths were made to suite the sloped floor so that no height adjusting legs were needed.
Your build is sort of what I'm thinking about doing. Built something similar for my last mill except I also built the drawer cabinet. I have a bunch of 100lb full extension drawer slides that I picked up for cheap so I may do the same thing again.
The issue with transferring the mill weight (and dynamic loads) through the stand and to the floor is that the stand should be the width of the machine base. That’s why i ended up with a stand (not including the toll box) that is over 325 pounds. If the stand was narrower it would have been soooo much easier. (contradicting what i said above) If I were doing again I’d start with a much narrower tool box. In my 20/20 vision hindsight, I’d use a pair of side tool boxes (KMS TBS4007X 7 drawer side tool box on sale, see below link, price $350). The mill would sit on one on the right which would be framed with angle iron. The power X feed would me over the box on the left. I’d also remove the bottom drawer to reduce the height of the box the mill sits on.

 www.kmstools.com
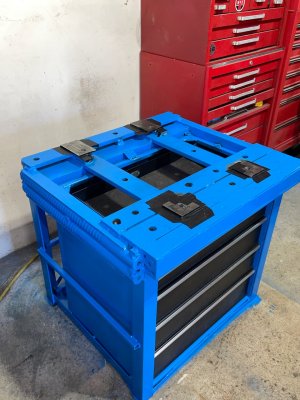
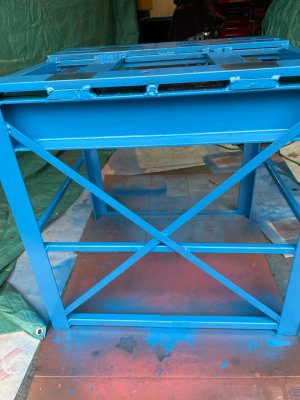
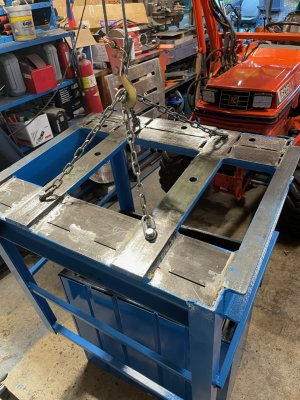
Here’s a couple more pics of my stand build. The mill sits on 4 pads (shims) that are machined to the required thickness so that when bolting the mill base to the stand the bolt tightening does not warp the mill base. This is an important step. (Thanks @Susquatch for the shim idea.) I lowered the stand onto the tool box and then welded them together (in pic I’m using my tractor mounted winch to lower the stand over the box).

Magnum 7-Drawer Side Tool Box
KMS's own Bynford Pro line of tool boxes are an excellent choice for both quality and price. They include high-end features like 18 gauge construction, ball-bearing slides and liners. This tool box is also available in blackBall bearing slidesAttaches to
Here’s a couple more pics of my stand build. The mill sits on 4 pads (shims) that are machined to the required thickness so that when bolting the mill base to the stand the bolt tightening does not warp the mill base. This is an important step. (Thanks @Susquatch for the shim idea.) I lowered the stand onto the tool box and then welded them together (in pic I’m using my tractor mounted winch to lower the stand over the box).
Attachments
Last edited:
The top photo shows the box sitting on 1 1/2” angles (near the floor at the base on the sides). These were added and welded into place after lowering the box in. There is also cross bracing between these floor angles. I certainly hope the box lasts a long time because it would be very very difficult to get the box outta there. Would likely be easier to just start over.
Last edited:
Princess auto and quality are not often used in the same sentence.
To borrow from the Simpsons India/China schtick......Princess Auto is Canadian Tire's Canadian Tire.

