• Scam Alert. Members are reminded to NOT send money to buy anything. Don't buy things remote and have it shipped - go get it yourself, pay in person, and take your equipment with you. Scammers have burned people on this forum. Urgency, secrecy, excuses, selling for friend, newish members, FUD, are RED FLAGS. A video conference call is not adequate assurance. Face to face interactions are required. Please report suspicions to the forum admins. Stay Safe - anyone can get scammed.

MT3 V.S. MT2

This model has the 2 adjustments providing you get the indicator head as shown. I think this style comes in both mini mag base & next larger arm size up, but you'd have to confirm the catalog.

It is absolutely beautiful! Perfect!

Is it my imagination or does that end have three different indicator mounts - two sizes of stubs and one dovetail?

Edit - KBCs website says it actually has 5 different mounts - 6mm, 8mm, 3/8", dovetail, and back lug.

Price is up there, but it really is perfect!

The Yeti is happy......!
 
Last edited:
I wanted to revisit this MT3 v.s. MT2, are they close enough issue and made a MT2 Dead Center using the same taper attachment setup I used to make some MT3 Dead Centers.....

DC.JPG


I would say YES close enough. Unfortunately the piece of scrap I chose to use was a bit on the short side. I overshot the small OD and had to extend the taper a bit to make up for that error which shorted the whole taper ever more.

MT2MT3.JPG


To turn the point, I put the taper into a MT2/MT3 sleeve and mounted it in my spindle. That worked well.

Short.JPG


As I said it turned out to be a little on the short side LOL...

Craig
 
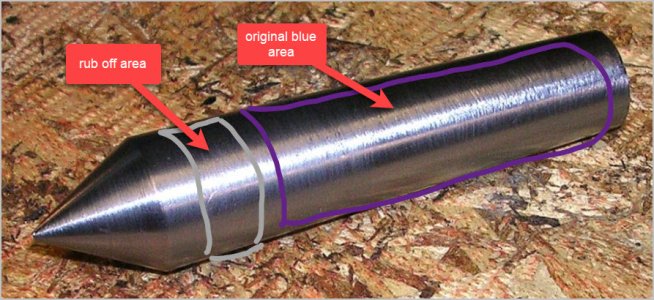
Craig, how did your blue rub off test turn out in terms of how the arbor MT matches your machine sockets MT? Reason I ask (and this might just be paranoia on my part) if your rub-off is confined to a relatively shorter width band near the front & the remainder of the rear surface is more or less non/partial contact, it will probably 'feel' like its mating, but in reality may not be to a sufficient extent. Any axial force and/or rotational force like in typical lathe use will be entirely concentrated on that fractional area. Your machine surfaces are probably hardened & your machined part probably slightly softer material, but that doesn't mean that wear or distortion can't occur on your machine surface, which would be a bad thing. Nothing against making your own tooling at all, but in this particular application I'd confirm fit by blue-ing. I've read sad tales where people are buying special $$ MT taper reamers with mixed results, or otherwise asking how to 'fix' their buggered MT taper seats. The story rarely ends well. I've always wondered how it got that way to begin with. Surface corrosion or trapping swarf might explain some of the minor issues. But some of the bell mouthing effect & spin direction gouges could be result of wrong tool taper & applying typical machining forces.
 
Craig, how did your blue rub off test turn out in terms of how the arbor MT matches your machine sockets MT? Reason I ask (and this might just be paranoia on my part) if your rub-off is confined to a relatively shorter width band near the front & the remainder of the rear surface is more or less non/partial contact, it will probably 'feel' like its mating, but in reality may not be to a sufficient extent. Any axial force and/or rotational force like in typical lathe use will be entirely concentrated on that fractional area. Your machine surfaces are probably hardened & your machined part probably slightly softer material, but that doesn't mean that wear or distortion can't occur on your machine surface, which would be a bad thing. Nothing against making your own tooling at all, but in this particular application I'd confirm fit by blue-ing. I've read sad tales where people are buying special $$ MT taper reamers with mixed results, or otherwise asking how to 'fix' their buggered MT taper seats. The story rarely ends well. I've always wondered how it got that way to begin with. Surface corrosion or trapping swarf might explain some of the minor issues. But some of the bell mouthing effect & spin direction gouges could be result of wrong tool taper & applying typical machining forces.

I don't think it's long enough to do a blue rub off check LOL...
 
Did you shorten it or something? You have lots of length there to check. Hopefully I'm not beating a dead horse, maybe picture will help. I'm not saying this is your situation, just example. If the rub-off area is confined to a short silver band, then that's where all the force goes. The rear area that remains predominantly blue isn't in full contact, so its not contributing to centering or load distribution. That's all I'm really trying to say.
 

Attachments

  • EDT-2021-12-10 2.30.37 PM.jpg
    EDT-2021-12-10 2.30.37 PM.jpg
    97.2 KB · Views: 5
Did you shorten it or something? You have lots of length there to check. Hopefully I'm not beating a dead horse, maybe picture will help. I'm not saying this is your situation, just example. If the rub-off area is confined to a short silver band, then that's where all the force goes. The rear area that remains predominantly blue isn't in full contact, so its not contributing to centering or load distribution. That's all I'm really trying to say.

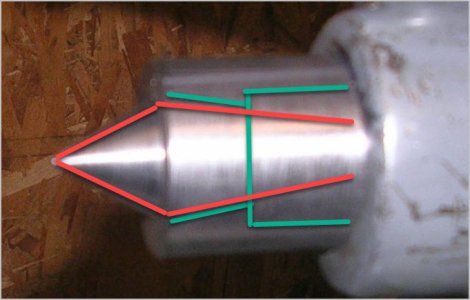
I understand what you are getting at but the taper is too short to do a rub check.....

short-jpg.18833
 
Do you mean the tapered portion inside your tailstock barrel is short? I don't understand.
If so, how about the headstock end. I would think that has to be at least couple inches long, no?
 

Attachments

  • EDT-2021-12-10 2.54.42 PM.jpg
    EDT-2021-12-10 2.54.42 PM.jpg
    37.1 KB · Views: 1
Do you mean the tapered portion inside your tailstock barrel is short? I don't understand.
If so, how about the headstock end. I would think that has to be at least couple inches long, no?

Ok, describe how to perform your blue rub check, maybe I don't understand what it is?

The taper in the tailstock quill is pretty much the length of the entire dead center taper.
 
Last edited:
Clean both surfaces, use a wide tip felt pen Sharpie marker, paint the entire male arbor, insert into female socket with light push, turn arbor 1/4-1/2 turn or so, pull straight out, observe results. What rubbed off & where? To repeat you may have to first wipe both surfaces clean again. Methanol works very well to remove marker from metal. Disposable gloves are helpful.

You will also hear 'blue-ing' as in the compound that machinists use. It usually comes in a tube, a petroleum based kind of greasy feeling substance (think like a tube of oil paint). It can be used in this way as well but its a bit fussier because it only dries when very thin & can smear a bit. More typically its applied very thin on machined surfaces or granite plates & the transfer (or lack of) shows where material needs to be scraped or otherwise conditioned. The Sharpie marker method above is easy to implement, probably with what you have in the shop. So black, blue, purple... any ideally dark color that you can see contrast to bare silvery metal.
 
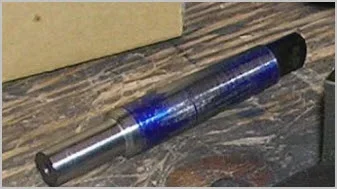
Hey, aren't you already doing it? This is from your pics no?
 

Attachments

  • SNAG-2021-12-10 4.19.19 PM.webp
    SNAG-2021-12-10 4.19.19 PM.webp
    13.5 KB · Views: 3
Hey, aren't you already doing it? This is from your pics no?

Ya, that's layout fluid and it really doesn't work that well for this. A felt marker might be better. The problem is.... look at the image of the dead center mounted in the tailstock. How am I going grab it in order to twist it 1/4-1/2 turn, I would have to turn another taper as a test piece, which I may do.
 
Oh, you mean you used layout blue? What I was referring to is called hi-spot (or different things depending on manufacturer). Different stuff again.
 
Last edited:
Ya, now that its made, may be kind of difficult to grab onto the point end & do the twist motion. Pure insertion & retraction might tell you a little bit but the rub might be faint or more localized. That's why I was saying somewhere way up the post, it's best if you have something like a reference MT socket to bring up to the work while in the lathe as its being made. That's really when you are in a position do something about it.
 
Back
Top