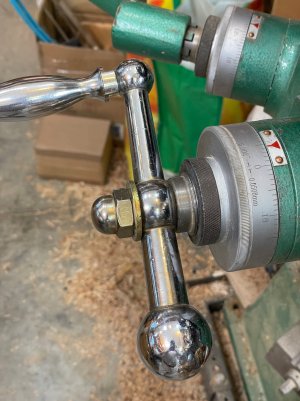
What does the rear face of handle bear upon because the sketch shows the next part is 520 part?
Hi Peter, I am glad you are asking questions like this. It furthers all of our understanding of this system and by extension other similar systems too.
Forgetting about the 300 gap for now, I believe that the graduated ring 423 rotates freely on the sleeve 521 and the knurled ring 523 tightens on the threads of 521 to clamp 423 on against the integral stop ring on 521. That is so you can adjust the graduations and them clamp them or even make them sorta sticky. This is similar to most other mills and totally independent of anchoring the leade screw. It all just floats on top of sleeve 521 because the handle, sleeve 521, and the leade screw are keyed together.
But to your question, part 521 extends out toward the handle beneath all of that stuff just discussed such that the rear of the crank handle bears against sleeve 521, not against the knurled ring.
Basically, I believe the crank handle nut tightens the handle, bushing 525, and sleeve 521 against the front of the bearing by pulling against the leade screw thus pulling the leade screw forward toward the operator and thereby anchoring the lead screw integrated collar (marked A in my earlier markup) against the rear of the bearing. The combined effect is to firmly anchor the leade screw so it can't move axially.
@Brian26 says he still has a tenth of an inch play in there which is still WAY TOO MUCH. I'd expect a thou or two instead.
The remaining play should only be the bearing play - whatever that is. Again, the parts blowup isn't clear enough to detail where the two opposing forces are applied. My Bridgeport has one force on the inside race of the bearing and one on the outside race which minimizes bearing play. But this one looks like both forces are applied to the inside race which would increase the bearing play a wee bit.
I confess that I have no idea what the role of part 525 is. It also appears to be keyed in the parts diagram so it is probably intended to serve as a simple extension of sleeve 521. Perhaps to facilitate adding a power y axis drive. (eg Remove the spacer, add the power drive). On the flip side, because it is keyed, it reduces the amount of keyed engagement that is then available to the handle and sleeve which are very important functional elements. But then again, maybe the key is much longer than it looks and can easily engage all three parts simultaneously.
If I were @Brian26, I'd crank the handle (or pull the table) to achieve maximum gap, and then tighten the handle nut again. Perhaps repeat multiple times till the gap is minimized.
If anyone has a better idea about what the bushing 525 is for, I'm all ears.


