• Scam Alert. Members are reminded to NOT send money to buy anything. Don't buy things remote and have it shipped - go get it yourself, pay in person, and take your equipment with you. Scammers have burned people on this forum. Urgency, secrecy, excuses, selling for friend, newish members, FUD, are RED FLAGS. A video conference call is not adequate assurance. Face to face interactions are required. Please report suspicions to the forum admins. Stay Safe - anyone can get scammed.

EMCO Maximat 13 Update

Scattered Parts

Mike
Premium Member
Now that things have cooled off a little, I decided to do some work on the Maximat I picked up at auction a couple weeks ago. I changed the oil in all the gearboxes. Then scrubbed a bunch of the rust off the ways. They are slightly dark from the rust but there doesn't appear to be any pitting. They are visually in good shape but I will have to measure them later to see what kind of wear there is. Checked out the tail stock. That was interesting. The clamping plate was a chunk of 1/4" plate with a nut welded to it. The clamping lever was missing and was replaced with a long bolt going to the fabricobbled clamping plate. I will be making a new plate with some 1 1/4" steel plate that I have. I will have to make a handle and the clamping screw, but that is what a lathe is for, right?

All the handles were removed and soaked in citric acid to remove the rust. It also removed the bluing that was on the handles originally, but I will look after that later. Just slathered a little rustproofing oil on them and reinstalled. Eager to get the lathe running rather than make it look pretty.

I have been bothered by the motor for a while. I haven't been able to rotate it. A look at it showed that it was completely covered in swarf and oil. The cooling vent was completely plugged up with dirty oil and swarf. Great, I'm thinking. The motor is seized. Only one way to find out. Remove it. Much cursing at Austrian engineers who must have small fingers and even smaller tools to access all the bolts. Finally get it out and pull off the fan cover. What do I discover? It has an electric brake! It engages when there is no power. There is no power to the lathe of course because I'm working on it. More cursing at my foolishness.

On the bright side, I can now clean all the dirt and oil out from under where the motor sits as well as the drive belt area. The belt is a wide ribbed belt and appears to be in good condition thankfully. By the end of next week I should have the 3 phase breaker panel wired in and I will be able to power up the lathe.

Chips will be happening.
 
Thanks for the update. I have a V13 as well, so if you need pics or dimensions, let me know. I have the brake motor as well and have it switched by my Teco L510 vfd. It works good, but i need to add a switched power feed to energize (deactivate) the brake in order to make gear changes easier.
 
Thanks for the update. I have a V13 as well, so if you need pics or dimensions, let me know. I have the brake motor as well and have it switched by my Teco L510 vfd. It works good, but i need to add a switched power feed to energize (deactivate) the brake in order to make gear changes easier.

Thanks. I think i can figure out the tailstock clamp base but i may need a picture of the inner lower clamp of the tailstock barrel. It has a v shape that is pulled into the barrel. I have the upper clamping piece but not the lower. It is part number 8 in the service manual of the tailstock.
 
I've always liked that lathe. Maybe its because I had a (well thumbed) brochure dating back many years ago. On my lust list but always out of $$ reach. I don't even remember where I sent off to for info but they are long gone. It was back when people had this strange ritual called licking stamps.

Is yours imperial or metric?

Possibly they varied over the years but this one shows a front brake which is kind of interesting. If yours is missing some bits, maybe someone did some 'changes' & that function has been electrically bypassed?

 
I've seen links with free PDF manuals kicking around that might show you a good view of tailstock/other parts. Looks like many of the so called reputable sites charge for the manual but you might be able to find something with searching. Often times little gems are buried within other forums. This one maybe? http://kinozoo.ru/pl/?q=maximat+v13+lathe+manual+pdf

There's also those <cough> dark alley sites that you can find <cough> out of print books, but I'm always afraid of catching something like a computer rash.
 
I have all the v13 manuals if anyone needs. I can get dimensions on that part soon
 
I have managed to find the manuals online as well. This is good since I have had to take a few things apart and they weren't obvious on how to do it. I had to remove the feed lever since it was seized. There is a small block that goes on the end of it that is missing. It probably fell into the apron. This picture shows the feed lever after I took it out. It goes on the end of the small rod shown below.
20210706_150048.jpg


This is the motor being reinstalled. The bolts were kind of difficult to access and turn but eventually it was in the right spot.
20210706_143030.jpg


20210706_145219.jpg


The lathe after it has been cleaned up a bit.
20210706_150059.jpg

20210706_150129.jpg
20210706_150125.jpg

The chuck is Pratt Burnerd (Atlas) 8 inch that came with the lathe. It would have been nice if the Enco 6 inch 4 jaw would have come with it.
This is a really well made and precisely built lathe. Much improved over my Hercus (Southbend 9 copy). I'm looking forward to getting it running.
 
It is an Imperial machine not metric. There is a tag on the end of the bed that shows it was at the Loraine County Joint Vocational School. I think this was in Ohio. Amazing how these machines move around.
 
Mine came from Washington State Community College in Ohio. I drove there to get it. I wanted a v13 for a long time...
 
I spent a little time working on the EMCO today.

I finally got my mill running reasonably well and that allowed me to work on making a bottom plate for the tail stock. I had a chunk of 1 1/2 x 6" bar I picked up from a scrap pile at my farm. Amazing what you can find when you least expect it. The piece was 3 feet long! It weighed a few more kilograms that I should really be picking up by hand but common sense goes out the window when the mill is going to be used. I cut it to length on the bandsaw then faced all 6 sides so it looked pretty. It was very rusty to begin. Milled the sides down to width to fit between the lathe ways then milled the slot to stick up a bit like the factory version. Cut a slot for the anchor bolt. It needs a slot so that the taper feature will work on the tail stock if I so desire. I do need to cut a slot on the underside to capture the clamping bolt.

I have some 16mm round stock I will use for a new clamping bolt since the foot long 1/2" bolt that was used previously won't be long enough. It needs to be deburred and cleaned up a little. I will thread the top of the clamping bolt for a lever that I will make when the lathe is working.
20210721_165515.jpg


The next step was to drop the apron so that I could find the brass shift block than engages the half nuts. It fell off when I removed the handle. Managed to figure out how to get it apart without too much difficult and only a minor amount of disassembly. This gives me a chance to clean things up a bit also. There is some serious sludge in the bottom of the apron so I will still have to clean that out before reassembly but everything looks like it is still in good condition.
20210721_165233.jpg


There it is sitting at the bottom. Glad I didn't try fishing it out with a magnet. That was my first thought. Reading the parts manual showed that it was brass. Brass isn't too magnetic! That would have been frustrating.

20210721_165306.jpg


Grabbed with the hemostats. Not much room for anything else in there.

20210721_165429.jpg


All attached to the lever and ready to be reassembled. The electrical tape is holding the half moon shield that keeps the detent ball and spring in place. There are two socket head cap screws that need to be screwed in to hold the assembly in place.

That is it for today. Much too hot in the shop. I gave my fan to my kids to use at the house. It was only 30C but the humidex was 36C.
 
I figured i would post a picture of the tailstock clamp system that was included with the lathe.
C0VMHGXuQBiyffWbYIDabQ.jpg

That is a 12” long 1/2” bolt used as the locking lever on the tailstock. The plate is 1/4” thick with a nut welded on it. Not exactly super strong or inflexible. Amazing what people will do to nice equpment.
 
Another update on the Maximat 13. I have finished up the work on the tailstock. I had to fabricate the aluminum pinch clamps to replace the fabricobbbled setup. Added an actual lever arm to the base clamp and of course the base clamp also had to be machined.

C49AA47D-8A9C-4F96-98CA-B7A202E3C7E0.jpeg


A6B80AB9-616E-49E3-9D79-B58C984FBEBE.jpeg
 
I also recently contacted a guy on Facebook marketplace regarding a rotary phase converter he has for sale which includes a 480 volt step up transformer. My lathe requires 480 volts to run but I only have 240 3 phase from my RPC. I figured that i could just pick up his whole system, use the transformer and sell the 10 hp RPC. Unfortunately, he is asking for full new retail price for a used device. He did not appreciate my offer! This is the listing. 10 hp RPC. He has lowered the price $1000 since my offer so I think he knows he is overpriced. He has two other RPC as well for gold plated prices.
 
I‘mstill working on powering it up. Due to the motor being a Dahlander 2 speed 440 volt it is kind of difficult to decide whether to just pick up a transformer or use one of the VFD’s i have seen that will take 240 single phase and bump it to 440 3 phase. This is the way I think I will go. Transformers are rare in Regina and expensive to ship. I know you converted your V13 to a VFD. Any hints would be helpful . There are alot of things I need to learn about an install of a VFD and its programming.

The lathe itself has been put into winter storage. i moved my Hercus 9 into the basement at my farm. I didnt feel like heating a poorly insulated shop all winter. That is a story in itself! I am using the Hercus to make a few parts and improvements to my Klopp shaper.That will be another update I will be doing.
 
are you sure it's not a dual voltage motor?

edit: I thought maybe my v13 was dual voltage, but i just checked and its listed on the motor tag as 208-230.

It should be a pretty standard motor size, even though its a metric motor. It looks like any 3hp motor would fit in the space. My have to adapt the pulley.
 
Last edited:
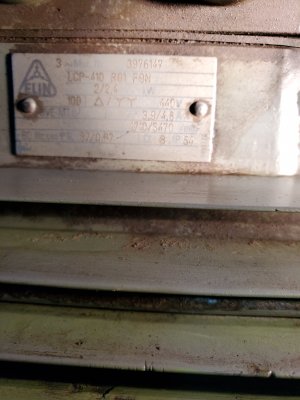
The motor size is an IEC 100 frame size. There is no NEMA frame size that corresponds to this European motor.

As you can see it is a 440 volt only 2 speed motor. Im sure i could adapt a motor but the cost of a 3 hp 240V motor is nearly the same as the VFD I’m looking at. It would also be single speed only, so to get anywhere near the same speed ranges I would need to add a VFD. More cost on top of the motor. I‘m more than happy to not go the route of a transformer and all the electrical connections required to be safe which is why the VFD is appealing.
 

Attachments

  • C2A43E0C-BEAD-488B-8528-8B0673E52938.jpeg
    C2A43E0C-BEAD-488B-8528-8B0673E52938.jpeg
    309.6 KB · Views: 5
Back
Top