• Scam Alert. Members are reminded to NOT send money to buy anything. Don't buy things remote and have it shipped - go get it yourself, pay in person, and take your equipment with you. Scammers have burned people on this forum. Urgency, secrecy, excuses, selling for friend, newish members, FUD, are RED FLAGS. A video conference call is not adequate assurance. Face to face interactions are required. Please report suspicions to the forum admins. Stay Safe - anyone can get scammed.

A Press-ing topic but broaching the subject- Arbor Press

Hey Craig, the 1/8” one was pretty brittle but my shim situation was not the best. The part I needed was about 1-1/2” deep and the broach would be more suited to 1” max depth. As I made broach bushing I failed to account for the shim issue.
BEEF6B22-6995-4CBB-8D35-DA9E890184F6.jpeg

The photo above was from happier times, when the broach was young and in the groove.....alas
 
The way the broach shattered, it is likely high-carbon steel that has been hardened but not tempered? I presume that is (one reason?) why the price was less than half as much as, say, McMaster-Carr would charge for a HSS broach.

As long as it doesn't go PING, I would guess that hard high-carbon steel would keep a sharp edge longer than HSS steel. [Or is my lack of experience showing again? ;) ] But that the HSS would be more tolerant of pressures that weren't perfectly in line with the cutting direction.

Anyway, I think many of us are learning from your hard-won experience. Thanks for showing both the good and the not-so-good!

Craig
(I have a little broach set--1/8 to 1/4"--but events have conspired such that I haven't tried it out yet.)

Ha Ha your last comment brought back the memory of buying my "store bought" broach set probably 10 years before I ever used it...it was on sale and I can remember thinking "I might need some of them someday.

That day eventually arrived, I hade 8 plates, 1/2 thick each , that needed a key-way cut in them. These plated had indexing holes drilled in them and all these plates needed to run in perfect unison on a central shaft. The axle shaft hole was drilled first, bolted tightly together and then the indexing holes were drilled through all the plates at the same time. Bolts were now used in the indexing holes so they remained lined up. A bushing with a flange and shaft long enough for the entire 2" thickness of the plates was cut and now I got a chance to use my "long time owned" broach. As I said before I was amazed at how effortless the process was.
those plates are spaced out where I need them on a central axle 5 ft long and do run in perfect alignment to each other.
 
View attachment 12488
they all seemed to be the same after a bit but here is the screen shot:

View attachment 12489
I guess they were a bit more than $24 but it was free shipping

Thanks I saw those and will give them a try.

That is too bad about the broach, just when you think everything is going great and you let your attention drift, I know that feeling and it does start with an Oh f..............
 
Last edited:
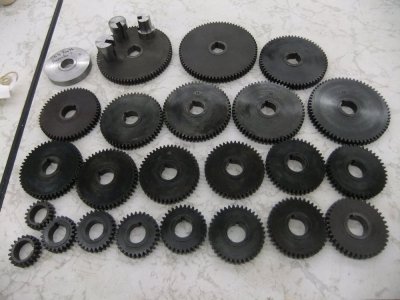
I had a bunch of gears to broach (~27 - they are the change gears for my spiral milling unit) - instead of shimming the broach I made up several broaching bushings that had different depth of slots. Numbered them and switched bushings as the keyway progressed - that way the broach was supported the whole way. Once set up to make the first bushing, it isn't a big deal to make several.
 

Attachments

  • DSCF4616.JPG
    DSCF4616.JPG
    116.9 KB · Views: 4
I probably used about 70% of the ramp that the broach progresses (you don't want to take too much, so that the broach still starts well - no different than the shimming of the conventional holder).
 
From research, it seems that the broaches are a two or three step process. So for example, the taper on the 1/8” broach was about 0.032” - or about 1/32 - so for two passes using a 30 thou shim you would be on the money for half of 1/8 or 1/16” depth of cut. The larger broaches like the 3/8” one I bought came with 2 shims.

I would say take the depth of cut needed (like 1/16”) and divide that up into the 3 depths you would require.
 
Thanks Gentlemen, that explains it perfectly! I will place my order for the broaches tonight. I have a couple of projects that I can use the broaches on.
 
Back
Top