-
Scam Alert. Members are reminded to NOT send money to buy anything. Don't buy things remote and have it shipped - go get it yourself, pay in person, and take your equipment with you. Scammers have burned people on this forum. Urgency, secrecy, excuses, selling for friend, newish members, FUD, are RED FLAGS. A video conference call is not adequate assurance. Face to face interactions are required. Please report suspicions to the forum admins. Stay Safe - anyone can get scammed.
You are using an out of date browser. It may not display this or other websites correctly.
You should upgrade or use an alternative browser.
You should upgrade or use an alternative browser.
Wanted Thread
- Thread starter Janger
- Start date
Bofobo
M,Mizera(BOFOBO)
No I have anvils lol, I'm looking to make a plate to use a small rotary table on my puny mini mill.Making an anvil? I want one too. Perhaps the scrap place in Ogden.
I have a Sherline 4" rotary table. I didn't have a slab of steel handy to make a baseplate but I did have some 1/2" thick 6061 aluminum. Being impatient I decided to just use the aluminum. All the surfaces were fly cut & square. It turned out very accurate & repeatable. I can position the RT into my 6" mill vice which was the plan. The aluminum isn't as tough as steel for dings & handling, but it worked well. From past experience if you do go steel, try & use hot roll vs. cold roll. A similar largish cold roll project decided to warp a bit even though I removed same amount off both sides (maybe 0.015-0020"). A slab of cast iron would be the best IMO but not that easy to source.
Attachments
Bofobo
M,Mizera(BOFOBO)
Is the picture of what you built? It's a nice little piece but not quite what I hope to accomplish. I need to create a mount for the RT and tail stock that sits on the bed with the RT on one end and the tail stock will have 1/2" incremental mounting holes over a 10" span. The bed of my mill is only 4" or so and the vertical mount holes are 5" apart. I have thought about doing a home cast In aluminum and just trying it but I know better. Ive got access to a full machine shop to make it, with a grind table, I just need the steel. Then I plan to make an adapter plate of home cast aluminum to secure my 3 and 4 jaw 3"chucks onto the 4" RT bed. At which point I will be happy to start my list of projects.I have a Sherline 4" rotary table. I didn't have a slab of steel handy to make a baseplate but I did have some 1/2" thick 6061 aluminum. Being impatient I decided to just use the aluminum. All the surfaces were fly cut & square. It turned out very accurate & repeatable. I can position the RT into my 6" mill vice which was the plan. The aluminum isn't as tough as steel for dings & handling, but it worked well. From past experience if you do go steel, try & use hot roll vs. cold roll. A similar largish cold roll project decided to warp a bit even though I removed same amount off both sides (maybe 0.015-0020"). A slab of cast iron would be the best IMO but not that easy to source.
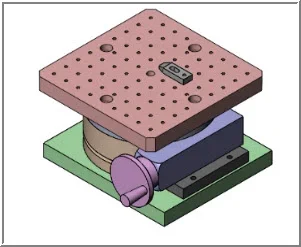
Bofobo, my CAD pic is illustrating (green) baseplate which is what facilitates the RT being mounted square in a larger mill vise. The (pink) plate on top is a general tooling plate to facilitate clamping odd sized parts & finicky things that similarly require rotary milling and/or indexed holes or whatever. Alternately you can mount a 3-jaw or 4-jaw chuck, or a MT# dead center into RT... whatever the application requires.
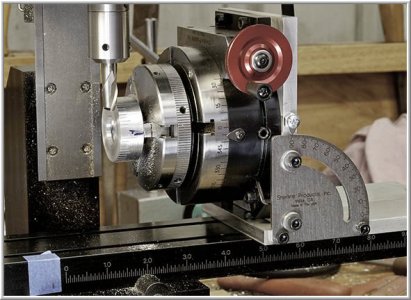
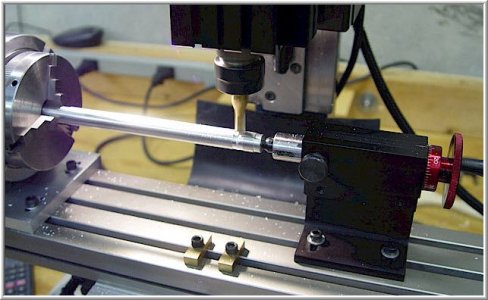
I'm not quite sure I follow your exact setup, but its equally common to put a RT up vertical to the mill table. Sherline sells a mount bracket to do exactly this & its also simple aluminum plate. They also sell a matching center height tailstock assembly for this mode for the unsupported end like a shaft part. They also sell a 0-90 deg adjustable angle plate to mount the RT for say, making bevel gears. Sherline is a miniature & lighter duty, but essentially same principles as a big boy shop. Particularly if you have limited real estate on your mill table & z-axis headroom, Sherline its one tooling solution to consider. The other 4" RT's I've seen vary in quality & some are real garbage IMO. The better RT's in that size unfortunately are substantially thicker & cost more. I don't think Sherline's have indexing plates if that's a requirement, but I'm not entirely sure. If you are simply indexing to positions vs. a requirement to cut while sweeping an arc, a dividing head is another option. But they tend to be taller yet & somewhat less clamp-up options. Good luck!
I'm not quite sure I follow your exact setup, but its equally common to put a RT up vertical to the mill table. Sherline sells a mount bracket to do exactly this & its also simple aluminum plate. They also sell a matching center height tailstock assembly for this mode for the unsupported end like a shaft part. They also sell a 0-90 deg adjustable angle plate to mount the RT for say, making bevel gears. Sherline is a miniature & lighter duty, but essentially same principles as a big boy shop. Particularly if you have limited real estate on your mill table & z-axis headroom, Sherline its one tooling solution to consider. The other 4" RT's I've seen vary in quality & some are real garbage IMO. The better RT's in that size unfortunately are substantially thicker & cost more. I don't think Sherline's have indexing plates if that's a requirement, but I'm not entirely sure. If you are simply indexing to positions vs. a requirement to cut while sweeping an arc, a dividing head is another option. But they tend to be taller yet & somewhat less clamp-up options. Good luck!
Attachments
Bofobo
M,Mizera(BOFOBO)
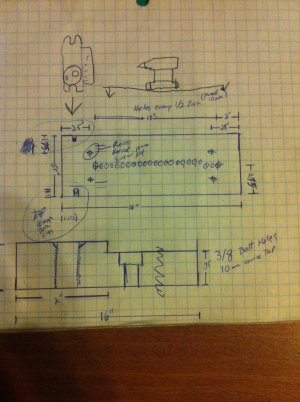
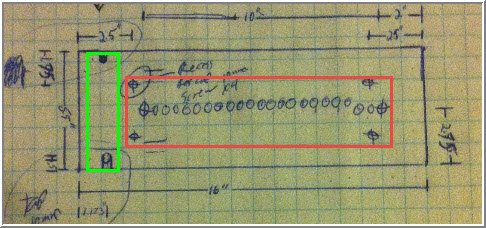
I suppose that aluminum in 1" chould be thick enough but I'll include a photo of my plan to show what I'm thinking, then I may even get just enough feedback about the aluminum I may try it. all my equipment is rebranded seig mini series and I don't have a cad program so my crude drawings will have to do. Thanks for describingBofobo, my CAD pic is illustrating (green) baseplate which is what facilitates the RT being mounted square in a larger mill vise. The (pink) plate on top is a general tooling plate to facilitate clamping odd sized parts & finicky things that similarly require rotary milling and/or indexed holes or whatever. Alternately you can mount a 3-jaw or 4-jaw chuck, or a MT# dead center into RT... whatever the application requires.
I'm not quite sure I follow your exact setup, but its equally common to put a RT up vertical to the mill table. Sherline sells a mount bracket to do exactly this & its also simple aluminum plate. They also sell a matching center height tailstock assembly for this mode for the unsupported end like a shaft part. They also sell a 0-90 deg adjustable angle plate to mount the RT for say, making bevel gears. Sherline is a miniature & lighter duty, but essentially same principles as a big boy shop. Particularly if you have limited real estate on your mill table & z-axis headroom, Sherline its one tooling solution to consider. The other 4" RT's I've seen vary in quality & some are real garbage IMO. The better RT's in that size unfortunately are substantially thicker & cost more. I don't think Sherline's have indexing plates if that's a requirement, but I'm not entirely sure. If you are simply indexing to positions vs. a requirement to cut while sweeping an arc, a dividing head is another option. But they tend to be taller yet & somewhat less clamp-up options. Good luck!
Attachments
Bofobo
M,Mizera(BOFOBO)
Yes that's it exactly, it's almost 2" narrower than I need for my RT. the tail stock has about 1" of travel so I put the spacing holes .5" apart. with this set up I figure my RT/TS assembly can very quickly be mounted, perhaps with guide pins and possibly if I need the machine for another use I can remove the whole thing part mounted and all and replace it to within a few thou in moments. That is why I figured on steel. However I could make the plate from scratch with home made ingots of aluminum and a mould, I'm just not sure about the strength when it comes to chatter and deflectionI take it maybe your existing mill table is a smaller footprint than how you want to set up the RT & tailstock assembly. Is that it?
Assume your tailstock has an adjustable screw type arbor to handle 'in-between' sizes of the bolt pattern.
Looks good to me. Another consideration might be to increase the distribution & count of your hold-down bolts (meaning the ones fixing plate to the mill table). More bolts will give additional clamping pressure & less chance of bowing. Also small mill means small T-slots = less risk of cranking down on a bolt & cracking the cast iron table slot (its happened). Plus it may give you more flexibility to set in different table orientations or even bolt up different topside attachments to it in the future.
You could get fancy & attach a keyway strip to underside of plate.That's quite common with mill vises. That way every time you bolt the assembly to mill table, it is pre-squared & dialed in. Or at least much closer than doing the bolt up & then going through the whole DTI tramming rigamarole across surfaces to ensure RT is aligned to y-axis etc.
I think the base will be solid no matter how you make it. I've seen homebrew CNC milling setups that use cast aluminum tooling boards & they are putting more HP down on that than your mill. Any chatter will probably be 'upstairs' milling & drilling on part supported by chucks & centers etc.
So what kind of parts do you want to make with this tooling assembly once its built?
Bofobo
M,Mizera(BOFOBO)
Chess pieces will likely be high on the list of to-do's. I plan to make brass and copper and steel pieces with some hobby model engines to follow.Looks good to me. Another consideration might be to increase the distribution & count of your hold-down bolts (meaning the ones fixing plate to the mill table). More bolts will give additional clamping pressure & less chance of bowing. Also small mill means small T-slots = less risk of cranking down on a bolt & cracking the cast iron table slot (its happened). Plus it may give you more flexibility to set in different table orientations or even bolt up different topside attachments to it in the future.
You could get fancy & attach a keyway strip to underside of plate.That's quite common with mill vises. That way every time you bolt the assembly to mill table, it is pre-squared & dialed in. Or at least much closer than doing the bolt up & then going through the whole DTI tramming rigamarole across surfaces to ensure RT is aligned to y-axis etc.
I think the base will be solid no matter how you make it. I've seen homebrew CNC milling setups that use cast aluminum tooling boards & they are putting more HP down on that than your mill. Any chatter will probably be 'upstairs' milling & drilling on part supported by chucks & centers etc.
So what kind of parts do you want to make with this tooling assembly once its built?
I'll post pictures of the build as it progresses. Should be interesting going from straight scratch with the exception of a pro shops mill as my little CX605 could not complete a squaring operation on a pieces this large

