• Scam Alert. Members are reminded to NOT send money to buy anything. Don't buy things remote and have it shipped - go get it yourself, pay in person, and take your equipment with you. Scammers have burned people on this forum. Urgency, secrecy, excuses, selling for friend, newish members, FUD, are RED FLAGS. A video conference call is not adequate assurance. Face to face interactions are required. Please report suspicions to the forum admins. Stay Safe - anyone can get scammed.

Tricky problem - squaring an untrue cube

Arbutus

Super User
Premium Member
Alright, so this started because I'm cheap. Or Scots. Or a cheap Scot. But, I bought this $25 ER-32 collet block on Amazoom recently.

So I thought if it’s a bit off I’ll just lap it square again. But this looks like it was kicked around the yard a few times before being sent.
It is not square.
The sides have different dimensions (+/- 0.1mm)
The chamfers on the sides show that the faces are not square.
The sides are not parallel, and I have no idea if the bore is central between the sides or the the bore is perpendicular to the base.
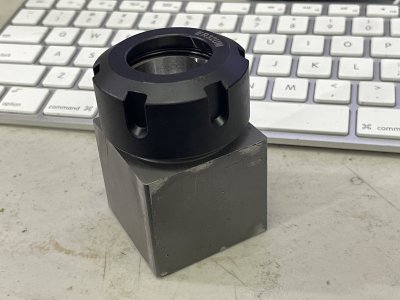
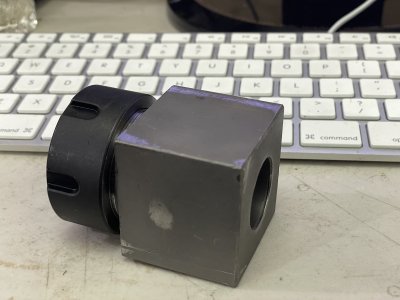
IMG_4439.JPGIMG_4440.JPG
The scuff marks in the images are from me rubbing it on a lapping plate.

But I love a challenge.
My machines are a 10" lathe, Bridgeport mill, lapping plate, 9" rotary table, ER-32 indexer and good metrology. I do not have a surface grinder.

How would you approach this to meet spec:

All faces shall be flat, parallel and square.
The bore shall be concentric with the faces and axially parallel with the faces.
The bore shall be precisely 90 deg to the base.

The part is nominally 44.6 square by 42.3 high.

I think I have figured out how to do this, but more brains = better!

:)
 
Sure! I'll give it a shot!

I would turn a mandrel (all in a single setup between centres) that is exact to the ER32 taper such that the nut will capture it, and the mandrel protrudes both ends. I'd then put it in Vee blocks in the mill and get the best average of the top face and the side faces. Then mill the top side. If the set up is rigid enough, the sides can also be milled with light cuts. Then the block can be held in a milling vice for the 4th side. Finally the block can be indicated in, held in the milling vice, and the back face can be milled.

Then the taper will be in line with the sides and perpendicular to the back.
Why not just use a precision ground shaft held in a collet instead of making the mandrel?
 
Why not just use a precision ground shaft held in a collet instead of making the mandrel?
You can for sure, but then you're at the mercy of the accuracy of the collet. But then again, you're at the mercy of the accuracy of everything else too: v-blocks, mill tram, squares angle plates, collet chuck taper, mill vise, etc.

But your suggestion is probably the easiest and quickest, and then measure the block after and determine if it's good enough for the purpose intended.
 
What is the material? Is it a properly charged lapping plate or sandpaper on a surface plate? You could lap it, but you have to reference off the bore and constantly adjust where the force is applied. It would be no fun. If soft, I'd use a good quality collet, longish dowel pin or thompson shafting and scrape it .... it would be imo faster and easier than lapping. If not soft, I'd buy a SG or send it back :)
 
I think a bit of measuring would be the first order of business. This in hand with possible needed specs. If it is a matter of just being square, faces flat and parallel is one thing, the bore being square, parallel and concentric is another.
Measuring from the bore to find if there is a side that is some what square to it and to see where the the least amount of metal is.
Making a mandrel as " Dabbler" says would possibly be a good start. Make the mandrel, between centres, mount the block on it in the lathe, this would allow you to face the ends, it appears only one end could be faced, ensuring the ends are square to the bore. While mounted on the mandrel and in the lathe would make it possible to tram the 4 sides with indicators and see if a side or more is possible to work from, and also show which may be the worst.
From here to the mill, leave the block mounted on the mandrel, if you can mount on centres in the mill. Put the "best" face up, tram it, to aline with cutter, take alight cut to true. Turn 90 degrees for each of the other 3 sides, while not moving cutter height. Make a last cut for finishing, again not moving cutter height for the 4 faces
If can't mount between centres on mill, a good vise could be used, but a lot more measuring and traming would be needed.
The trick is to get one side parallel, square, concentric to the bore to act as the reference.
Others may have better ways to do it! And faster or easier.
It will be interesting to see what arises with this, as I don't have a mill, was trying to think of how with a shaper.
 
So I had the same problem... first make sure all sides are 90 degree... then make it square. Then make it square such as the ER-32 is right in the middle of it. Just a grinder problem.

For the ER-32 just put say end mill in it and using test indicator on a granite plate figure out which side is high.
 
I have a related question.

Why are all collet Blocks smaller than the nut? That means you cannot use them on the table. Only in a vise. If they were bigger than the nut you could use them anyplace. Seems dumb but most things are dumb till you realize how sharp the dummy is.
 
I have a related question.

Why are all collet Blocks smaller than the nut? That means you cannot use them on the table. Only in a vise. If they were bigger than the nut you could use them anyplace. Seems dumb but most things are dumb till you realize how sharp the dummy is.

I assume its from "practical" standpoint of shipping.

Imagine if blocks were bigger then the nut - nut on ER-32 is quite large.

The hole for the collet would be the same size... so a LOT of extra metal.

Extra metal not only cost money... it also is heavy - there are no voids there.

So shipping would be more! Much more.

Just use 1-2-3 blocks to shim. I use 5C collet blocks so no issues with the nut - its smaller then the block.
 
So I had the same problem... first make sure all sides are 90 degree... then make it square. Then make it square such as the ER-32 is right in the middle of it. Just a grinder problem.

For the ER-32 just put say end mill in it and using test indicator on a granite plate figure out which side is high.
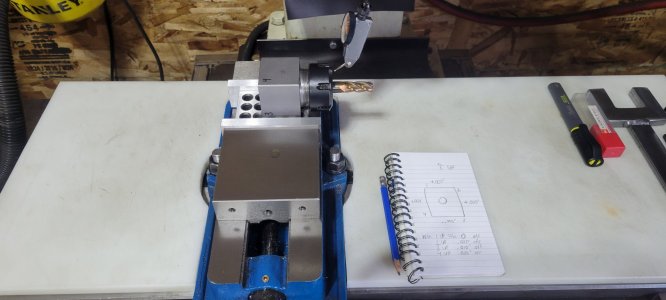
I thought about doing this the poor man's way with it on top of the fixed jaw in my mill with an indicator in the quill.

Probably get it better then it is but not perfect? Maybe today I will try it just to see how far out the square is

All goes out the window if I need a surface grinder, or a surface plate lol
 
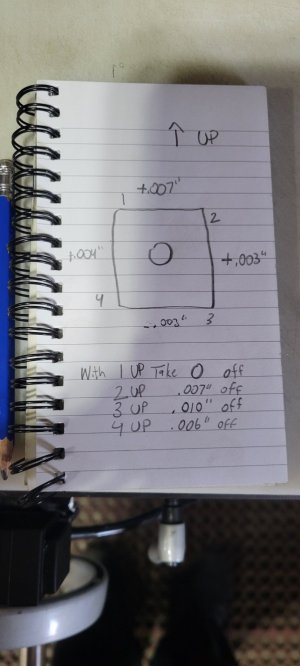
You guys think this would work, or make it better, or waste of time?

I checked it with a file and it was easily filable. And then I would leave the low and take off some from the other 3 sides to make them equal?

I checked the measurements 3x on each side, it's not clamped in the vise just sitting there on a 123 block which indicated flat.

It wouldn't get any twist out like a bar held between centres tho

I think I'm into it for 19 bucks so I wouldn't cry either way lol.
 

Attachments

  • 20240306_124954.jpg
    20240306_124954.jpg
    190.2 KB · Views: 6
  • 20240306_125335.jpg
    20240306_125335.jpg
    175.2 KB · Views: 5
You guys think this would work, or make it better, or waste of time?

I checked it with a file and it was easily filable. And then I would leave the low and take off some from the other 3 sides to make them equal?

I checked the measurements 3x on each side, it's not clamped in the vise just sitting there on a 123 block which indicated flat.

It wouldn't get any twist out like a bar held between centres tho

I think I'm into it for 19 bucks so I wouldn't cry either way lol
Since its the bore that is the controlling dimension, it would be smart to tram vs. the bore while its in the in the vice. That would verify that the bottom face is true to the mill bed.
 
Great suggestions and discussion folks.


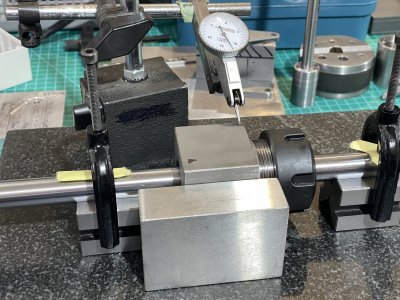
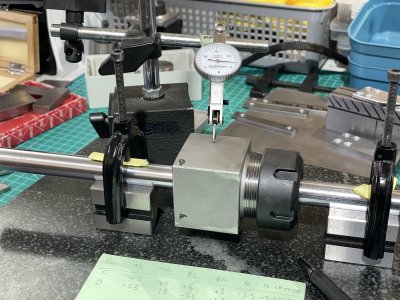
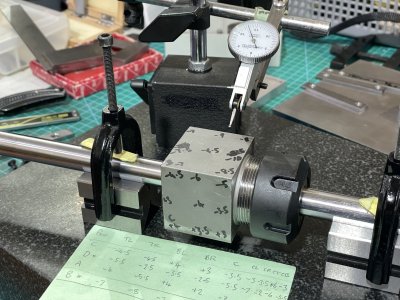
I have a piece of straight, polished linear rail, which is held in a 5/8 collet. I checked the inner face of the block with some blue on a collet. The taper was nicely ground and showed no high spots, so I'm going to trust the collet/shaft/bore as the reference.

The shaft is supported over two new Vee blocks and the height of the shaft vs. the surface plate was checked. It was level within 2 tenths over 12 inches.


IMG_4441.JPGIMG_4442.JPGIMG_4444.JPG
To align a face, I used a 123 block to reference the vertical while the shaft was gently secured in the Vee blocks to prevent rotation.

I took relative measurements at 9 points on each face. This showed 2 opposite faces were within 2 thou of each other. The other faces were off square by 7 thou. The faces are also dished and one side is 89.9 degrees to its mates.

And the %$!* thing is hardened.

Next stage - using the indexer and good support in the mill, I'm going to surface grind the top using a 320 grit 4" flared cup wheel, taking dusting passes only. The indexer is quite precise and I am confident that 90 degrees is exactly 90 degrees.

I may have to make a jig to work on the base. I wasn't expecting the steel to be as hard as it is, so at this point grinding is the only realistic option.

If that works out as intended, then I'll lap the faces,

:)
 
What is the material? Is it a properly charged lapping plate or sandpaper on a surface plate? You could lap it, but you have to reference off the bore and constantly adjust where the force is applied. It would be no fun. If soft, I'd use a good quality collet, longish dowel pin or thompson shafting and scrape it .... it would be imo faster and easier than lapping. If not soft, I'd buy a SG or send it back :)
It seems to be made of a fairly hard tool steel. A cut file barely scratches the surface. I use a steel lapping plate charged with Clover 600 or diamond paste for finishing.
 
Great suggestions and discussion folks.


I have a piece of straight, polished linear rail, which is held in a 5/8 collet. I checked the inner face of the block with some blue on a collet. The taper was nicely ground and showed no high spots, so I'm going to trust the collet/shaft/bore as the reference.

The shaft is supported over two new Vee blocks and the height of the shaft vs. the surface plate was checked. It was level within 2 tenths over 12 inches.


View attachment 45179View attachment 45178View attachment 45177
To align a face, I used a 123 block to reference the vertical while the shaft was gently secured in the Vee blocks to prevent rotation.

I took relative measurements at 9 points on each face. This showed 2 opposite faces were within 2 thou of each other. The other faces were off square by 7 thou. The faces are also dished and one side is 89.9 degrees to its mates.

And the %$!* thing is hardened.

Next stage - using the indexer and good support in the mill, I'm going to surface grind the top using a 320 grit 4" flared cup wheel, taking dusting passes only. The indexer is quite precise and I am confident that 90 degrees is exactly 90 degrees.

I may have to make a jig to work on the base. I wasn't expecting the steel to be as hard as it is, so at this point grinding is the only realistic option.

If that works out as intended, then I'll lap the faces,

:)
Just as a sanity check, take the collet nut, shaft, and collet out, clean up everything and reassemble and check your numbers again (not necessarily 9x per side). Just so you don't go through all the trouble of doing as perfect a job as possible, and then start scratching your head why it didn't turn out like you wanted due to a bad collet or collet nut.
 
It seems to be made of a fairly hard tool steel. A cut file barely scratches the surface. I use a steel lapping plate charged with Clover 600 or diamond paste for finishing.

600 will polish but take forever. I'd used something coarser if trying to remove material. Maybe I'm singing to the choir, apologies if so, but lapping plates are so often abused. With a lapping plate, flatness depends on the flatness of plate. charge it and wash away any loose abrasive and it'll stay flat, but if there is rolling abrasive it can/will get messed up.

Let us know how it turns out!
 
Last edited:
Back
Top