• Scam Alert. Members are reminded to NOT send money to buy anything. Don't buy things remote and have it shipped - go get it yourself, pay in person, and take your equipment with you. Scammers have burned people on this forum. Urgency, secrecy, excuses, selling for friend, newish members, FUD, are RED FLAGS. A video conference call is not adequate assurance. Face to face interactions are required. Please report suspicions to the forum admins. Stay Safe - anyone can get scammed.

Machine StevSmar's PM-833TV Mill and Stand

Machine

StevSmar

(Steven)
Premium Member
Now that winter has arrived, I've started working on my Mill stand again in earnest. So I thought now would be a good time to post progress to date and then add updates.

Hopefully by the end of this winter I'll have the Mill together and running in some manner…..

I ordered the PM-835TV mill from Precision Matthews mid August 2022:
PM-833TV

Since they were expecting a shipment it wasn't long before I could watch the progress of the ship carrying it from SanDiego onwards. Here it is going through the Panama Canal Jun 28, 2022:
IMG_8945.jpg


Mid August 2022 the mill arrived in my garage:
IMG_8928.JPG


Since cottage season was still in full swing, the first job was to make a computer model so I could design the stand:
IMG_7706.jpg


Thanks to the members of this forum, the stand was designed by the end of November 2022:
IMG_8946.webp


And then once the cottage was shut down I pulled the Mill apart into major components and moved it to the basement:
IMG_8932.JPG


Only minor damage to the stairs, though the tracks on the Princess Auto appliance cart didn’t survive…

Come January 2023 and the I was happily learning how to weld:
IMG_8929.JPG


I gotta say, learning how to weld was so much fun!!! I was disappointed once the fabrication of the mill stand was done... Almost wish I could build a second stand... (I am fanaticizing about building a custom stand for the lathe eventually, though that will probably be after I make another woodworking bench (with a metal frame of course!)

Now cottage season had started, the Mill stand was put on hold, though I did get it powder coated by mid September:
IMG_8930.JPG


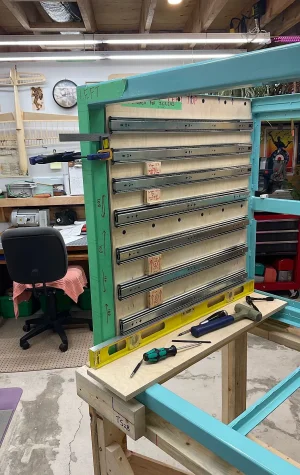
Which brings the story up to today, the drawer slides are installed and now I’m starting on the drawers:
IMG_8931.JPG
 
That looks like a nice design and build of a stand. Shop does look a little disappointingly clean however, might want to ask your doctor about that.
The tracking is cool stuff. I once ordered an iPad and was able to track the various aircraft enroute, China, Korea, Anchorage, Tennessee ( I think), Toronto, Calgary, Vancouver and finally Victoria. On this side of the big pond I was able to livestream the ATC as well. Kinda dorky I know but it was rather fun. Interesting too seeing the flow of the logistics. IIRC it came Fedex and I poked the weight and dimensions data printed on the labels into their rate quote app and it came back over 14k, so I guess Apple gets a better rate than me.

John
 
Nice machine. It deserves a nice stand. Well done on both.
Even your stand for the stand looks nicely done. :)
 

Attachments

  • 1703427452058.webp
    1703427452058.webp
    337 KB · Views: 9
Looks great!
Thank-you.
Paint looks good how big was the oven?
I should have been more specific, I didn’t powder coat it. I paid a company to do that. Based on what I saw in their shop, I bet their oven has at least an 8’ dimension. Even though it hurts the wallet, I think I’ll get all my fabrication projects powder coated.
Shop does look a little disappointingly clean however, might want to ask your doctor about that.
Yes I did. He said lie back on the couch and told me that we have a natural level of chaos that we can tolerate and the photos of my shop show him that between my ears seems to be taking more of my allotment than in most.
IIRC it came Fedex and I poked the weight and dimensions data printed on the labels into their rate quote app and it came back over 14k,
Wow, that’s an amazing difference!
Even your stand for the stand looks nicely done.
I have lots of wood offcuts from making the ramps to move my lathe downstairs… But I’m sure glad I spent the couple of hours to make the stand for the stand, I’ve got enough trouble re-injuring my left knee when I put pants on… The joy…
 
Making progress, slow progress.

IMG_9009.jpeg


What I’ve learn‘t is that:
- A track saw is a cumbersome replacement for a table saw. But I don’t have room for a tablesaw.
- Having the sides of the stand bow in by about 1mm is a pain in the arse because I then had to size the drawers individually.
- I was too greedy with the depth of the drawers, now I have to make the false fronts with a tight tolerance.
- I should have paid more attention to the inside weld size. The bottom left one will potentially give me clearance issues. Nothing that a file on the false fronts won’t fix, but it potentially annoys me…

I’m going to space the false front’s about 1/8” in from the sides and 1/8” between drawers. At the top and bottom I’ll leave maybe 3/16”.
The tracks seems to have no more than 1/16” of side to side slop at the most, probably more once I fill the draws with 100lbs of garbage.

I really enjoyed making the first drawer. Enjoyed the second one 50% less. The seventh one was enough already. Glad that this part is done.

I’m still hopeful that before Winnipegs winter finishes in July I’ll have the mill assembled somewhat.
 
Making progress, slow progress.

View attachment 43172

What I’ve learn‘t is that:
- A track saw is a cumbersome replacement for a table saw. But I don’t have room for a tablesaw.
I find that if I have an easy way to set up for track saw use it is a lot less hassle.
For sheet goods my setup is a pair of sawhorses with 2x4’s across their tops. I drop the sheet on them and go. I don’t use styrofoam like many do on YT. Primarily because then I have to store the styrofoam.
I also use a square that attaches to the track for crosscuts and parallel guides for repeat rips.
When I built my Cosman workbench I reduced two sheets of 5x5 Baltic Birch into 4” strips in 30 minutes using parallel guides.
 
Time for an update after passing a milestone. The stand is finished, finished, done 99.9%.

I don’t get any joy out of making ugly things, so I decided to add a couple of decorative touches to the stand:
Mill stand drawer decorations.jpeg

I enjoyed the inlay work, probably took about 20 hours to do. What I didn’t enjoy was the aluminium edging, that was extremely tedious to get fitted properly. Somewhat easier once I made up a jig for the chop saw though:
IMG_9560.jpeg

A little dicey once I got to the small end pieces of the top three drawers, but everything held and no pieces got thrown around the workshop.

In the theme of ”in for a penny, in for a pound” I thought brass screws would look nice:
IMG_9561.jpeg

I’m really happy with how the decorative flourishes turned out, even if they did take far longer than I thought.

Based on the suggestion of a forum member, concrete was fitted to the bottom of the stand to lower the center of gravity:
IMG_9559.jpeg


And here’s the stand finished:
IMG_9557.jpeg


IMG_9558.jpeg


A most enjoyable project which has taken far longer and cost considerably more than I’d ever anticipated.

But now it’s time for a side project… I can lift the stand off its temporary stand using my shop crane. What I won’t be able to do though is lift the Mill onto my stand. So now I think it’s time to modify the shop crane to make the feet parallel. I could purchase a gantry but this will be another tool that I struggle to store in the workshop, so I’m leaning towards the shop crane modification. I’ll start up a separate thread on that…
 
Back
Top