• Scam Alert. Members are reminded to NOT send money to buy anything. Don't buy things remote and have it shipped - go get it yourself, pay in person, and take your equipment with you. Scammers have burned people on this forum. Urgency, secrecy, excuses, selling for friend, newish members, FUD, are RED FLAGS. A video conference call is not adequate assurance. Face to face interactions are required. Please report suspicions to the forum admins. Stay Safe - anyone can get scammed.

Shade Pull

YotaBota

Mike
Premium Member
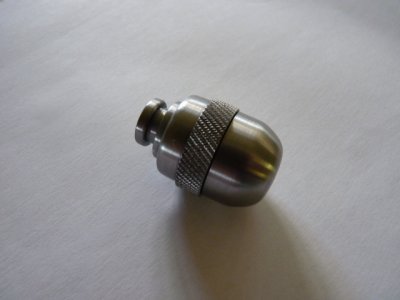
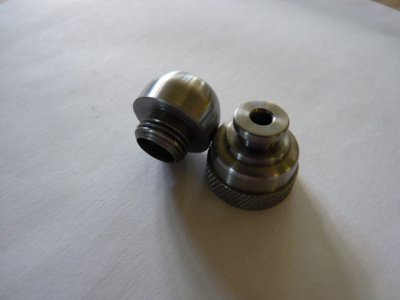
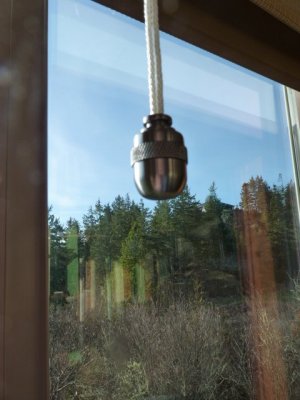
We bought a couple of new roll up shades but they are up about 9' so not easy to reach. I tied a string to them but then it's just a string hanging there so I made a couple of Acorn(ish) looking pulls. Of course picture taking took second place to actually making them but here is the finished product.
P1010978.JPGP1010979.JPGP1010980.JPG


I used 1" bar stock and it took a couple of tries to get it to look reasonable but the other half is happy with the result, browny points for my up coming birthday :)
 
We bought a couple of new roll up shades but they are up about 9' so not easy to reach. I tied a string to them but then it's just a string hanging there so I made a couple of Acorn(ish) looking pulls. Of course picture taking took second place to actually making them but here is the finished product.
View attachment 30211View attachment 30212View attachment 30213


I used 1" bar stock and it took a couple of tries to get it to look reasonable but the other half is happy with the result, browny points for my up coming birthday :)
nice
 
Nice. What material did you use? It looks like a burnished/brownish stainless steel finish of some sort but maybe that's just the lighting?
 
So, being new to this whole lathe thing... what is the order of operations to make that?
I was turning a steady rest brace for the grinder today ala Clough42.
Just a simple bar of a certain length with a threaded hole in each end.
I swear I had that thing in and out of the chuck 30 times.
I know I have a chaotic workflow at the best of times but I'm thinking my order of operations is waaaaay wrong.
 
I assume you made it from bar.

If I were making it, I would prolly start by cutting the thread on the male part first.

Then I would remove the male part from the lathe and put the other piece in to drill and tap for the female side. The female part is drilled all the way through.

Then I would thread the male into the female, and then cut the male ball end.

Then I would either make a sacrificial male part strictly to finish the other side of the female part, or I would make a mandrel to hold it.

Then I would machine the rest of the female part either held by the sacrificial male or by the mandrel.

Perhaps there is a better way to do it, but that's what I would do without spending a year thinking about it.

Basically it's four setups - one for each side of both halves.
 
As was noted in the first post the bar is 1" mystery steel.

First thing was to make a gonogo for the threads, the thread used is 9/16 - 18.
P1010981.JPG
P1010982.JPG


For the top I started with the knurl then drilled a 3/16th hole about an inch deep. From there I bored the hole and turned the inside thread. After that it was wittleing away what didn't need to be there to end up with the shape I wanted, done mostly with a parting blade. The piece was then cut from the bar, screwed to the gonogo and filed and sanded to final shape.

P1010983.JPG
P1010985.JPG


The bottom piece was done in the same way, first was the male thread then boring a hole to make room for the string knot. Then parting it off and screwing it to the gonogo for final shaping and sanding. The HHS rounded bit was one that was in a box of bits I got from,,,, somewhere. lol

P1010986.JPG
P1010979.JPG


The finish is just done with 320 emery cloth on the lathe.

Oh, if you use a brush for apply cutting fluid while knurling, keep the bristles away from where the knurler meets the stock.

P1010984.JPG


Hope that answers the Order of Ops queries.
 
I discovered fairly early that getting half way thru a job and then trying to figure out how to hold the part to do another step doesn't work worth a hoot. You end up starting again, and again, and again lol, but you do get lots of practice just like golf, lots of practice swinging.
 
I discovered fairly early that getting half way thru a job and then trying to figure out how to hold the part to do another step doesn't work worth a hoot. You end up starting again, and again, and again lol, but you do get lots of practice just like golf, lots of practice swinging.
I have a whole little cabinet chock full of pre-cut pieces for smaller projects than originally conceived..... They are only mistakes when they hit the scrap heap, everything else is just getting an early start on a future project. (making the same mistake repeatedly needs some kind of justification. ):cool:
 
As was noted in the first post the bar is 1" mystery steel.
I thought I was guilty of not reading completely (which happens) but I am only guilty of not being more clear and leaving room for misinterpretation. :oops:
I did see and comprehend that you used 1" bar stock but I was curious of what type of material you used. Thanks for clarifying that it was mystery steel. I used alot of that myself.:)
 
Back
Top