• Scam Alert. Members are reminded to NOT send money to buy anything. Don't buy things remote and have it shipped - go get it yourself, pay in person, and take your equipment with you. Scammers have burned people on this forum. Urgency, secrecy, excuses, selling for friend, newish members, FUD, are RED FLAGS. A video conference call is not adequate assurance. Face to face interactions are required. Please report suspicions to the forum admins. Stay Safe - anyone can get scammed.

Power Feed

Alexander

Ultra Member
Administrator
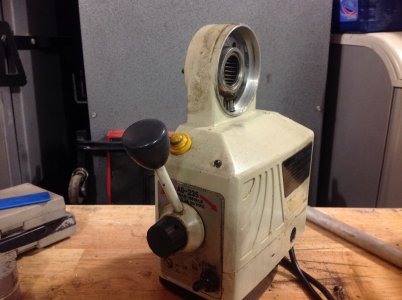
I am converting my mill to CNC I have removed the power feed unit and I no longer need it. Busy bee sells the same unit for $465 I am asking $250.
image.jpeg

Here is the link to busy bee power feed.
http://www.busybeetools.com/products/power-feeder-for-milling-machines.html
 
Last edited:
Hmmm... I've been thinking of retrofitting my PITA manual head raising handle to a powered unit. Not sure if the table feed can easily be retrofitted to the column though. What's the torque rating of the unit? And what am I looing at in the lead screw shaft hole - some kind of 1-way bearing so you can still manually turn lead screw with power off or neutral?
 
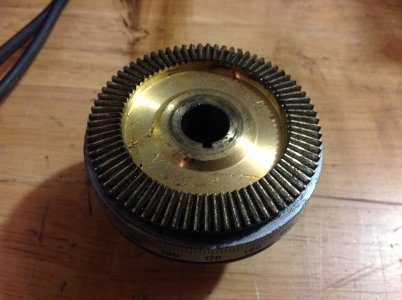
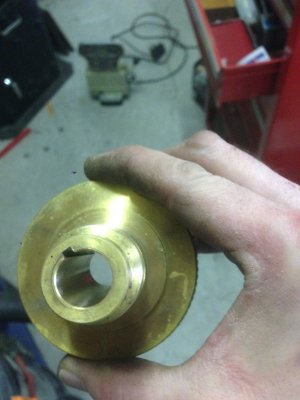
Hey sorry I forgot to attach the picture of the gear that actually drives the lead screw.image.jpeg
You could use this to raise and lower the head. It has 780inLB of torque. I have seen them used to raise and lower the table of knee mills. That is just a needle bearing that helps things stay lined up. The hole in the middle of the gear is .625" and the key way seems to be .113". The power feed slides on the shaft and then the gear slides on after and a nut on the other side of the handle holds everything on.
 
I want it.. I just have to figure out how much I want it.. Does it fit on your y axis? That's kind of what I was thinking I want one for.. But honestly I want all 3 power fed.
 
Go for it. Last night I measured my manual head raising lifting requirements, no issues from the torque standpoint. But now looking closer at how to orient where the manual handle stub comes off the rear column, more involved than I thought. I need to think this through some more. I have a smaller version of this on my x-axis & just eyeballing even that would be tight. Hopefully you can use on your table or Alex can flog on ebay at US$, the price is sure right.
 
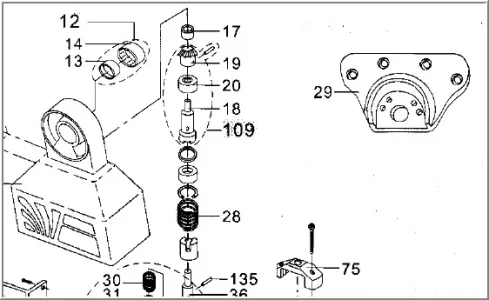
Hmm.. I think I misunderstood the upright flange mount segment that bolts to the table end. First I thought it was permanently integrated into the unit housing but judging by the parts diagram in this link, that flange comes off? But I also see they offer a different lift model than longitudinal x-axis model on the same motor platform. I wonder if the difference is jut in the mounting brackets?
http://www.bestlinepro.com/prod01.htm
 

Attachments

  • 1-21-2016 0001.webp
    1-21-2016 0001.webp
    21.1 KB · Views: 8
  • 1-21-2016 0002.webp
    1-21-2016 0002.webp
    11 KB · Views: 6
  • 1-21-2016 0003.webp
    1-21-2016 0003.webp
    22.5 KB · Views: 6
image.jpeg
I hope this answers your questions. That big flange easily comes off. I think it will easily fit on your Y axis. Measure how much the lead screw extends out of the machine. This unit takes up some space. You would have a hard time fitting it to the machine if you have less than 3.5" of leads screw sticking out.
 
I'm very interested in the power feed. You interested in trade plus cash? I have some 5" 4140 and some 5" other mild steel (not 100% sure the grade but I think it may be 1045 or something similar). The 5" steel is great for making back plates, and ER Collet holders, not to mention other countless applications :P. I have a couple Face mills, some inserts, a couple big cutters, Taper Pin Reamers.... I have a Craftex knee mill so I think this would fit well.
 
Im thinking about it. I was going to buy some 4.5" aluminum this weekend to make stepper motor mounts on my hybrid mill. I could use steel but there in no way I am turning that stock down on my cnc lathe. Its too to slow turning 5" steel No interest in big cutting tools. My machine is smallish. Ill take your money though of you have it
 
I also have some nice aluminum. I don't know the grade but I was told that it is of good quality and it came from a shop that services the aircraft industry. It's not that big though. I think it's 3" or maybe 3.5". If you can make that work, maybe we can work something out. Also, if you are interested in some of that steel, I would gladly turn some down for you. It takes me a while on my lathe but it is doable. Any interest in a smaller Face mill? I have a nice Iscar 2" I believe. It is appropriate for smaller machines. It takes a 3/4" Arbor. I do have the $$ but i'm on a pretty tight budget so a bit of a horse trade could help me a lot! I have no power feed on my mill and I was going to make something but if I could adapt this one, it would be optimal. Let me know about the Aluminum that I have or if you would be interested in the steel if I turn it down, or the Iscar face mill. Cheers!
 
I'll formally back out of negotiations as it looks like strong interest here & my mill modifications aren't quite clear to me yet. I for sure have to machine an extension stub, no biggy there but the hard mounting to replicate the table anchoring & space accommodation is what I need to get my head around. Alex, if its convenient to bring to coffee meeting tomorrow, I would like 5 minutes of fondling time just to get a better visual . If its not convenient to transport, no worries.

Geoff, maybe interested in some aluminum depending on price if you have any left over. 'aircraft' probably means 6061 or 7075 which is good for my engine project. Lemee know.
 
Hi Peter. Thanks. I don't think it is 6061 because I have some other 6061 and you can tell it is different. I have access to more of this so we can certainly talk. Any idea how much you might be interested in?
 
hmm 4.375 round bar is the smallest that could work for these mounts so that won't work unfortunately I could use 4" square stock I suppose if you have that. I have a 2" facemill also. I'll bring this power feed unit tomorrow and we can pass it around for anyone who wants to see it.
 
What is the length you need? I would turn down some of this steel to 4.5". Any other stock that you might be interested in just to have some on hand?
 
Geoff, I require 3" dia. 1 foot would probably do me for now. If its not 6061, guessing either 2024 or 7075? Either would be fine. Probably overkill in both cases. OTOH this radial crankcase ends up looking like a block of swiss cheese & has lots of threaded holes, both favoring harder/stronger alloy. I'll prototype on my 6061 lump & save the good stuff for the real thing. Let me know what you think you have & price. petertha at shaw dot ca if you don't want to broadcast. We may have to have discussions about your source. I've been gobbling up my small supply of 3/8 & 1/2 on fixture plates & whatnot.
 
Hey Alexander, I just had a look at my mill and my leadscrew looks to be compatible with the gear (.625 with approx .115 keyway). I should probably just take it. I have needed a powerfeed for awhile now but I just couldn't buck up $465 'ish.... I would love to make a bit of a deal with you... maybe say $200 and some Alum / Steel? I would gladly turn whatever you need down to 4.5". Anyways, this is me committing to it! I''m not 100% sure if I can come to the meet tomorrow but I would like to.... I would like to talk to you before then... Can you txt me? 403-869-5549. Cheers!
 
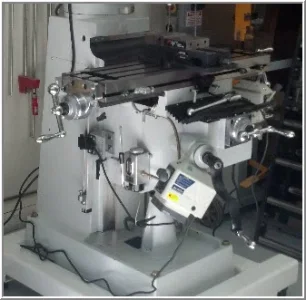
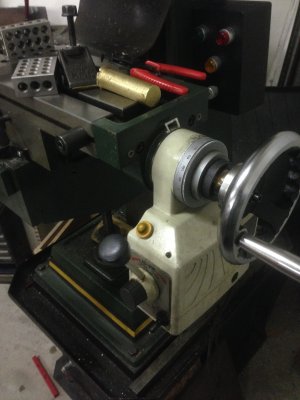
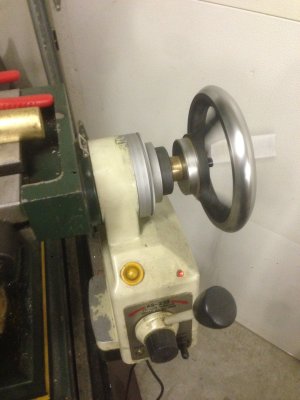
Hey Alexander. Got the Power feed installed. It did take a little fussing but it's on and i'm happy with it!

I has to bore the brass bevel gear out by 4 thou for it to slip fit onto my leadscrew shaft. Also, I turned a bushing to go into the roller bearing as the shoulder on my leadscrew was a fair bit smaller. The bushing turned out really well.
It turns out that I can mount the unit directly onto the sidecap of my table without using that 'bridgeport' adapter at all!! I was just getting ready to make a new adapter and then it dawned on my that it would fit right without any adapter! Last thing which really sucked was that there are 2 mounting holes tapped onto the side bearing cap of the table and i'm most certain that there are there for mounting a powerfeed. Turned out that the mounting holder were about .050 wider that the mounting holes on the Powerfeed!! Made in China hey!! Anyways, I just drilled out the clearance holes slightly and it now fits like it was supposed to!

Here are a few pics. The last pic is the power feed running :) Cheers!
 

Attachments

  • Photo 1-23-2016, 3 04 31 PM.jpg
    Photo 1-23-2016, 3 04 31 PM.jpg
    958.3 KB · Views: 10
  • Photo 1-23-2016, 9 45 14 PM.jpg
    Photo 1-23-2016, 9 45 14 PM.jpg
    773.3 KB · Views: 10
  • Photo 1-23-2016, 9 45 46 PM.jpg
    Photo 1-23-2016, 9 45 46 PM.jpg
    968 KB · Views: 11
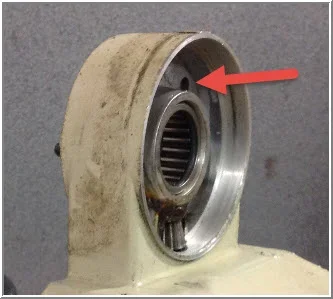
Good job, I'm happy it found a good home. You'll love it. I'm still curious how it attaches to table end though, if not using the mounting plate. These internal holes maybe?
 

Attachments

  • 1-23-2016 0001.webp
    1-23-2016 0001.webp
    14.6 KB · Views: 2
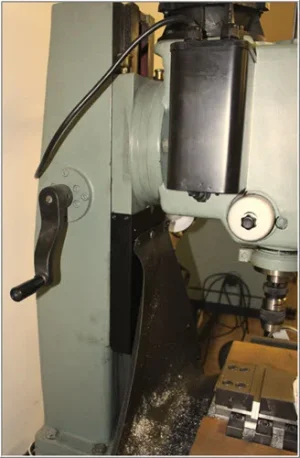
Here is the rack & pinion crank handle on my RF45 mill. I figure I would have to 1) make an extension stub for the shaft & 2) replace the existing flange with a thicker hybrid that extends further out but replicates the bearings/bushings..whatever is behind there. So definitely not a 5 min job. Option-2 would be use the original power units bolt flange & integrate that by drilling holes in the columns through spacers studs etc. Meh! - cranking is really not that bad, I can live with the exercise.
 

Attachments

  • 2016-01-22_21-58-01.webp
    2016-01-22_21-58-01.webp
    22.4 KB · Views: 8
I see, that would take a bit of working for sure! The way it mounts is the end cap on the mill has 2 M6 theaded holes. The Power feed has like 8'ish holes that you use for mounting and they are located under behind the bevel gear, just like the picture you attached. This one has many mounting holes which I suppose are there to provide options for various mills..... So you slide the power unit on, fasten the 2 screws which secures the unit to the mill table / end cap and then the bevel gear slides over the leadscrew shaft, hand wheel goes back on and Bobs your uncle! It took a bit of tweaking but all in all it went on nicely! I am pleased with it! I actually used a piece of stainless to make the bushing between the leadscrew and the roller bearing in the power unit, since that it what I had handy in the right size. I found I got a fantastic finish in the bore by using a brazed carbide boring bar. Anyways, i'm off to bed. Will give this a full on test drive tomorrow. I have to cleanup all of the plasma cut edges on that AR400 plate that I cut so that's a perfect job to run the power feed for awhile.

Cheers!
 
Back
Top