• Scam Alert. Members are reminded to NOT send money to buy anything. Don't buy things remote and have it shipped - go get it yourself, pay in person, and take your equipment with you. Scammers have burned people on this forum. Urgency, secrecy, excuses, selling for friend, newish members, FUD, are RED FLAGS. A video conference call is not adequate assurance. Face to face interactions are required. Please report suspicions to the forum admins. Stay Safe - anyone can get scammed.

My first single point thread.

darrin1200

Darrin
Not sure if this is the right place for this.

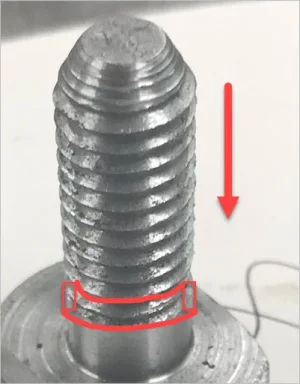
I needed a new lock down bolt for my cross-slide. I made it from a chunk of 7/8” mild steel. 3/8”x16 thread, with a T-head slightly curved to follow the rotation.
It’s the first time I have used my metal lathe to cut threads. It only took two try’s and I didn’t even crash it once.
My new veil sander worked great to shape the head.
It’s a little rough, but it works and I’m happy with it.

68C51AD1-4F1F-4C55-99FB-0D655C884E8C.jpeg
 
That's really good for a first try, it's really satisfying to be able to make the parts you need. Next is the left hand ACME thread ;)
The type steel used makes a huge difference to the finish.
 
That's really good for a first try, it's really satisfying to be able to make the parts you need. Next is the left hand ACME thread ;)
The type steel used makes a huge difference to the finish.
Thanks Mike.
While an acme thread is definitely in my future, I have some more walking to do before I run that project.
I’m not sure exactly what the bat is. I just played with a bunch of speed/feed combos, while I turned down from 7/8 to 38. It made it a good practice project.
 
Looks good. We all started from point zero, it only gets better from here. Are you threading in direction of arrow? if so, I recommend getting in the habit of pre-turning a relief groove for your tool to terminate within. Its good threading practice almost always as you can disengage within a comfortable margin. That saves on drama & maintaining delicate tool tips & the threads are essentially complete up to that groove. Threading on scrap is totally fine but just so you know, a lot of alloys like run-o-mill CRS is actually kind of crappy to turn a finish at the best of times. Threading is harder still because of the speed & feed. If you can get your hands on some 12L14 that will show the difference. You can thread, turn id down, try a different pitch on smaller OD etc. to use it up.
 

Attachments

  • EDT-2021-08-11 8.54.52 PM.webp
    EDT-2021-08-11 8.54.52 PM.webp
    21.3 KB · Views: 4
With hard to machine metal (like 1018, since it is gummy), one could also just do a partial thread single point and then finish it off with a die. The finish seems to be better that way.

Another method to consider is to thread away from the HS (using the threading tool upside down). One can use much higher speeds (what 1018 likes better) since there is no drama at the end of the cut because the tool runs “out into open space” giving you lots of time to disengage the treading op before bad things happen.

Nice job on your first thread - I remember in HS screwing up my hammer handle on the last pass. Cut off the messed up part and did it again. The handle was no longer to spec, but at least I had something to hand in for marking…
 
Another method to consider is to thread away from the HS (using the threading tool upside down). One can use much higher speeds (what 1018 likes better) since there is no drama at the end of the cut because the tool runs “out into open space” giving you lots of time to disengage the treading op before bad things happen.

Can describe this operation in more detail in the context of an external RH thread, please?
 
Last edited:
With hard to machine metal (like 1018, since it is gummy), one could also just do a partial thread single point and then finish it off with a die. The finish seems to be better that way.
Thanks RobinHood. I don’t know the steel, but it was sort of gummy. I was using a Craftex 3/8 triangle carbide insert.

Another method to consider is to thread away from the HS (using the threading tool upside down). One can use much higher speeds (what 1018 likes better) since there is no drama at the end of the cut because the tool runs “out into open space” giving you lots of time to disengage the treading op before bad things happen.

I never thought about threading left to right (off the work). It would ease up the nerves


That is an excellent thread Peter. I think I will print out this pictures and add them to my cheer sheets.
 
Can describe this operation in more detail in the context of an external RH thread, please?

In a nutshell:

Use a LH threading tool held upside down in your tool post. Set the compound to 30* (if you only want to cut on the rear flank and plunge in). Run the spindle in REV. Also run the lead screw in the same direction (to produce a RH thread). Start the tool off in the thread relieve groove (if you are using one). Engage on your mark and let the tool run off the end of the thread. Repeat until done.

Here is one of Joe Pie’s early videos explaining the whole process:

 
In a nutshell:
Use a LH threading tool held upside down in your tool post. Set the compound to 30* (if you only want to cut on the rear flank and plunge in). Run the spindle in REV. Also run the lead screw in the same direction (to produce a RH thread). Start the tool off in the thread relieve groove (if you are using one). Engage on your mark and let the tool run off the end of the thread. Repeat until done.

Thank You. You just confirmed what I had concluded. No choice but to run the spindle in reverse which I can't do with a threaded spindle.

Craig
 
Last edited:
Thank You. You just confirmed what I had concluded. No choice but to run the spindle in reverse which I can't do with a threaded chuck.

Craig
Could you turn the tool upside down, and feed it into the material from behind the work? You wouldn't have to reverse the spindle then.
 
Could you turn the tool upside down, and feed it into the material from behind the work? You wouldn't have to reverse the spindle then.

Nope, that configuration will cut a LH thread. Look at Peter's chart. All of the ext RH threads with the tool traveling away from the headstock have the spindle running in reverse.
 
Last edited:
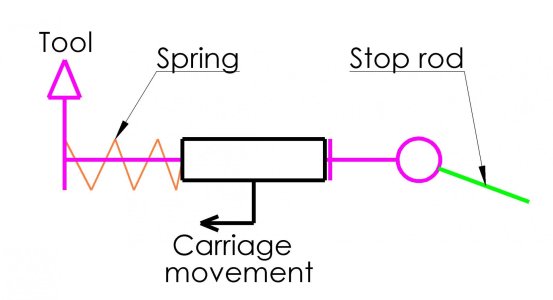
If you have lots of threading to do, you can make yourself a spring loaded slide to mount on the cross slide which is aligned with the longitudinal carriage travel. You mount your threading tool on it and set a stop either in front of the slide or by the tailstock end of the lathe. The slide doesn't stop advancing until it hits the stop. That way there is no chance of crashing the tool. That gives you time to either reverse the lathe spindle or disengage the threading handle. It looks kind of like this drawing from Jacque Maurel's website.
 

Attachments

  • Principe ME.jpg
    Principe ME.jpg
    86.5 KB · Views: 13
If you have lots of threading to do, you can make yourself a spring loaded slide to mount on the cross slide which is aligned with the longitudinal carriage travel. You mount your threading tool on it and set a stop either in front of the slide or by the tailstock end of the lathe. The slide doesn't stop advancing until it hits the stop. That way there is no chance of crashing the tool. That gives you time to either reverse the lathe spindle or disengage the threading handle. It looks kind of like this drawing from Jacque Maurel's website.

Got any more info on this John? I don't follow.
 
If you have lots of threading to do, you can make yourself a spring loaded slide to mount on the cross slide which is aligned with the longitudinal carriage travel. You mount your threading tool on it and set a stop either in front of the slide or by the tailstock end of the lathe. The slide doesn't stop advancing until it hits the stop. That way there is no chance of crashing the tool. That gives you time to either reverse the lathe spindle or disengage the threading handle. It looks kind of like this drawing from Jacque Maurel's website.

I normally cut a thread relief. But I am old so I cut the relief big enough to accommodate my reaction time.

I am intrigued with your idea too. I follow the idea, but am wondering how you manage to keep the threading tool rigidity up while on a spring loaded mount. What happens if the tool bit grabs a bit and stops advancing before it hits the stop?

Can you PM me too?
 
PM sent
You would, of course, still need a thread relief for the threading tool to stop in.
The tool is mounted on a rigidly designed slide that is spring loaded heavily enough to overcome any force other than a rigid end stop. The cutting action typically wants to pull the tool toward the spindle or at the very least is neutral in cutting action. When the end of the thread is reached, the tool stops advancing. The length of the rigid slide, thread pitch and spindle rpm determine how long you have to reverse or disengage the threading handle.
 
Back
Top