• Scam Alert. Members are reminded to NOT send money to buy anything. Don't buy things remote and have it shipped - go get it yourself, pay in person, and take your equipment with you. Scammers have burned people on this forum. Urgency, secrecy, excuses, selling for friend, newish members, FUD, are RED FLAGS. A video conference call is not adequate assurance. Face to face interactions are required. Please report suspicions to the forum admins. Stay Safe - anyone can get scammed.

Mini-fly cutter

BradH

Member
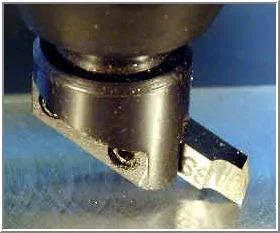
I have been working with my big fly-cutter for surfacing (does a great job!) but then I wanted to make a "small" radius (1" or so) in a project. After much mucking about I made a nice little flycutter that was incorrectly milled... the cutter would not be on the center of roation. Probably would work... but the redo is here... On the bench you can see the "failed" cutter.

A trial run tells me it should do the job. Will show pics of the project when it is complete...

Rough specs: the shaft is 0.75" to be held in an R8 collet... no flat for a "weldon shank" affair, but might be a good idea.

The head is approximately 1.1" diameter. Original size was good based on stock at hand and keeping the overall diameter big enough to handle the work at hand.

Used with 1/4" HSS tool - worked well. Figure with brazed carbide like the large cutter this little guy would make a great medium surfacing tool.

4mm set screws hold the tool... 3 is probably overkill.

P101015320110101_0011.JPG
 
Looks good. I think 'centering' the cutting edge is kind of a variable/relative thing anyway, because the edge/point that contacts the work may not actually be coincident with the rectangular tool shank even if the slot edge is no center. The cutting edge might be slightly behind center (like a self-ground HSS tool blank) or ahead of center (like typical brazed carbide tip cutter). Another design consideration is maybe angling the tool cutter slot so you have a bit of clearance. You aren't making big chips or anything to get hung up with the flat bottom, its more of a visual thing. I messed around with fly cutters & they can make some really nice finishes. Just like on a lathe, results can vary by the cutting tool nose radius & relief angle, feed & depth etc.
 

Attachments

  • 8-1-2015 0000.webp
    8-1-2015 0000.webp
    11.3 KB · Views: 8
Hi Peter:

Thanks for sharing your experiences. My big fly cutter does well for finish, it seems. This was for profiling... will reveal all soon.

I am confident that the off-center one will work fine for surfacing, for example. I re-did it because I want to be able to get a reasonable measurement of the tool position - going to use this to control the radius of a cut. Using no rake on the cutting tool should result in a fairly accurate measurement of the radius of the cutter... It is not a super-critical dimension (a boring head would be better if that were required) but was more about the project / process for me.

It is not clear from the image, but I actually milled the tool holding slot about 10 degrees off of parallel. That should provide sufficient clearance for the task at hand. The body of the tool is square to the work, however, but cuts will be light so no problems expected. The 10 degrees pushes the cutting edge below the body, providing clearance.

B.
 
P101016520110101_0005.JPG
P101016920110101_0009.JPG
OK... here we go! The little profile cutter milling away happily... and the final project - a spindle square.
 
Spindle square is a great project. I'll have to add it to the list!

How do you keep the gauges in the block?
 
I ran a slitting saw along the bore and drilled and tapped for a 3mm screw. The screw clamps the indicators in their bores.

This is actually a "short" model I made for a friend with a small mill. Mine is a longer one. Will get a shot of the slit / lock screw.
 
Back
Top