• Scam Alert. Members are reminded to NOT send money to buy anything. Don't buy things remote and have it shipped - go get it yourself, pay in person, and take your equipment with you. Scammers have burned people on this forum. Urgency, secrecy, excuses, selling for friend, newish members, FUD, are RED FLAGS. A video conference call is not adequate assurance. Face to face interactions are required. Please report suspicions to the forum admins. Stay Safe - anyone can get scammed.

Milling vise work stop "Doubleboost Style".... kinda

BradH

Member
Here is my milling vise mounted work stop.

Overall pretty happy, but the brass seems to be quite slippery on the rod. The rod fitted to the vise is an M8 internal hex fastener with the head turned down. The rest of the rods are left overs from a shift rod kit for buddy's old car... his mistake = my free material!

Brad.
P101016120110101_0001.JPG
 
Yup - set screw would have been easy, but the idea is that the knurled brass bit pulls a threaded piece up, locking the rods. Will get pics of pieces...
Each main body holds two threaded pieces, and the knurled bit is a nut.
 
Yup - set screw would have been easy, but the idea is that the knurled brass bit pulls a threaded piece up, locking the rods. Will get pics of pieces...
Each main body holds two threaded pieces, and the knurled bit is a nut.
That sounds way better then a set screw for sure.

Do send over piece pics! Any specific reason for the brass as opposed to steel or aluminum?
 
I'll take a pic of my vise stop, its not quite as elaborate, but does the job. I use it religiously, just makes setup more accurate. Not just for replicating multiple parts, but also just removing a single part like to take measurements out of the vise if that's required.

Re the set screw retention method, that's what I did on mine for simplicity & I started to notice a series of screw indentation marks along the .250" diameter rod. I milled a flat more-so to give the setscrew more bite surface, but it just looked ugly. Fortunately the rod was O1 tool steel, so bit of dressing & it became my first torch & quench & temper hardening project. That seemed to work, no more bite marks. I made a few other post profiles like a skinny one for thin parts.

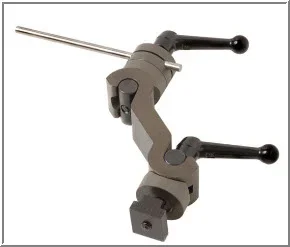
For more unconventional mill setups like longer stock extending out of the vise or odd-ball parts, I was eyeballing one of these positioning stops forever & put on my project to-do list. They popped up on sale one day, I had a credit coupon so bit the bullet & ordered. Its actually well made & really useful tool. Hopefully you can see the same non-setcrew clamping mechanism, which is very secure & doesn't mar the rod. http://www.traverscanada.com/five-axis-single-milling-stop/p/99-008-260/
 

Attachments

  • 9-1-2015 0000.webp
    9-1-2015 0000.webp
    4.3 KB · Views: 21
@JW: no specific reason except that I like brass, and had some 3/4" stock left from making brass fingers for my fixed steady...

@ Peter T: Mine is threaded directly into the vise. It is the dents I didn't want... so decided to try to build it like a dial indicator stand connection. I looked at doing a slit and screw clamp too, but was thinking of something that wouldn't need tools to set up.

Of course the handles on the table mounted unit don't need tools either.
 
but the brass seems to be quite slippery on the rod
I was reading about the self lubricating properties of brass the other day, makes sense!

How did you mount the stop to your vise? Just drill and tap a hole?
 
Yes, I drilled and tapped each side, so it can be located on either side as required.

I am thinking that maybe drilling through the clamping bits I could get less surface area and therefore greater holding power (higher pressure) on the clamps... will have to think about that. They are a bit fussy to make - if I mess them up.
 
Yup - set screw would have been easy, but the idea is that the knurled brass bit pulls a threaded piece up, locking the rods. Will get pics of pieces...
Each main body holds two threaded pieces, and the knurled bit is a nut.

BradH,
Your vise stop made it to "HomeMadeTools.net" today.

You offered some pics of the clamping mechanism - any chance you still have those a year later?
(even a sketch or link would be helpful.)

How is the slippery brass a year into the clamps?

Thanks.

KarlH
 
Back
Top