• Scam Alert. Members are reminded to NOT send money to buy anything. Don't buy things remote and have it shipped - go get it yourself, pay in person, and take your equipment with you. Scammers have burned people on this forum. Urgency, secrecy, excuses, selling for friend, newish members, FUD, are RED FLAGS. A video conference call is not adequate assurance. Face to face interactions are required. Please report suspicions to the forum admins. Stay Safe - anyone can get scammed.

Lathe lead screw question

DPittman

Ultra Member
So my little lathe has a 16 tpi lead screw and it is a tricky sucker to engage the half nut right on the indicator line as you can be off just a bit and hardly notice it. There is 8 spots I can engage the half nut between the half nut thread indicator markings. What is typical? (If there is such a thing as typical)
I guess if the half nut thread indicator had a huge dial on it then it would make it easier to see the small differences between being on spot or just one thread off.
 
My threading dial also has eight divisions; 4 are mumbered numbered, the in-between ones are just lines.
 
Last edited:
if the half nut thread indicator had a huge dial on it then it would make it easier to see
I actually did just that, I put a second and larger diameter dial face on top of the small original one.
Not sure what your “small lathe” is but I have an Atlas 618 and the thread dial is probably about 3/4” in diameter. There’s only four hash marks on it but still, trying to hit the mark on the small diameter was tricky for me at first. So I just threw together a bigger dial out of some 1/8” thick aluminum and sticky-taped it on top of the original one. It worked fine and as I recall it was easier to get the timing to hit the mark as it came around.
Not surprisingly the double-sided tape adhesive let go after a while as I figured it would but by that time my confidence with the timing had improved so I never replaced it. I’m sure an epoxy would work way better and would still be reversible with a bit of heat should it ever need to come off.
As far as hitting the precise mark goes, one does get used to it and also the nuances of a particular machine. Mine engagement point tends to lead the mark a bit so I have to strike a bit before the lines actually line up but it’s not a big deal. I think I could shim the attachment point and get the alignment closer but I’ve gotten used to it am not going to fuss with it.
 
This is the instructions for my lathe (Lead Screw with 8 TPI):

The Dial on the left front of the Apron has 4 divisions marked 1, 2, 3, 4, and 4 unmarked half-divisions. A 4"
traverse of the carriage gives one complete turn of this Dial.
(i) When the number of threads per inch is divisible by 8, disregard the Dial.
(ii) When the thread has an even number of T.P.I., e.g., 12, 22, T.P.I., engage the Half-Nut at any graduation.
(iii) For an odd number of T.P.I., e.g., 11, 13, T.P.I., engage only on numbered graduations.
(iv) For half T.P.I., e.g., 3 1/2, 4 1/2 T.P.I., engage the Half-Nut only on opposite numbered lines, i.e., 1 and 3, or
2 and 4.

The dial is maybe 1.5" in diameter. You have to anticipate a bit to get things happening on the line all the time. With 16 TPI I could see being one thread off would be easier to do.
 
I actually did just that, I put a second and larger diameter dial face on top of the small original one.
Not sure what your “small lathe” is but I have an Atlas 618 and the thread dial is probably about 3/4” in diameter. There’s only four hash marks on it but still, trying to hit the mark on the small diameter was tricky for me at first. So I just threw together a bigger dial out of some 1/8” thick aluminum and sticky-taped it on top of the original one. It worked fine and as I recall it was easier to get the timing to hit the mark as it came around.
Not surprisingly the double-sided tape adhesive let go after a while as I figured it would but by that time my confidence with the timing had improved so I never replaced it. I’m sure an epoxy would work way better and would still be reversible with a bit of heat should it ever need to come off.
As far as hitting the precise mark goes, one does get used to it and also the nuances of a particular machine. Mine engagement point tends to lead the mark a bit so I have to strike a bit before the lines actually line up but it’s not a big deal. I think I could shim the attachment point and get the alignment closer but I’ve gotten used to it am not going to fuss with it.
Yes I had a 618 also and remember that it had a very small dial. I guess mine now in comparison to that one would be considered large, however bigger yet would make it better yet! The 8 spots I can engage the half nut in between the hash marks have no lines whatsoever so its a bit hard to tell if your on the mark or not.
 
This is the instructions for my lathe (Lead Screw with 8 TPI):

The Dial on the left front of the Apron has 4 divisions marked 1, 2, 3, 4, and 4 unmarked half-divisions. A 4"
traverse of the carriage gives one complete turn of this Dial.
(i) When the number of threads per inch is divisible by 8, disregard the Dial.
(ii) When the thread has an even number of T.P.I., e.g., 12, 22, T.P.I., engage the Half-Nut at any graduation.
(iii) For an odd number of T.P.I., e.g., 11, 13, T.P.I., engage only on numbered graduations.
(iv) For half T.P.I., e.g., 3 1/2, 4 1/2 T.P.I., engage the Half-Nut only on opposite numbered lines, i.e., 1 and 3, or
2 and 4.

The dial is maybe 1.5" in diameter. You have to anticipate a bit to get things happening on the line all the time. With 16 TPI I could see being one thread off would be easier to do.
I think mine is similar protocol.
I read an old post on another forum that the poster felt that the fine lead screw thread was good to help ensure accurate threads. I don't agree with that statement because you are either on spot or your not! The fine thread lead screw just makes it harder to see that you are off and I guess technically you won't be off as much, but a bad thread is a bad thread.
 
Well yes if you're threading towards the headstock you usually have quite a bit of leeway to engage and pull back out if not quite spot on, but if you're threading up to a shoulder disengaging in time can certainly be a butt clencher.
 
DPittman - what machine do you have?

YYC - my SM9 has 4 divisions marked 1, 2, 3, 4, and 4 unmarked half-divisions. Has your machine had a mod of some sort?
 
DPittman - what machine do you have?

YYC - my SM9 has 4 divisions marked 1, 2, 3, 4, and 4 unmarked half-divisions. Has your machine had a mod of some sort?

No, you're right, I can't count:confused: 4 numbered divisions with 1/2 divisions.
 
but if you're threading up to a shoulder disengaging in time can certainly be a butt clencher.

Luckily I can stop threading and have a big pulley I can turn to thread to a shoulder.
 
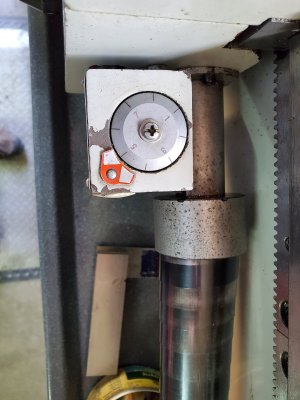
Can you post a picture of it @DPittman?
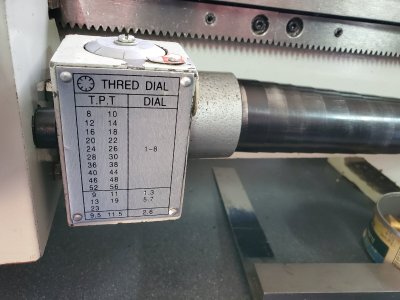
My dial measures 30mm across the face ( I guess not so small) .

Don't ya like how they spell "Thread" and instead of T.P.I. it's T.P.T.

20210403_093642.jpg20210403_093622.jpg
 
Chinglish
Chinglish is slang for spoken or written English language that is influenced by a Chinese language.
In Hong Kong, Macau, Guangdong and Guangxi, the term "Chinglish" refers mainly to Cantonese-influenced
English. This term is commonly applied to ungrammatical or nonsensical English in Chinese contexts,
and may have pejorative or deprecating connotations.
Yes I'm quite familiar with "chinglish" , my shop has quite the library of manuals written in chinglish. LOL
 
There is lots of room to make the dial twice the size. You could probably use a soup can lid. Mark and drill for a center hole. Put your marks on the circumference, and bolt it on top of the existing dial using the screw that is already there. Extend the index arrow out underneath the new, larger dial and you are done.
 
Aside from the thread dial, a big part of the challenge is that a 16 TPI lead screw presents twice number of potential engagement points as an 8 TPI lead screw.
I’d recommend slowing down your spindle speed perhaps and as always there’s no substitute for practice.
I’ve stood in front of my lathe, with a length of stock chucked up and marked to show the end of the thread and run through the threading motions for a good 45 minutes without cutting a single thread.


Sent from my iPhone using Tapatalk
 
Back
Top