• Scam Alert. Members are reminded to NOT send money to buy anything. Don't buy things remote and have it shipped - go get it yourself, pay in person, and take your equipment with you. Scammers have burned people on this forum. Urgency, secrecy, excuses, selling for friend, newish members, FUD, are RED FLAGS. A video conference call is not adequate assurance. Face to face interactions are required. Please report suspicions to the forum admins. Stay Safe - anyone can get scammed.

Lathe cutting a taper

Okay, here's another crazy one. My soon to be reviewed lathe is cutting a taper. In 3" it will taper .010" (OD). The cross slide was locked during cutting. Depth of cut has no effect on taper. Changing tool posts did nothing. Compound is also locked (tight).

The machine is not level but the bed is level (no twist).

When I questioned it, I was advised to tighten up the carriage. Specifically the carriage lock bolt and the clamp bolt at the rear of the carriage.

I'm not imagining thinking that these two so called solutions are crazy and not related right?

Seems to me the headstock is out of alignment. I suppose they are skirting around reality knowing the whole machine will need to be disassembled to tweak it. The two rear headstock bolts are buried inside the casting.
 
An offset tailstock will produce a taper. Are you using the tailstock in this case?
 
Last edited:
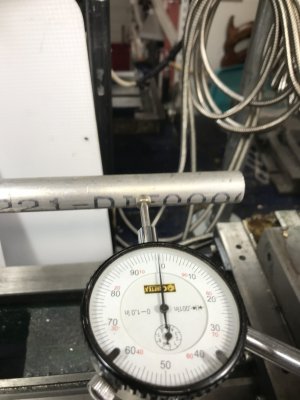
put your round bar in the chuck. put a dial indicator on the cross slide, set the indicator pin as close to centre height as possible. Start the cross slide at the tailstock end of the bar. move the cross slide inwards to set the dial indicator at an easy-to-read zero point. move the cross slide towards the chuck. if you measure without using the compound it removes that possible flex, and will immediately show if the headstock is out of alignment. using round bar with the indicator on centre will identify if the misalignment is vertical or horizontal.

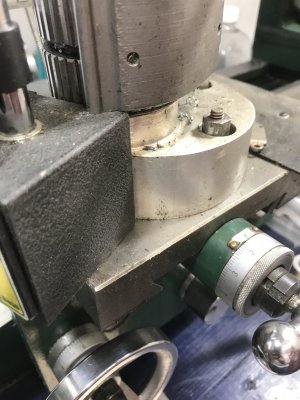
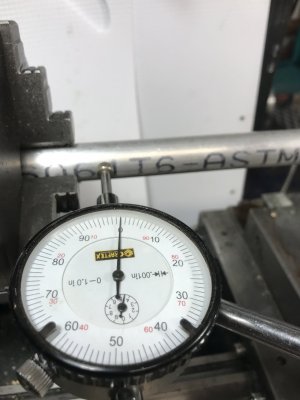
In the photos, I‘ve locked the cross slide by pulling it up tight against the outer travel stop, and I’m not using the compound. The gauge bar is just a chunk of 3/4” aluminum, and it’s reading within 0.0015” without doing any special tweaking.

Rotate the chuck 90*, do it again. Then three more 90* rotations. If the taper is always the same amount, it’s the headstock. if it changes at each rotation, it’s the chuck.
 

Attachments

  • D03B9B18-B153-43DD-9A79-82862A5AD790.jpeg
    D03B9B18-B153-43DD-9A79-82862A5AD790.jpeg
    234.1 KB · Views: 9
  • 5EC708CD-3EDF-4E2D-8320-FCAB4CBB8C5D.jpeg
    5EC708CD-3EDF-4E2D-8320-FCAB4CBB8C5D.jpeg
    265.2 KB · Views: 8
  • 5EE8034A-92C6-45BE-9EF5-57E268ACD2A4.jpeg
    5EE8034A-92C6-45BE-9EF5-57E268ACD2A4.jpeg
    389.6 KB · Views: 8
Last edited:
Okay, here's another crazy one. My soon to be reviewed lathe is cutting a taper. In 3" it will taper .010" (OD). The cross slide was locked during cutting. Depth of cut has no effect on taper. Changing tool posts did nothing. Compound is also locked (tight).

The machine is not level but the bed is level (no twist).

When I questioned it, I was advised to tighten up the carriage. Specifically the carriage lock bolt and the clamp bolt at the rear of the carriage.

I'm not imagining thinking that these two so called solutions are crazy and not related right?

Seems to me the headstock is out of alignment. I suppose they are skirting around reality knowing the whole machine will need to be disassembled to tweak it. The two rear headstock bolts are buried inside the casting.
This is an 8X16 lathe, right? If you extrapolate, that means the axis of rotation is misaligned by over 0.050" along the working length of the machine. That's enormous.

I would guess that there is a chip or burr messing up the alignment of the headstock to the ways. Do some careful measurements of both the vertical and horizontal alignment to the ways before removing the headstock. Maybe the source of the problem will be obvious but you may also end up 'reconditioning' the machine before using it. Ugh. I take it that getting a replacement is prohibitively expensive or time-consuming?

BTW, you say the bed has "no twist". To what precision are you doing that measurement? I don't expect that the bed could be twisted enough to give the results you've quoted but it would help to understand how you ruled out that issue.

In addition, was there an inspection report with the machine? I know these are often a work of fiction but it might provide a little leverage in dealing with the seller.

Craig
(Reports like this are particularly troubling as I'm waiting on a new import lathe!)
 
the headstock is not aligned with the ways
Right, seems obvious but they can't see that.
This is an 8X16 lathe, right? If you extrapolate, that means the axis of rotation is misaligned by over 0.050" along the working length of the machine. That's enormous.

I would guess that there is a chip or burr messing up the alignment of the headstock to the ways. Do some careful measurements of both the vertical and horizontal alignment to the ways before removing the headstock. Maybe the source of the problem will be obvious but you may also end up 'reconditioning' the machine before using it. Ugh. I take it that getting a replacement is prohibitively expensive or time-consuming?

BTW, you say the bed has "no twist". To what precision are you doing that measurement? I don't expect that the bed could be twisted enough to give the results you've quoted but it would help to understand how you ruled out that issue.

In addition, was there an inspection report with the machine? I know these are often a work of fiction but it might provide a little leverage in dealing with the seller.

Craig
(Reports like this are particularly troubling as I'm waiting on a new import lathe!)

Yes 8x16, and yep, that is really bad. Even at the 3" it's bad enough that I can't build what I need.

I have checked the side to side but that's a great idea checking the up and down.

Getting a replacement is up to them, unless I file a paypal claim. This lathe also came with damage on the ways. See another thread on that. Minor as per opinion. This really is the question I am struggling with at the moment. Between this alignment, damage on the ways, rear spindle bearing heating up. I don't know how far I should push this... I want to throw it back at them but I know it'll be a good one if I put a lot of time into fixing it. I shouldn't have to do that.

Re the twist. I used a 6" precision level on the ways, under the chuck and at the tail. It's as close to .0002" as I could get it, probably around .0006" or so.

Inspection report... okay, that actually made me smile.
 
put your round bar in the chuck. put a dial indicator on the cross slide, set the indicator pin as close to centre height as possible. Start the cross slide at the tailstock end of the bar. move the cross slide inwards to set the dial indicator at an easy-to-read zero point. move the cross slide towards the chuck. if you measure without using the compound it removes that possible flex, and will immediately show if the headstock is out of alignment. using round bar with the indicator on centre will identify if the misalignment is vertical or horizontal.

In the photos, I‘ve locked the cross slide by pulling it up tight against the outer travel stop, and I’m not using the compound. The gauge bar is just a chunk of 3/4” aluminum, and it’s reading within 0.0015” without doing any special tweaking.

Rotate the chuck 90*, do it again. Then three more 90* rotations. If the taper is always the same amount, it’s the headstock. if it changes at each rotation, it’s the chuck.
I don't have much stock around and what I do is not straight.

No matter how many times I chuck the last cut piece I get the exact same .005" on the dial when I run it on its side.

Vertical is dead nuts, well almost. @trlvn
 
If you"re firm enough with them they will probably give a refund of some sort to keep it, otherwise I'd push for a replacement. my 2 cents.
I wish firmness worked with them, the only way I will have any leverage is by filing a claim through PayPal. I only have a week left to file one as it took 4+ months to be delivered.
@opensourcefan who was the vendor?
 
OMG!!! They won't stop correlating the spindle and chuck runout to this issue. They're driving me crazy. They are saying because my spindle has no runout the headstock is fine. They say if the headstock was out of alignment the a dial indicator on the spindle while rotating would be going crazy.

They also said using my 4 jaw to hold round material is wrong and it should be used to hold not round material!!!

They just don't get it, It's like I'm talking to a tree.
 
Get this... They wanted me to redo my test again but at a slower speed to eliminate "inertia" due to a out of round part causing the taper....

I used the 4 jaw this time and dialed it in to .0005" exact same result of course.

They then proceeded to tell me that I shouldn't use the 4 jaw because it's not self centering and that I should be using the 3 jaw instead!

Am I losing my mind...? Is this reality?
 
If the 4 jaw is terrible - i.e. cheap china, and if you zero it at close to the chuck, the bar indeed may be a taper further out.

This is why getting quality 4 jaw is more important then quality 3 jaw.

use 3 jaw as they are asking and cut the bar.
 
Back
Top