• Scam Alert. Members are reminded to NOT send money to buy anything. Don't buy things remote and have it shipped - go get it yourself, pay in person, and take your equipment with you. Scammers have burned people on this forum. Urgency, secrecy, excuses, selling for friend, newish members, FUD, are RED FLAGS. A video conference call is not adequate assurance. Face to face interactions are required. Please report suspicions to the forum admins. Stay Safe - anyone can get scammed.

Hydraulic press upgrades

Tmate

Well-Known Member
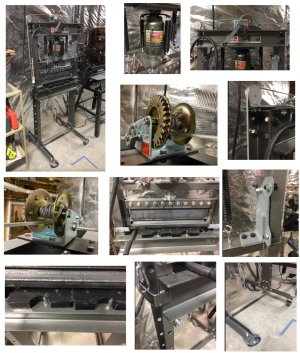
Here are some mods I made to my 20 ton Harbor Freight press:

Air/hydraulic jack, table winch, guide rollers, casters, pinned table plates, release knob, grade 8 frame bolts, finger brake, support pin shaft collars.

Also, I have found it obnoxious to give up my ability to use my press when it is occupied by my Swag finger brake. As useful as the brake is, it is tiresome to have to uninstall it every time the press is needed as a press.

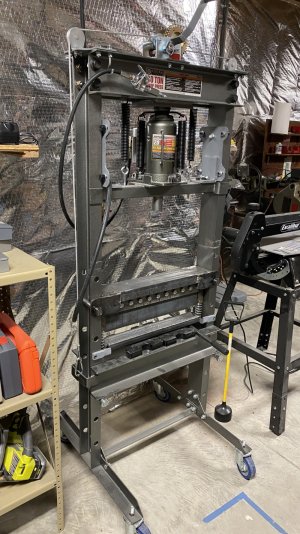
I'm currently fixing this problem. If you have a winch installed to raise and lower the deck, as I do, my fix is to lower the existing deck (table) way down, and fabricate a second deck from a length of channel. It can be quickly inserted above the brake in the frame and used for pressing. The second deck can be made as sturdy as necessary for the pressing you intend to do. Use a wooden block to raise the pressing surface as needed. I'm using 4" x 7.25 channel, which is in the process of being delivered. See second image.
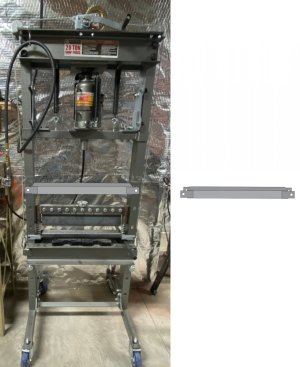
press mods.jpg lower brake.jpg
 
Nice press.

When the snow melts, and I can bring my press in from the barn to the garage, one of the first things I want to make for it, is a press brake like yours. The swag stuff is pretty $$$ by the time it gets up here, but should only be a nice easy weekend project to roll my own (famous last words).

So far I've only used mine for bearings, but they're a handy thing to have with some more attachements, and I'd like to start using it more. Some dimple dies are on the list too.
 
Awesome press! I like your H frame, I built a 20 ton hydraulic press a while ago using more of a cube design, to give me more area under the press for my work. However the top of the frame did not hold its shape against the 20 tons of force when using the press more aggressive. I'm thinking of using some thick u Chanel for the top, or I may have to just go with a more simple H frame.
 
My shop built press needs a bit of overhaul. Top is made of 2 pieces of heavy angle iron welded together to form a T, this was inverted and welded in to the frame. Worked good with a 20 ton jack, then a relative put in a 40 ton pneumatic jack for some job and bent the T upwards. The angle iron is 5/8 inch thick, so they had some serious pressure going on.
 
Worked good with a 20 ton jack, then a relative put in a 40 ton pneumatic jack for some job and bent the T upwards. The angle iron is 5/8 inch thick, so they had some serious pressure going on.

Yup, 80,000 lbs. At an average of 4000 each, that's the equivalent of 20 cars sitting on that press ram. Ya, that's some serious pressure......
 
Love the work, We have the same harbor freight press !
You took a 200$ press and made it 2K with all your hard work. Great idea on the guides.
 
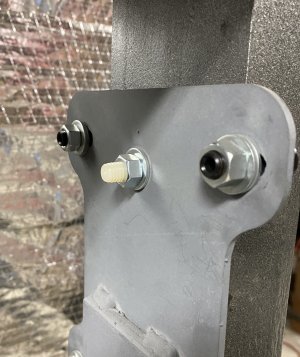
Nice! Like the guides, too. Between the top rollers, you have another washer/nut on some light coloured, threaded material. What's going on behind the scene there?
 
My 20 T has the exact same framework but uses a single acting hyd ram attached to the top beams. The ram is operated by a porta-press style pump...slow but efficient. I dont think I have had the thing pressured up beyond 15 T. That handle gets extremely hard to operate after 12 tons, after 15 I think I might have to jump on the handle to get more pressure. One nice feature on mine that I dont see on the one in the photos is a pressure gauge showing force applied, man that slim little hyd hose sure gets tight and stiff as a rod when pressure is applied.
Your fixtures & changes are very well done and sure look "usable & needed" with that bottle jack set-up but Im glad I have the ram instead, I cant see any benefits or needs to do similar.
 
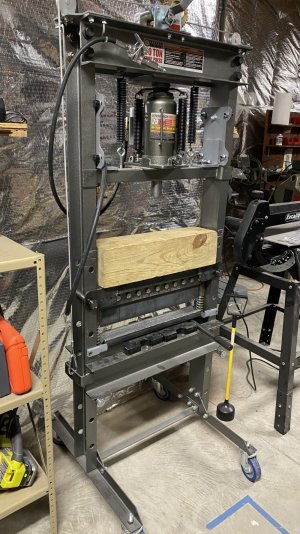
Here the 2nd table is installed in the press above the lowered Swag brake. Two of the height adjustment frame hole levels are still available above the brake. The 6x6 block of wood acts as a spacer, and adds stiffness if needed. The 18 lb. table can be removed and the brake raised for use in about 5 minutes time. The brake bolts to the frame in its raised position, which takes about 3 out of the 5 minutes.

2nd table.jpg with spacer block.jpg
 
Looking at your guide plate rollers, I was thinking of just using a 608 2RS bearing or similar. Yours aren't just a roller bearing, though.
 
Looking at your guide plate rollers, I was thinking of just using a 608 2RS bearing or similar. Yours aren't just a roller bearing, though.

Cam followers!
 
Back
Top