• Scam Alert. Members are reminded to NOT send money to buy anything. Don't buy things remote and have it shipped - go get it yourself, pay in person, and take your equipment with you. Scammers have burned people on this forum. Urgency, secrecy, excuses, selling for friend, newish members, FUD, are RED FLAGS. A video conference call is not adequate assurance. Face to face interactions are required. Please report suspicions to the forum admins. Stay Safe - anyone can get scammed.

How (and How Much) Do You Use Your 3D Printer?

Tecnico

(Dave)
Premium Member
It seems my eyes have caught the shiny object of 3D printing which up to now I have been studiously avoiding because it's a black hole so I have a few early on the learning curve questions to toss out there. Maybe this thread can be a catch all for what's new/hot in the game too?

Anyhow, to kick it off, some fundamentals; how much use are you making of your 3DP? Is it worth having one? Are there lots of useful little things that pop up that keep it from gathering dust?

Are these things being printed because you have a hammer and now everything looks like a nail or is it because now that you have the hammer, it opens up a whole new world of genuine uses you never imagined? Are you making things that you could pick up cheep in a trip to town but it's more fun to print them or are they things that aren't just laying on the shelf to buy? I don't see myself printing key rings.

What about materials? One of the reasons home shop 3DPs haven't caught my attention more has been the relatively flimsy prints that low end machines can make out of material like PLA (my impression). I see now that more capable machines can print ABS, PETG and ASA which are more structural grades, is the print cohesion anywhere the strength of the base material or do the layers separate? I also see the ability to 3DP Thermo-Plastic Elastomers (TPEs) which is very interesting for custom weatherproofing things.

For more capable machines that can print the more structural grades and TPEs, does anyone have any insight into what machines are well regarded in the market?

I feel the pull of a black hole in the distance...........:oops:

D :cool:
 
I bought my Ender 3v2 to build my PrintNC CNC router. Totally worth it for that alone. I also used it to print all the pieces for my laser. I’ve used it periodically since then to make various and sundry things for the shop. I would never get rid of it.
 
3D printing structural materials is not a problem for a properly configured printer. I print with ASA, ABS, polycarbonate, Nylons, and flexible materials such as TPU and TPE.

Now getting to the point of printing RELIABLY is the gotcha. Each type of filament behaves slightly differently. I'm not just talking about melting point, but also bed adhesion, retraction and stringing, shrinkage and warping and many other details.

Reliable printing means taking all the variables out of the process.

First, the printer should be shrouded, to stabilize the ambient temperature around the print. Look for a fully enclosed printer or consider making a hood. Many materials such as ABS will shrink as the print becomes taller and farther from the hot bed. The shroud will substantially reduce this warping which is also the primary cause of the print breaking free of the bed.

Second, the print bed must be FLAT, heat uniformly and be designed for the widest possible range of filaments to stick to the surface. Personally I prefer a glass plate, which I spray with a film of Wolfbite - a sticky, water soluble polymer. This works for everything from TPU to Nylon910, but not POM (acetyl) which requires brown paper.

Third, the extruder drive must be as close as possible to the hot end. Many filaments are very soft and flexible, so they do not respond well to being pushed into the bowden tube. The direct drive extruders such as the MicroSwiss products allow filaments such as TPU to be used reliably.

Fourth, the software used to control the details of the print production is worth investing in. There are plenty of apps out there to control the printer, but many people avoid this step by generating a machine-specific G-Code directly from Fusion360 for example. But using a 3D printing app, such as Simplify3D allows you to tweak the settings during printing and it allows you to manage and control several types of printers at the same time.

And fifth - look after the filament - it must be kept dry or there will be microbubbles and inclusions in the print, or worse, the filament will break frequently. Investing in a filament dryer is well worthwhile if you are doing any commercial work.

My current printer is a highly modified Ender 5Pro, fully enclosed, with the MicroSwiss extruder, Borosilicate glass plate, BLTouch auto levelling and a tungsten 0.6mm nozzle. I generally print ASA and polycarbonate at 0.15mm layer thickness.

Enjoy the journey!
 
Last edited:
I smell a rabbit hole...
For some, you are correct, suddenly everything looks like a nail.
But as @Arbutus and @David_R8 stated they are incredibly handy for making things that would otherwise be impossible or very difficult.
Making patterns for casting has become easier with a 3D printer compared to making them from wood.
I needed retaining clips to hold PC boards in place. Couldn't be metal. To make out of plastic on the mill would have been possible but a lot more work.
I talk to my 3D printers using a Raspberry Pi running OctoPi which connects to the USB port of the printer controller. Via WiFi Ethernet I use a web browser to interface to the Pi. I can drag and drop a new G-Code print onto the user interface. Set up whatever might be needed that isn't done by the sliced drawing to G-Code interface.
Then print and even watch what's being printed with a camera from another room.
Be warned though. The fun of printing other peoples .stl files becomes boring after a while. To make the 3D printer truly useful the real task is becoming good at CAD.
 
I talk to my 3D printers using a Raspberry Pi running OctoPi which connects to the USB port of the printer controller. Via WiFi Ethernet I use a web browser to interface to the Pi. I can drag and drop a new G-Code print onto the user interface. Set up whatever might be needed that isn't done by the sliced drawing to G-Code interface.
Then print and even watch what's being printed with a camera from another room.
I do a similar thing but with a device from Cyberpunk.
 
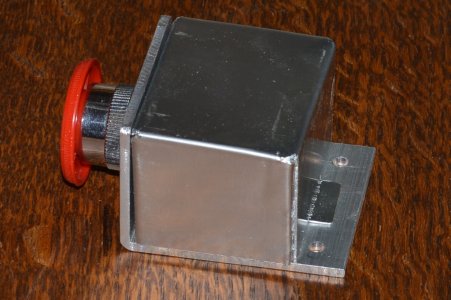
When you don't have a 3D printer but you have a 3:1 sheet metal roll, shear and bender plus a separate corner notcher and other sheet metal hand tools the direction to build a cover over an ESTOP switch might be this way:
ESTOP-CoverMetal.jpg

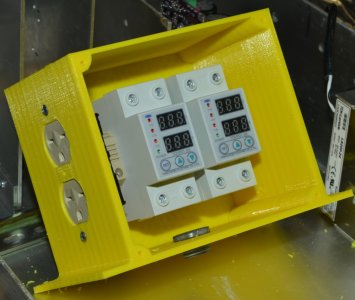
But once the 3D printer arrives it starts to be easier to make things out of plastic including the holes for the duplex outlet. One controlled by the master switch and the other under ESTOP control. So the PC stays alive while ESTOP is ON but power to the motors has been removed.
OutletBox-3D-1b.jpg

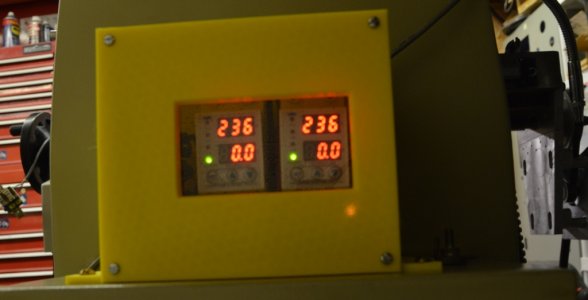
And I can look at power consumption although in this shot nothing is plugged in.
OutletBox-3D-1g.jpg

So yes, I've drifted over to the dark side... a bit...
 
Good discussion so far, lots of good tunnels to follow in the rabbit hole.........some I have read about so far.

@Arbutus , is your borosilicate glass bed plate mounted on the original heated plate as a layer or did you replace what was there to start with? The glass plate is counterintuitive because glass and borosilicate in particular has a much lower thermal coefficient of expansion compared to plastics so unless they're maintained carefully the plastic would naturally want to split off the glass. POM on paper sounds interesting, do you Wolfbite the paper to the glass then prep it for the POM?

@jcdammeyer , interesting take on the junction box. My go to would be like a Hammond box I have on order for the controls of my drill press (ex treadmill)
controller/user interface. It's something like $12 but not custom to the application.

Keep it coming!

D :cool:
 
Fourth, the software used to control the details of the print production is worth investing in. There are many apps out there and many people avoid this step by generating a machine-specific G-Code directly from Fusion360 for example. But using a 3D printing app, such as Simplify3D allows you to tweak the settings during printing and it allows you to manage and control several types of printers at the same time.
I am close to finally setting up the farm. Since I now have 2 brands, with a third on the horizon... This software is what I am going to get for sure. I have been on the post but waiting 3 weeks my shop will be filled with all the elements. One of my sales teams from Toronto strictly uses Simplify a the language of choice, so this builds confidence ..

Be warned though. The fun of printing other peoples .stl files becomes boring after a while. To make the 3D printer truly useful the real task is becoming good at CAD.
This is a department I am good with,,, I have downloaded from thingiverse and usually redraw them. Reason being is the quality is sacrificed to have a small file. On my CAD, I will expand to metric and triangulate the model at a 0.0001 tolerance with an angular tolerance of 0.01. This will make a large file, but no jaggs. Quality starts with a good file.
 
Last edited:
@jcdammeyer , interesting take on the junction box. My go to would be like a Hammond box I have on order for the controls of my drill press (ex treadmill)
controller/user interface. It's something like $12 but not custom to the application.
Thing is for less than $12 I could also have used my 3:1 sheet metal tool. Instead I would have just cut a rectangular hole like a regular outlet box and put a cover plate on it.

I think the problem is, and others may or may not agree, by the time you've drawn it out with your 3D parametric CAD the process to an STL file and then 3D printed overnight takes so much less time. Assuming you want to build from drawings and not a sketch on the back of an envelope.

One of the reasons way back when I first bought AlibreCAD was that it had a sheet metal feature. To be able to build a part up as sheet metal and then flatten it. And it included the bend lines taking into account bend radius and sheet metal K factor. But like all programs it requires regular use or what you get takes a long time to draw and may have errors when you try to build it. The 3D printing ends up easier.

Some people even take the 3D printing with casting to the extreme of lost PLA and the resulting casting comes out looking like metal 3D printed. Of course if the casting fails another print must first be made. One day I may find a use for that approach but for now just making patterns and core boxes is easier with 3D printing than with wood. If the sames are complex.
 
I go through phases where I use them a lot, and other times like this year, where I've barely touched them at all. Certainly not in about 6-7 months. It depends on the projects I'm working on. This year my projects have been more machining and fabrication related to getting my shop, and blacksmith tools built and setup so that I can more easily build "things". I have some casting projects that I'm planning on this winter that will feature 3d printed patterns, so they'll get some use there. Plus I have a fishing lure idea that I want to try, so will be printing prototypes, and "tooling" to make molds from.

The problem with my printers is that I have never had a great spot to leave them setup, so that I can just quickly fire one up and print something quick whenever I want. Hoping to change that over the winter. I bought a cheap "microwave stand" that I was hoping to turn into printer central, but after using it a bit I'm not thrilled with it and will be ditching it for another solution.
Whatever you do for placing our 3D printer slip a slab of concrete or marble under it. So it's sitting on 1.5" or so of very heavy rock. You will be amazed.
 
Whatever you do for placing our 3D printer slip a slab of concrete or marble under it. So it's sitting on 1.5" or so of very heavy rock. You will be amazed.
That's a great tip that I've read before, but 100% would have forgotten when it came time to set them up again. Thanks. :D

My ideal spot would be a totally insulated, heated and vented enclosure with a big thick stable cast concrete table top for them to sit on/attach to.
 
I think the problem is, and others may or may not agree, by the time you've drawn it out with your 3D parametric CAD the process to an STL file and then 3D printed overnight takes so much less time. Assuming you want to build from drawings and not a sketch on the back of an envelope.

but you can do that in your pj's at 9pm when you would rather not, or dont have the energy to be in the shop.

at least thats the way i look at it, it often takes more time, but it is much easier, some times i would rather sit at the computer than work in the shop.

and obviously the time thing goes out the window as soon as you start to build multiples of anything.
 
Thing is for less than $12 I could also have used my 3:1 sheet metal tool. Instead I would have just cut a rectangular hole like a regular outlet box and put a cover plate on it.

I think the problem is, and others may or may not agree, by the time you've drawn it out with your 3D parametric CAD the process to an STL file and then 3D printed overnight takes so much less time. Assuming you want to build from drawings and not a sketch on the back of an envelope.

One of the reasons way back when I first bought AlibreCAD was that it had a sheet metal feature. To be able to build a part up as sheet metal and then flatten it. And it included the bend lines taking into account bend radius and sheet metal K factor. But like all programs it requires regular use or what you get takes a long time to draw and may have errors when you try to build it. The 3D printing ends up easier.

Some people even take the 3D printing with casting to the extreme of lost PLA and the resulting casting comes out looking like metal 3D printed. Of course if the casting fails another print must first be made. One day I may find a use for that approach but for now just making patterns and core boxes is easier with 3D printing than with wood. If the sames are complex.

Not sure how it came across but I wasn't knocking 3D printing the box but rather saying where I am right now. I may see it differently if I get set up to print too.

The Hammond box is easy because I can download a 3D model from the manufacturer and fit the layout of the internals in CAD and just add any mods I need to mount the internal components and then machine it. Without being able to print it, it's the clear path. I do have sheet metal design/fab tools but that's more work than starting with the Hammnd box. I bought a BUD metal box for the power electricals too and it cost me $20 so that was worth it. I downloaded their 3D model and did the same layout/mod thing with it too then spent some quality time with the mill.

You're right, a good 3D modeler for sheet metal is great because it does all the hard lifting for bend rads and gives you the flat pattern. I wonder how many could do the calcs anymore to get the flat pattern the old way, I'd have to crack the books myself. :oops:

D :cool:
 
@Arbutus , is your borosilicate glass bed plate mounted on the original heated plate as a layer or did you replace what was there to start with? The glass plate is counterintuitive because glass and borosilicate in particular has a much lower thermal coefficient of expansion compared to plastics so unless they're maintained carefully the plastic would naturally want to split off the glass. POM on paper sounds interesting, do you Wolfbite the paper to the glass then prep it for the POM?
The glass plate just sits on top of the aluminum heated plate with a thin sheet of thermally conductive plastic between. It is held in place with tiny spring clamps.

Acetyl is tricky. It's slippery and there's not much adhesion even with the liquid polymer. I have had some success (not perfect) using thin unwaxed brown paper, glued flat onto the glass without bubbles using a UHU glue stick. The rough, dry surface seems to grip the acetyl enough to complete the print. Usually :)
 
Back to the materials for a moment. Once something is printed, is adhesion between layers anywhere close to the strength of perpendicular to the layers? Are the objects practical for more than light loads? I understand that the fill wouldn’t be 100% by design or it would take much longer to print.

What about materials? Do some give better layer to layer adhesion?

What about the fill/void distribution, can the shape & placement of the voids be manipulated to place strength where you want it?

D :cool:
Those are complicated questions. Every plastic performs quite differently than another type.

Yes, most prints will delaminate under extreme bending due to interlaminar shear. The inter-layer adhesion really varies significantly - not only due to small temperature variations, but also the nozzle clearance, ambient temperature, filament dryness and a dozen other factors.

Proper structural design and an appreciation for the loads and resultants, paying attention to details such as filleted corners and designing the interior fill to accomodate loadings and fasteners is all part of the process.

Most folks starting their 3DP journey will begin with PLA and evolve into ABS, PC and more durable materials only after learning the ropes.

Have fun!
 
It's important not to make the 3D printing the only solution. I've printed things where I know there will be stress that will cause separation on the layers. Often some epoxy and a few strands of carbon fibre in the load direction make the part robust enough to use. The key thing is that 3D printing is amazing for complex shapes that otherwise would be very difficult.

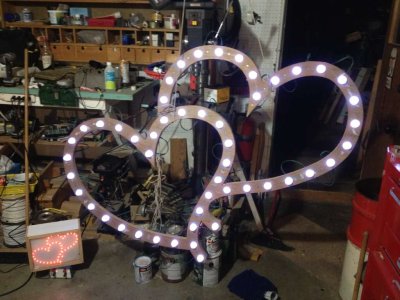
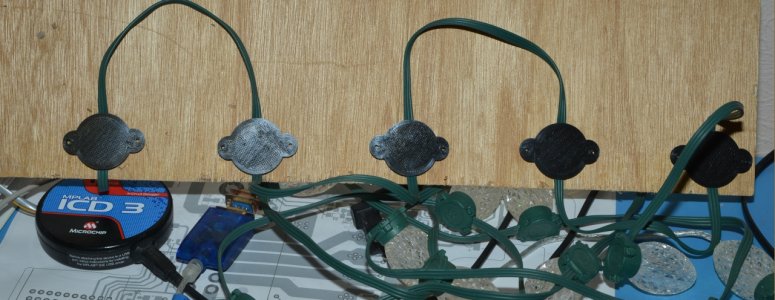
A number of years ago I made these heart shapes to hold GE35 Christmas lights bought from Costco. There were 50 in the string and the wooden frame covered in gold foil was 1/8" mahogany plywood. I printed clips that held them in place. The end lamp on the string needed an additional clip since there wasn't a second wire coming out to hold it back.
GE35-Clip4s.jpg

From the front you can just see the edge of the clips.

GE35-ClipCoverInstalled.jpg


And there were a lot of clips
GE35-Clips-300.jpg


RonLizWedding3.jpg

The little box with the small red heart on left had an ESTOP button on the top that had the latch removed. Just a giant push button. Used like the tinkling of fork on glass so the newly married couple would get up and kiss. In this case, press the button and all 6 heart assemblies would pulse red at a heart beat rate. That was the message that the bride and groom had to find each other and kiss. Anyone could go and press the button.

Here's a closeup of one of the hearts.
Heart_nbr1_s.jpg


Would been very difficult without a 3D printer running almost 24 hours for a few days to make 300+ clips.
 

Attachments

  • Rough Frame.jpg
    Rough Frame.jpg
    92.8 KB · Views: 2
  • GE-35-TestMount-Back.jpg
    GE-35-TestMount-Back.jpg
    137.6 KB · Views: 1
Back to the materials for a moment. Once something is printed, is adhesion between layers anywhere close to the strength of perpendicular to the layers? Are the objects practical for more than light loads? I understand that the fill wouldn’t be 100% by design or it would take much longer to print.

What about materials? Do some give better layer to layer adhesion?

What about the fill/void distribution, can the shape & placement of the voids be manipulated to place strength where you want it?

D :cool:
I would Orient the print to suit load. Another option is to Anneal them, thereby reducing air gaps. Doing this will change the shape slightly of the part and so the model might need to be scaled appropriately. For parts requiring load, maybe use a performance material such as PC or CF.
 
Back
Top