• Scam Alert. Members are reminded to NOT send money to buy anything. Don't buy things remote and have it shipped - go get it yourself, pay in person, and take your equipment with you. Scammers have burned people on this forum. Urgency, secrecy, excuses, selling for friend, newish members, FUD, are RED FLAGS. A video conference call is not adequate assurance. Face to face interactions are required. Please report suspicions to the forum admins. Stay Safe - anyone can get scammed.

Good Day From Chestermere

RobinHood

Ultra Member
Premium Member
Howdy,

No my name is not Tubal Cane or Robin Hood. But I do like machining and archery a lot. So much so that both are pretty passionate hobbies of mine. I have been involved in archery for about 45 years and was introduced to machining/metal working in High School. Never had any machines until about 3-4 years ago - other than the common hand tools/power tools used to rebuild a house or work on vehicles.

Then I needed to make this special bushing for one of my bows: SAE id with Metric od. Could not find anything off the shelve so I bought a lathe to make one... The rest is pretty much history.

Some of the equipment that "plugs up" my small shop includes: a second (bigger) lathe, milling machine, shaper, surface grinder, tool & cutter grinder, pantograph, metal band saw, welder, and tons of tooling.

I make my living operating machines that go really fast and far. So I do very much appreciate what the pro machinist/metal works do every day; it helps me get home safely. A big Thank You to all of them out there!

Cheers, Rudy
 
Cool man. I do a little archery as well just target practice with a recurve bow. Glad to have you as a new form member. Sounds like your garage is likely packed solid. Thanks for shairing.
 
Alexander, that's all I do: Compound Target.

The deal with the Better Half is as long as she can still park her vehicle in the garage I can get more stuff (within limits of course)... So I got very good at putting machines on casters and stacking them tightly. Not the ideal situation when I just need one for a small job, as it requires a lot of extra time to get it done...
 
Welcome Rudy. Look forward to your projects. We like pics!
Love the Top Gun Pilot avatar, made me chuckle.
 
Thanks PeterT!

I am starting to compile a few pictures and will have to learn how to upload them. Should be soon though...
 
Particularly interested in your tool cutter grinder & pantograph. I've been T&CG lurking for a while but mostly the $$ competes with other nice-to-have tooling and in my case that's a long wish list. Seems almost analogous to metal lathes. The old school oldies like Deckels are un-obtanium or insanely priced. The first gen clones from Taiwan are in the 2K range new & very few used ones come up. The second gen Chinese clones-of-clones are more reasonable cost, a bit rougher around the edges in some respects, but seem to be catching up quickly. Well, that's just my read from internet trolling, be interested in your experience & opinion.

Pantograph - are you doing engraving or more like 2D/3D router shape copying?
 
PeterT,

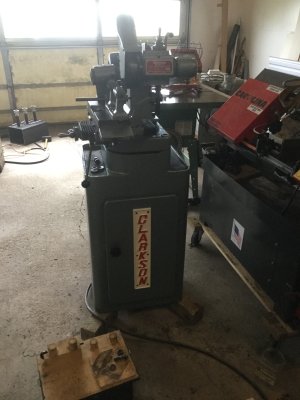
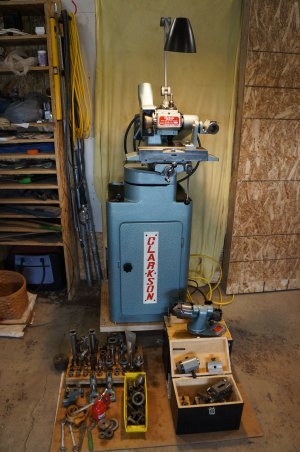
My tool and cutter grinder is a Clarkson MkII, I think about '70 vintage. It came up for sale with the Drill Point and Tap grinding attachment as well as the Radius Grinding attachment. It also had a nice diamond wheel with it. I "had" to jump on it for the price. The machine was filthy (I seem to attract them...). I think that's why a lot of potential buyers stayed away. I saw that underneath it all the machine was in excellent shape. The spindle bearings sounded a bit rough - not good and $$$s if I had to replace them. I just took it all apart to see what was up; just all the original grease all dried up. Cleaned them and changed them from grease to spindle oil. I drilled a hole on top of the spindle housing between the bearings. I squirt a good bit of oil into that bearing housing before each use and voila, the machine runs quiet and smooth. Unfortunately I have not had time to learn how to sharpen end mills and other cutters yet (my main reason to get a T&CG). I do use it for grinding carbide and HSS lathe tools regularly.

Here is a pic after I cleaned it
IMG_0102.JPG

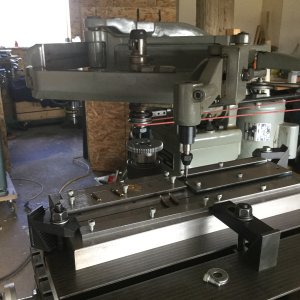
The pantograph is a Friederich Deckel GK12, 1968 (I think). The machine came up for sale with lots of letter/number templates. Since the machine is essentially obsolete (replaced by CNC) nobody seems to want them. The quality of the plain bearings, castings, table slides (lead screws), and spindle is absolutely phenomenal. Max rpm is 20000. So I am able to use it for super small drill bits as well. It is mainly for engraving, but certainly 2D and limited 3D copying could be done.

Here is a picture of the engraving process on the change gears I made for my SM1340 (see post in Projects section)
IMG_0141.JPG
 
Found a better picture of the T&CG (after I cleaned all of it) and the "stuff" it came with...
DSC03255.JPG
 
Wow, I'm experiencing serious machine envy on both counts! FWIW, have you seen YouTube channel Stefan Gotteswinter? He has a Deckel G1L. I'm not sure if its similar model to yours but I'm really intrigued by the intricate parts he's made, especially early vids miniature M1911.
 
It's like they say: buying a machine is only half the cost, tooling is what can make or break a deal. I have to say, I have been extremely lucky as far as accessories go that came with the machines I have purchased. Yes, some of the stuff was broken or had missing parts, but nothing that could not be made or repaired even at my humble level of experience in machining.

Oh yes, Stefan is an absolute master at his craft. He's probably forgotten more than I'll ever know about machining. His Deckel would be a little smaller. I am not sure his size was ever sold here in North America. They are quite versatile machines; basically they are capable of any operation a vertical mill will do. One can just lock the pantograph arms and then you have a very good vertical, high speed spindle.
 
Welcome Rudy

Hey is that a 3 burner forge I see getting built on your shop floor? I have a really good burner setup made from stainless and brass. Let me know if you want a look.

Bruce
 
Hi Bruce,

Very keen eye!

Yes, it is a project that our youngest son started in the last year of High School. We had it running at the time without any fire bricks/insulation or doors. We since got all that completed.

We are struggling with the correct location of the gas nozzles in the ventury tube. He based the positioning on instructions off the internet. It maintains a flame, but sounds like a pulse jet engine. I believe the nozzles are too high in the ventury and the air rushing past it is still accelerating and thus we get the pulsing action. I personally would put the gas nozzle where the ventury has narroed down to min diameter (like a fuel nozzle in a carb). He did locate them according to the plans he had; the video of the guy he copied shows smooth operation of the forge. So not really sure what is going on.

Sounds like you understand the build of forges - perhaps you can enlighten us?

Cheers, Rudy
 
I had a similar burner at one time to the one you built and it pulsed when it was warming up but then ran smooth after the forge got up to temp. My gas nozzle was a .035 tip from a mig welder wire feed and it was located just inside the bell of the ventri tube about a half inch inside the bell. It was fixed there and did not allow for any movement in or out of the tube. Did not get the flame hot enough to get mild steel much past cherry red. Closing the forge doors tightly makes the flame pulse and you don't get any air flow through the ventri so that might be an area where you are having some trouble.

I custom made a burner with the same tip installed in a sliding brass sleeve inside the stainless ventri tube of 1" id. drilled into the side of that ventri tube are air holes to allow for the air to mix with the propane. Propane needs at least 27:1 air to gas to burn and more to burn hotter. You get more heat and air when you increase the gas pressure at the nozzle. I run my single burner forge at 15 to 20 lbs and can get mild steel to an orange heat easily. the gas nozzle tip is located at the same level of the air induction holes in the side of the ventri tube. Any lower and the flame pulses at the burner nozzle. When I get to where the forge is Ill post you a photo of the burner.

Hope that helps.
 
image.jpg
image.jpg
My first forge (brother and I) was a manufactured piece. If anyone here is a member of proto space you may have seen it there, (still?) it has 3 burners and also had trouble "breathing" at wide open, it acts like a non valved pulse jet until you get the right air fuel mixture, (my wood stove also does a chuffing during warm up, shooting flames 6" out the open air control until the chimney can draw flow when operating temperature is achieved, solution in this case is more air) try restricting the air flow, also you need to create a vortex effect and that's near impossible pointing 3 burners in the same direction ... Looks like Grant Thompsons (YouTube) burner like my foundry ... When my foundry is running if I add to much forced air with out extra fuel, the combustion happens closer to the top of the cavity and energy is lost out the top. Try using just one burner at the end and blocking half the opening closest to it. The square body is likely not helping, it resists vortices/flow and leaves extra room for energy to be lost to atmosphere and not the part to be heated. This is why many people like the square electric type, close the door no combustion just hot, but it sounds cool having a rocket for white noise IMO. My current "forge" total cost; 1 fire brick $15, map gas torch (vortex tipped works best but regular LP tip will work also) $25, with propane bottle (20lbs exchange cylinder) $60 and adaptor hose (20lbs- 1lbs) $45.
$145 fill retail and you don't need a 20lbs tank the 1lbs will work, I made this copper bar in a foundry with this set up, just used the fire brick differently (dedicated foundry design see pic)
 
Last edited:
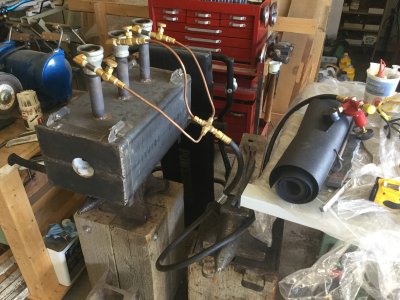
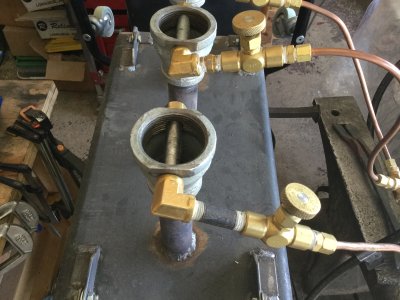
So here is an overview of the three burner forge

IMG_0460.JPG

It is made from an off cut of 10"x8"x0.25" wall rectangular tubing. We cut a 1" sliver off each end in the band saw to give us a frame for each door. We then welded two pieces of 0.25"flat bar on the frames and drilled a 1" hole using a hole saw. We used the same hole saw to cut the three 1" holes for the flame tubes on top. We used 1" black pipe for the flame tubes and 1.5" to 1" reducers for the venturies.

Here is a close-up of one of the burner venturies

IMG_0461.JPG

The gas comes from the pressure reducer through a three way splitter and a regulating valve to the little tube in the throat of the venturi. We drilled a 0.020" hole as a gas nozzle. The idea of mounting the gas nozzle across the downward airflow was to aid in mixing the gas and the air in the vortex created by the air rushing past the "obstruction" in the venturi. We are now thinking we need to add a short extension with the nozzle further down in the venturi to get rid of the pulsing action. (On the to do list....). Ideally, we want the gas to mix with the air in the down tube and the flame should only be present in the forge's cavity and not in the tube. We do have flame in the lower portion of the tube at this time - hence the forge is not that efficient.

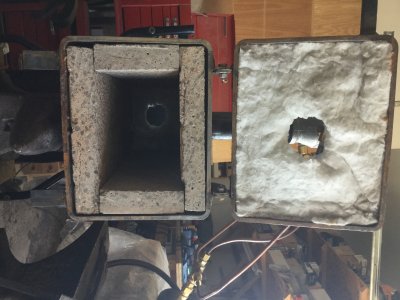
Here is a shot with one of the doors open. We used fire brick from an old fire place. The white hi temp insulation in the door came from a friend of my son. (Sorry, pic is sideways)

IMG_0462.JPG

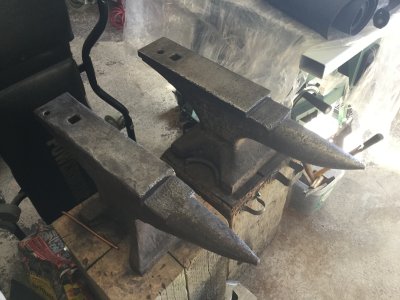
P.S. Yes, the forge is sitting on an anvil (the one my son bought). There is another one right beside it - that one is a much nicer one; it had a really good price - as long as he could carry it out of the shop... he did (with a little help). Here's a pic of them...

IMG_0463.JPG
 
Last edited:
We have tried with one, two, and all three going. As far as the pulsing, it does not matter how many we run.

Each door has a 1" hole in it. You think that may not be enough overall cross-section? That could well be the case: like too much back pressure in the exhaust of a car.... Hmmm. I thought we also tried it with one door fully open - or did we just talk about it? Can't remember - will need to go try that.

Dug around the internet some more: seems that our orifice size of 0.020" may be a little small. Lots of folks use 0.035" welding tips. Will try them. Also, seems that people do in fact have the gas outlets deeper in the throat - will have to try that as well....
 
I used the .025(.6mm) for mine, and like the "gas blaster" (identical actually) the tip is right at the bottle neck of the down tube, before going to far with a mod I wonder if a small piece of tube added to the (presumed) 2" reducer would enhance the Venturi ... Do you have a method of controlling the air in? My foundry requires (likely due to nozzle tip dimensions, .025 ) that I restrict air flow even at full gas On the single burner.
 
Back
Top