• Scam Alert. Members are reminded to NOT send money to buy anything. Don't buy things remote and have it shipped - go get it yourself, pay in person, and take your equipment with you. Scammers have burned people on this forum. Urgency, secrecy, excuses, selling for friend, newish members, FUD, are RED FLAGS. A video conference call is not adequate assurance. Face to face interactions are required. Please report suspicions to the forum admins. Stay Safe - anyone can get scammed.

Fixture plate for CNC Router

Matt-Aburg

Ultra Member
Last year I decided to purchase a highly customized 4 x 4 CNC router. This router comes for Cancam in Bowmanville. I ordered it very customized with a 5.5 Kw 6 hp motor, 6 tool changer with ISO 30 taper. Also, custom was the 12-inch gantry height. My intention is to run Aluminum and plastic mainly. Not much beaver work going on that machine. I chose the upgraded spindle because of the native high RPM's. 14000 is peak 6 HP. For example, then 1000 rpm is 0.428. Horsepower is proportionate. With a 2 HP motor, there is no way you could slow it down and still be able to drill 5/16 holes in aluminum. The Router comes standard with supposed PVC table, 8 pods for 4 vacuum zones. Hindsight, I would not have bothered to have this vacuum system as I have covered it with a BIG plate. Total travel of the machine is 57 x 54. The machine has a Masso controller. I am almost done Manufacuring the fixture plate now. See specs below.

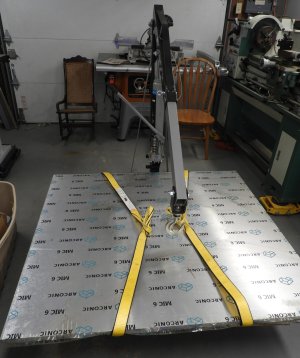
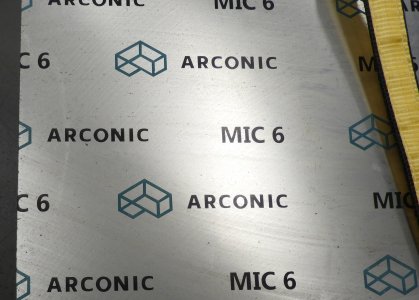
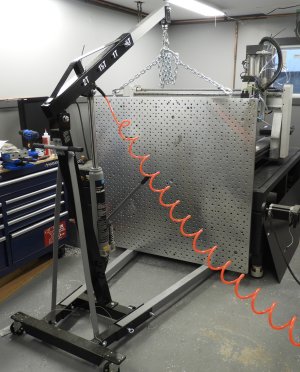
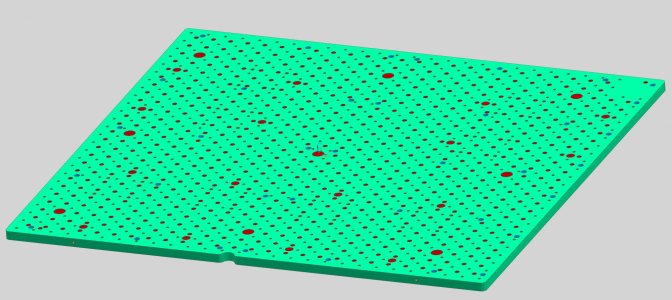
Plate is 56 X 52 X 1.000 MIC6. There are about 675 3/8-16 holes through, and 675 3/8 reamed holes with a 0.56 C-bore 0.18 deep. The C-bores are for 3D printed plugs to keep debris from going in the holes. I made sacrificial plugs for all the reamed holes. Also on the table are 18 0.625 reamed holes and 36 1/2-13 holes for up to 8 Kurt vices (DX6). Besides this there are 36 C-bored holes for 3/8-16 SHCS to attach the plate to the table. There are also 9 1.000 diameter hole for pickup, with the center hole being absolute zero. The 0.625 and 1.000 holes will also have sacrificial plugs to keep debris and water from penetrating. I am also putting in plastic setscrews in all threaded holes to keep it clean.

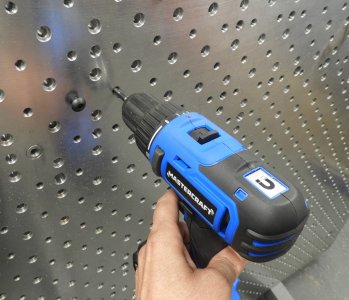
Below, are some starter photos. Raw plate, plate being tapped. (Note, I thread milled all threaded holes to plus 0.005/ side and finish tapped them). (3-day ordeal to tap all the holes.) Anyway, the plate is on machine, I have also made other customizations to this machine which I will show in following posts.
 

Attachments

  • plate1.JPG
    plate1.JPG
    395.7 KB · Views: 23
  • plate2.JPG
    plate2.JPG
    387.3 KB · Views: 24
  • plate3.JPG
    plate3.JPG
    483.6 KB · Views: 24
  • plate4.JPG
    plate4.JPG
    380.2 KB · Views: 26
Last edited:
Nice! did you power hand drill/tap all those threaded holes?
The holes were thread milled on the router to plus 0.005 / side. I then started the tap by handle, aligning to my already undersize threaded hole about 3 turns. Then I used the drill to do the work. Carefully not straining an any direction. I let the drill float basically, with me only holding it.
 
Nice plate! Looks like the Canadian Tire cordless is up to the task.
Now that's testing.
Wicked job.
Just wondering, what CAD software you using for 3D?
 
Nice plate! Looks like the Canadian Tire cordless is up to the task.
Now that's testing.
Wicked job.
Just wondering, what CAD software you using for 3D?
I use NX for design and Mastercam for programming. I am a bit occupied on a small lathe job till after tomorrow. I will then resume on this plate. I have to still do the C-bores for the 0.625 and 1.000 Dia holes and all engraving. I am attaching a screen shot of the engraving.
 

Attachments

  • plate-engrave.JPG
    plate-engrave.JPG
    478.2 KB · Views: 9
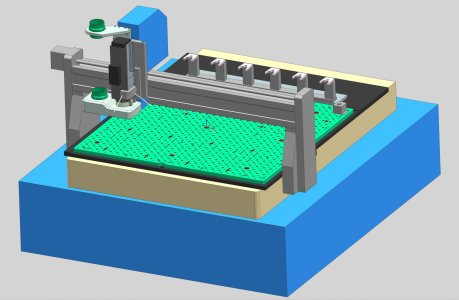
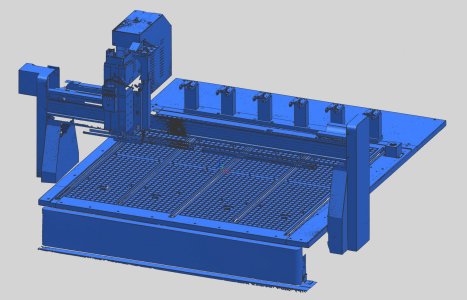
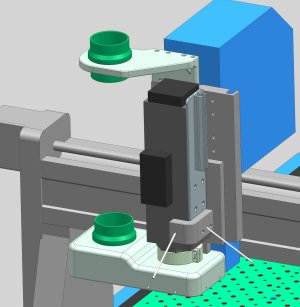
This customization began with having to scan the existing table and then the gantry separately. From this data I constructed a 3D solid model of the existing machine. I will be going under the machine to scan the structural tubular soon. This is in case the existing PVC top causes too much vibration when machining. I might have to add structural support below my plate. This is yet to be determined. I am including screen shots of the original scan data my solid model build, and the solid model of my plate. Note that the plate is showing my red sacrificial plugs that were 3D printed. I also show my custom 3D printed removable dust boot, attachments for the Fogbuster. The Fogbuster is mounted on the sheet metal housing behind the spindle.
 

Attachments

  • build.JPG
    build.JPG
    186.8 KB · Views: 6
  • scan.JPG
    scan.JPG
    277.1 KB · Views: 7
  • plate-with-plugs.JPG
    plate-with-plugs.JPG
    194.7 KB · Views: 6
  • custom.JPG
    custom.JPG
    148.3 KB · Views: 7
Thanks for the reply.
I'm a Solid works, Mastercam, Worknc user.
I certainly don't miss the days of 2D wire frame, 3D wire frame and surfacing.
Solids changed our world in a perfect way.
Looking forward to interacting more in the future.

Eric
 
@Aburg Rapid Prototype is there a CDN supplier you can recommend for MIC-6 or was it a kind of a custom order thing? I've purchased some smaller/thinner off-cuts in the past, even so was spendy stuff. Your fixture plate must have been a chunk of change.

Maybe you can comment - the other thing I've read is because its cast aluminum, its not the best material for repetitive hold-down fastener insertion/removal. Maybe they mean observe some max recommended torque for hold-down clamping etc. so as not to strip & extend wear? I'm not sure what the options would be, steel or CI would be a fortune & much heavier, whereas MIC comes pre-ground to good tolerance. Anyway just curious there. My little fixtures & jigs had a different feel when tapping vs regular 6061 alloy aluminum but I haven't had adverse issues. Mind you they didn't see a lot of threading repetition.
I chose cast plate because it is ground both sides. I was not confident about maintaining flatness on 6061. Also, in my case this plate covers the entire table, including the tracks they put in the PVC for holding down. I have many threaded holes. If I have a problem with thread pull, I could use another hole set. If in time too many pull out, I can upsize to 1/2 -13. Another thing to make sure of is to use almost the entire thread for engagement. I would not go crazy torquing my threads. My supplier of all metals is linked below. I use Essex Metals. Since you are in Alberta, you need to find someone local. Another big supplier is ASA alloys (also linked). They have locations out of Ontario. I believe they only deal with Alca-5 cast plate. Cost is very close. I chose MIC6 because this is what all the toolmakers here in Windsor Essex use, and it was highly recommended. Other options were steel, but two issues are weight, and corrosion., not to mention manufacturing and RPM on the router. This plate did cost a lot of money, but it is a tool. Accuracy downstream will be repeatable. Theoretically, I should be able to mount a fixture to it with the labeled dowels called out on a setup sheet. Then G54 can stay at the center of plate (absolute zero). The Masso controller allows for up to 6 preset zero locations G54 to G59. See links below.

 
Ya just to be clear, I wasn't advocating 6061 over MIC for fixtures & plates the reasons you mention. I was just saying when I tapped MIC it felt 'easier' to tap. The swarf kind of exits the flutes as fine grain crumbles, maybe what one would expect with cast vs. 6061/2024 et. is more the spiral thread swarf. So I was a bit concerned myself that maybe the MIC threads themselves might not be as strong & more prone to stripping with torque. In my case, these were just little fixture plates, but it saves the effort of fly cutting the surfaces because MIC is quite accurate.

I can almost guarantee Calgary has no suppliers or stock of this stuff. We are a 'round & hollow steel kinda town' LOL
I decided to have a look at manufacturing recommendations for this Cast plate. I am finding that thread pull is definitely possible. For this reason, I will double down on my screws in the fixtures that will be attached to the plate. If this becomes an issue, inserts are suggested. On day at a time though. I have attached a PDF from the manufacturer of this material.
 

Attachments

Here is an Alberta supplier of Metal products. They are part of a large network. If the fixture plate is not in stock, they probably could have it shipped from a different location. This link is for their Edmonton warehouse.

 
I build a lot of checking fixtures out of Mic6 and other tooling plate. I try not to put threads in the tooling plate when bolting other components to it, and instead put the threads in the other materials when I can. Not that mic 6 can't handle thread, but they will deform and strip out a lot sooner than just 6061-t6, and I try not to if I have options. For repeated high use where we can't get around it, I'll use helicoils/STI and call it a day. That said I've still tapped, and still make a lot of shop jigs out of scraps and tap them just normal and they last for years before wearing out.

For your plate, and you being the only user you should be able to get a long service life out of it just fine. If you find you're working in one area more than another and start to notice threads getting a bit sloppy, then drill them out and tap for an STI, or a keensert if you're feeling spendy and it's a high use area. You have lots of options. Cross that bridge when you come to it.

Nice plate BTW. Being able to bolt down fixtures anywhere, and leave them there has a lot of benefits.
 
I use 6061 plate as I get good pricing, if I need a precision surface I'll do a skim cut. I set mine up for specific cuts and allow cutting into the plate, again reduce cuts by designing for specific mounting points for a limited number of parts on a plate.

Both formats have serious advantages and disadvantages. Would I recommend one over the other as the one and only solution, never. I would though depending on the application. Again maximize the advantages vs the disadvantages.

If it comes down to one plate I would likely go this something like you are doing as it gives easy flexibility.
 
I like your idea of having the origin in the center of the plate.
I did the same, saved my riser table as templates in Mastercam, then just merge my work piece/s on the template.
Unless something moves, your work offsets will stay the same.
For Z and tool changes, with or without a tool carousel.
I pick the tools off the table and leave them set in the height offsets.
I just indicted from the table to the top of the work piece and set that as G54 Z offset.
No need to pick up tools each time unless something changes.
You can always adjust the common shift in Z if depth is slightly off.
So many options with a cool plate like that...
Unless a tool pulls out slightly or pushes up, you don't have to pick up another tool until it needs to be replaced or swapped out.
I find that is the beauty of these types of plates.
I think you will be ok with that plate for some time, maximizing thread engagement. I would grab a small torque wrench, set it and forget it.
 
I set mine up for specific cuts and allow cutting into the plate, again reduce cuts by designing for specific mounting points for a limited number of parts on a plate.

Both formats have serious advantages and disadvantages. Would I recommend one over the other as the one and only solution, never. I would though depending on the application. Again maximize the advantages vs the disadvantages.

If it comes down to one plate I would likely go this something like you are doing as it gives easy flexibility.

Hmmm, why would you ever need or want to machine into a riser plate? Just curious.
 
I like your idea of having the origin in the center of the plate.
I did the same, saved my riser table as templates in Mastercam, then just merge my work piece/s on the template.
Unless something moves, your work offsets will stay the same.
For Z and tool changes, with or without a tool carousel.
I pick the tools off the table and leave them set in the height offsets.
I just indicted from the table to the top of the work piece and set that as G54 Z offset.
No need to pick up tools each time unless something changes.
You can always adjust the common shift in Z if depth is slightly off.
So many options with a cool plate like that...
Unless a tool pulls out slightly or pushes up, you don't have to pick up another tool until it needs to be replaced or swapped out.
I find that is the beauty of these types of plates.
I think you will be ok with that plate for some time, maximizing thread engagement. I would grab a small torque wrench, set it and forget it.
Got any pictures of the work held down on the table? Matt? Little ol e?
 
Hmmm, why would you ever need or want to machine into a riser plate? Just curious
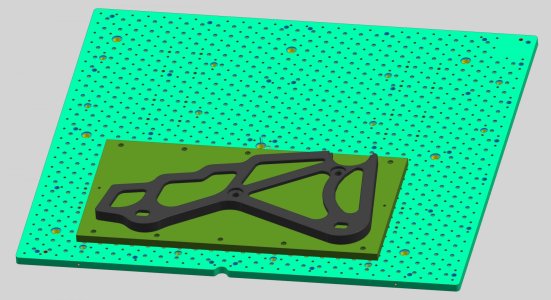
I hope to never accidently cut this plate. What exactly do you mean by riser plate.? I have an upcoming job for the machine which will use a plate attached to this plate. It will be machined clearance for the profiles and holding points. See Pic.
 

Attachments

  • plate-with-frame.JPG
    plate-with-frame.JPG
    221.9 KB · Views: 5
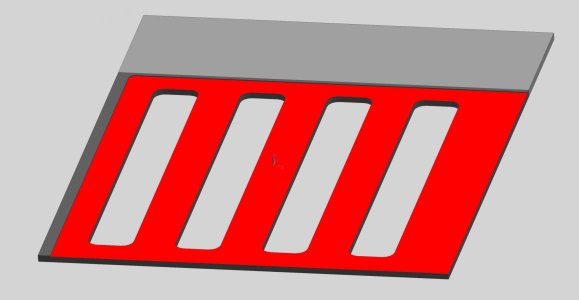
I mentioned earlier that the PVC table that came is suspect for vibration. My contingency plan will be to build a plate that mounts directly to the tubular structure below. This tubular weldment is only 1/8 wall stock and so tapping into it is not going to work. This is my preliminary plan. It is actually two plates due to size. I will not be doing this unless it is necessary. This will be made from `1 inch thick 6061 and bolted through the tubular structure. I put big slots to enable holding to fixture as this plate is larger than my tooling plate (TBD). Note that the large red surface will be faced after bolting to the frame.

I question if.

Will the plate warp, even if it never gets unclamped from the tubular structure?
It will be secured to the tubular with a shitload of 3/8-16 SHCS with washers, lock washers and nuts.
 

Attachments

  • sub-plate.JPG
    sub-plate.JPG
    71.7 KB · Views: 4
Back
Top