• Scam Alert. Members are reminded to NOT send money to buy anything. Don't buy things remote and have it shipped - go get it yourself, pay in person, and take your equipment with you. Scammers have burned people on this forum. Urgency, secrecy, excuses, selling for friend, newish members, FUD, are RED FLAGS. A video conference call is not adequate assurance. Face to face interactions are required. Please report suspicions to the forum admins. Stay Safe - anyone can get scammed.

First time sweating / soldering copper pipe - Air compressor purchase and cooling line

Jwest7788

Joshua West
Administrator
Hey All, Haven't been posting much lately, but have been busy working on this project, so want to share an update!

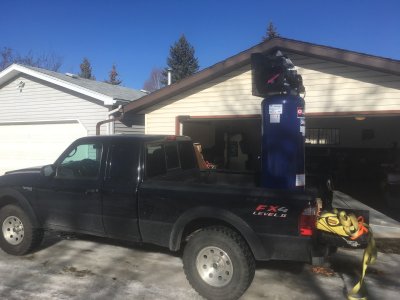
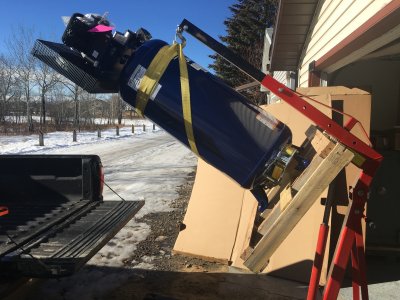
I finally got rid of that beast of a horizontal air compressor (~500lbs, cast iron, awful) I've had in my shop for two years now in favour of a vertical compressor.

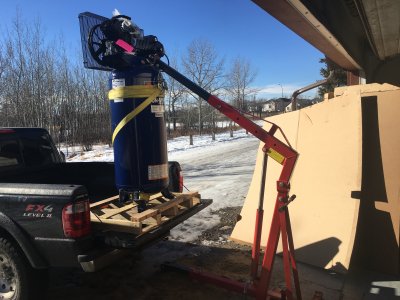
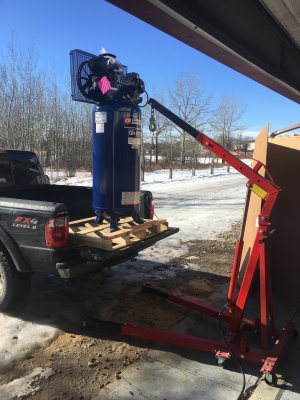
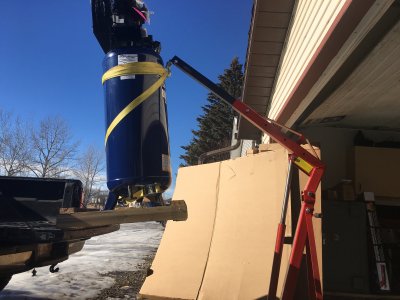
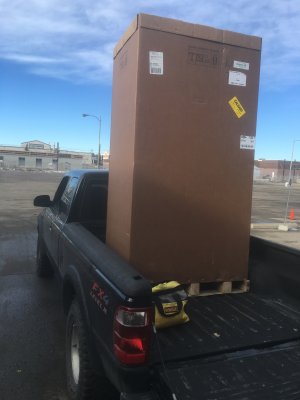
Moving compressor home: (scary unloading this solo)
2016-02-13 11.52.53.jpg 2016-02-13 12.39.47.jpg 2016-02-13 13.06.05.jpg 2016-02-13 12.50.27.jpg 2016-02-13 13.19.04.jpg 2016-02-13 13.20.19.jpg
That last pump of the engine hoist when you know it's coming off the truck is terrifying, haha.


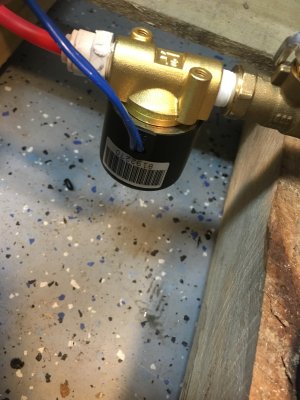
Next up was setting up a home-made auto tank drain. Really it's just a 12V actuated air solenoid valve:
2016-02-18 19.55.47.jpg
Hooked to a timer. The line was been snaked through the shop out the garage door. The little bit of plastic tube sticking out of the garage may freeze solid in the winter, now sure yet, but will update when I know.


I have a little sandblaster, and want to get into paint, but historically moisture was always an issue, as I didn't have enough distance from the compressor for the water to condense out. As I want to plumb my garage anyways, I spent the tail end of my weekend getting started with plumbing copper lines into the shop.

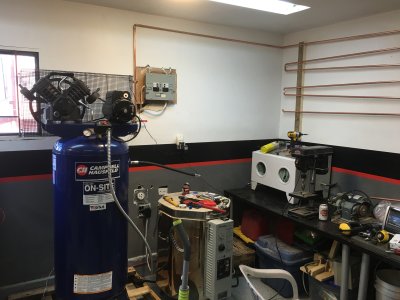
First step though, was getting the water to drop out by cooling the air to room temp.
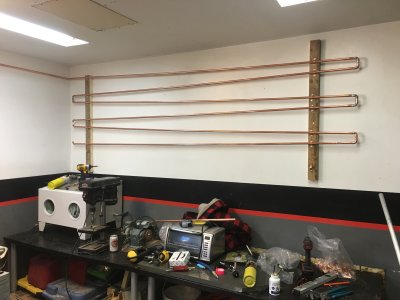
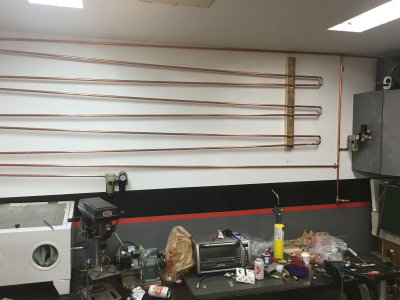
2016-02-21 09.43.14.jpg 2016-02-21 09.43.08.jpg
I plan to pull the wood down and paint to match the decor, but for now just wanted to get working on the piping.
I found several sources and did alot of math before finally settling on 1/2" copper, and the above design for cooling the air, while maintaining a heavy slope to gather the water at the bottom. (Not done yet).

The above is where I left off before bed, hopefully make some more progress tonight.

I plan to make one more u-turn with the pipe at the bottom, to a T fitting with a drip leg. From there distribute to 6-8 locations across the garage (one per side, one per corner).

I've also decided sweating/soldering copper is pretty fun. Will likely work with it in future too!

Will take some more pics as I go. :)

JW
 
Last edited:
I hope you don't get offended JW but I've never seen a piping layout like that. What kinds of moisture issues were you having before? I've done a fair bit of shop spraying using a variety of auto paints over the years; catalysed, solvent based, water based, lacquers, clears... & all I had was a cheapo version of a knockout at the compressor outlet & a small moisture trap on the gun as final polish for anything in the line. The better ones use a trap flow and desiccant media which should deliver air dryer than popcorn farts. A tall compressor like your new baby & air delivery off the top should be pretty darn good IMO.
http://www.amazon.com/Compressed-desiccant-combination-EQUIPEMENT-COMPRESSOR/dp/B00UEUYHOG

I'm concerned about the max pressure of your lines / joints / solder vs. max compressor delivery pressure? If you have ever seen the destructive power of compressed gas (air), Google "air compressor rupture failure". All it takes is a pinhole & boom. Yes you may have a regulator set to X, but you always have to think What If... reg jams open, or someone unscrews the wrong way, it launches a tiny liquid slug with mass. Is the general idea to flow air uphill, air cools by conduction, water flows back down into... (a trap of some sort)?
 

Attachments

  • 2-22-2016 0001.webp
    2-22-2016 0001.webp
    13.3 KB · Views: 11
  • 2-22-2016 0000.webp
    2-22-2016 0000.webp
    12.3 KB · Views: 6
Appreciate the concern!

I did a lot of research actually. Bursting pressure on this pipe far above max compressor psi. 850psi is the tube, the joints are the weakest point but still above air comp psi by a safe margin.

This cooling line style is not uncommon actually:
https://www.google.ca/search?q=copp...MzGMKHcIyDZQQ_AUIBygB&biw=414&bih=660#imgrc=_

And copper air plumbing is super common practice. :)

The benefits of copper are many fold.
Cheaper than black pipe at HD right now.
Lighter
Conducts heat better (cools)
Doesn't rust
Easy to put together,
Etc.

With regard to bursting, it's a lot of the reason I finally got rid of my old compressor, I did not trust it not to kill me one day.
Copper is deformable, which means if it were to leak, it wouldn't explode like PVC does, into shards. It simply develops a leak or crack, no explosion. :)

The typical reason that a cooling line like this one is put into a system is that the overall distance from the compressor to the gun is not more than 50ft, the recommended minimum for the compressed air to cool in line. This run simply adds the distance to drop out as much moisture as possible before the filters.

Again, appreciate the concern! We should always bring potential safety concerns to top of mind!

Here's a great article on air piping systems that covers copper, written by ingersoll rand
http://www.ingersollrandproducts.co...ing-your-air-piping-distribution-system-needs


JW
 
Last edited:
I completely stand corrected. Looks like I'm the Neanderthal paint sprayer :) I've seen the fancy manifolding before, just not temperature cooling & liquid drop-out aspect.
I had some minor dealings with industrial copper heat exchangers in the past & that's why my PSI spider sense was tingling. But now I know why - those were much bigger diameter tubes, high flow rates, hotter gasses... all collectively serving to de-rate pressure & I seem to recall required brazed joints. But looks like once you get down to say 3/4" OD the K&L are 580-850 psi & plumbing (is that M?) is 400 psi. Way more than what compressor will deliver. Do those numbers go around with what you have determined? Interesting stuff, good luck.

http://www.powdercoatguide.com/2014/06/how-to-dry-compressed.html#.VsyxKv72aUk
 
Oops what I wanted to mention in that link is kind of interesting - a heat exchanger after-cooler, looks like salvaged from a car transmission cooler or automotive a/c condenser. They pipe it off the compressor discharge but before the tank. And it has a similar liquid knock-out. I guess an advantage is small footprint & keeps water mostly out of the tank to begin with. Hmm.. now you have me thinking :)
 
Here is the doc I was referencing against for maximum PSI:
http://www.copper.org/publications/pub_list/pdf/copper_tube_handbook.pdf

I'm only running 1/2" actually, so while it is M type, it should be good to 850PSI (page 25/26)
--> Just looking, the 8" diameter pipe is only rated to 250PSI. Interesting. Makes sense though, with the nature of "Pounds per square inch" the the greater internal surface area means more stress.


I like the intercooler between the discharge and tank idea. I had heard about it in the past, but decided, since I'm plumbing anyways, that this would be just a couple extra steps in a project I planned on undertaking anyways. haha
If you end up proceeding with that plan, you should take some temperature measurement before and afters! Discharge before and after, tank before and after, etc.

I bet there is a calculator that can help us figure out the dew point and relative humidity before and after if we put our minds to it. Would be interesting to see actual imperical data on the benifits. Something I've had very little success finding for much of this air compressor moisture stuff.

JW
 
I plan on plumbing my shop eventually. I've heard that silver brazing is the better way to go for the joints, any insight on this from all your research?

Sent from my B15 using Tapatalk
 
Hey Eric,

Brazing VS Solder = Melting point, and final strength
Brazing is above.. 800F I think, Soldering is below. Ultimately brazed connections are several times stronger, but you can get solder with silver content (0 lead, or 95/5) which is supposed to be stronger then regular solder, but not as hot as brazing.

I read somewhere that normal leaded solder is fine for air plumbing, but later read that lead free is considerably stronger, but not required.


I did not read, but had fears of heating the copper hot enough to braze, causing it to anneal. Not sure if it would impact the max PSI, but had already decided on lead free solder at that point anyways.


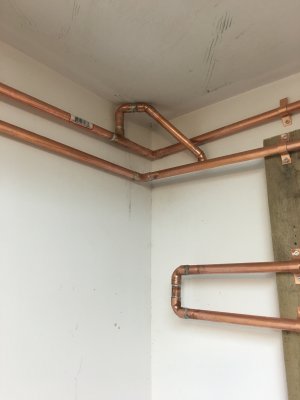
Worked some more on this yesterday. It's funny, you spend more time on a single access leg, rather than running 50 feet of straight pipe. The little corner shown below took forever to work through the kinks.
If anyone goes this route, buy way more fittings than you need. Grab a bunch of 45 degree fittings too. I keep running into sections where overlap needs me to work around the existing lines, or add spacing for the filters to fit, etc. 45's keep saving the day!

Two access points plumbed in with filters and regs now.
2016-02-25 21.53.02.jpg

This corner bit took a lot of work, taking a line off the top, then feeding through the gaps shown. It actually feeds off the top line, then another pipe is added to the 45D angle here, feeding down towards the ground.
2016-02-25 18.22.43.jpg
 
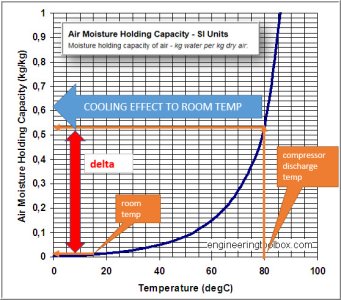
Yeah you would think there would be a straightforward online calculator. Hopefully my attempt is not out to lunch. Any engineers in the house? :) Found this graphical link, eyeballed the moisture content based on the difference between compressor discharge tempe & room temp (lowest you could cool to) & guesstimate CFM. Holy crap, if assumptions & math is right, that's a lot of water. The water holding content goes up very rapidly but not sure of actual air temp exiting compressor.
http://www.engineeringtoolbox.com/moisture-holding-capacity-air-d_281.html
 

Attachments

  • 2-26-2016 0000.jpg
    2-26-2016 0000.jpg
    78.8 KB · Views: 5
  • 2-26-2016 0001.webp
    2-26-2016 0001.webp
    10.9 KB · Views: 4

Attachments

  • 2-26-2016 0002.jpg
    2-26-2016 0002.jpg
    25.5 KB · Views: 2
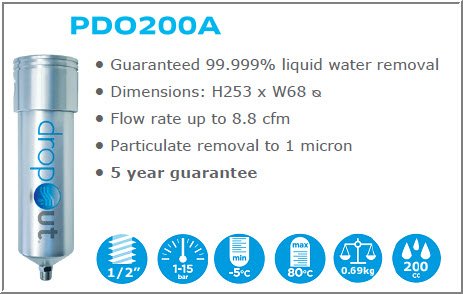
These look interesting. They claim 99.99% water removal.
http://www.pcltireinflation.com/Pro...6ec8-eafb-4abc-8f3a-3afb8056f1f1#.VtCZGU2hqUk

Cross section schematic. 164 Brit pounds = 307 Kanuck bucks. Ouch.
http://www.davidharriesstore.co.uk/...-compressed-air-point-of-use-water-separator/

ok, I'm so glad JW started this. I will never look at my compressor the same. Somehow, some way... I must have moisture free air!

Happy to help!

Keep in mind with those filters, they're referring to 99.9% liquid water removal. They will not impact water vapour in the air!

For that, your previous suggestion of a desiccant dryer is the way to go!

As far as I know there are only 2 ways to remove water from air. Desiccant, or cooling the air below it's dew point.

For $300 you're just a hop skip and a jump from an entry level refrigerated dryer: http://www.harborfreight.com/compressed-air-dryer-40211.html (USD though)
--> Slick stuff these things, reduce the temp to ~2C, which drops the vast majority of water out. Issue with these, besides the cost, is you need a nice filter setup before and after the dryer. But because these drop the air temp so low, you don't have to worry about anything else dropping out at room temp later. (My setup, if I didn't have a desiccant could still condense water if painting cold steel for example.)++

The best is a combination of a cooler, a super filter, and also a desiccant system!
 
I needed dry air for a plasma cutter, decided to go with desiccant since it's so cheap (available as kitty litter crystals), but the downside if you are fabricating it yourself is that it's more complicated to assemble than you might think.
The desiccant needs changing depending on use, so there needs to be some way to remove it, and some sort of filter to keep desiccant dust from going downstream.

I used ~6" diameter 1/4" wall pipe and plate to make the container, then have a drop-in stainless steel mesh screen which is followed by the desiccant, and another screen. The screens are attached to each other at a fixed distance with 4 small metal rods so changing the desiccant just necessitates depressurization, removal of 5 or 6 bolts, and lifting the screens out of the pipe.

It works, but if I was to do it over again I would probably find a cheap refrigeration unit and use a large diameter copper pipe to collect all the vapour as ice, then use a microcontroller and a couple motorized valves to stop the refrigeration periodically and flush out the water.
 
So @Jwest7788 - Josh - I read all this. Trying to digest. The long line allows the air to cool and water then condenses out of the air. I think then the water will fall to the bottom of your line to the ball valve at the lowest point. You extract the air above where the water gets trapped? And it's dryer? Do you actually get any water at the drain point?

Looking at the pictures more closely I don't think I follow. Is there some sort of circular air flow happening where the plumbing in the corner feeds dry air back into the top of the radiator section? Post more pictures with the final arrangement all in view? Thanks Josh this is interesting.

The other posts on this using desiccant (cat litter?) are interesting too on another thread. What kind of cat litter? Buying one of those desiccant units always struck me as expensive as the desiccant from the tool stores is expensive.

I have a new california 10 gallon compressor. Quiet. 7 cfm. Nice upgrade from my little old one. I think @PeterT has one too.
 
Last edited:
I'll take some more pictures tonight. :)

I'm actually finishing the project this weekend (hopefully) The top corner actually feeds behind the cooling line, down to an outlet, doesn't actually circulate back into the unit.

You've hit the nail on the head, water condenses out, drains to the lowest point, and is later removed from the system by opening the ball valve. Air (-liquid water) goes up the pipe and onwards to the rest of the system.

I initially had a small desiccant unit attached to the tool I was using, but liquid water blasted through the line and soaked the desiccant, which ruined it.

From there I learned, desiccant is meant to be used after the air has cooled, and water condensed out and separated from the air, to remove the last bit of moisture from the air, which refuses to condense, as room temperature is above the dew point of a little bit of water: https://upload.wikimedia.org/wikipedia/commons/thumb/9/91/Dewpoint.jpg/300px-Dewpoint.jpg


I'm not sure about the cat litter, that's news to me. Actual dessicant isn't too pricy at the store, considering it lasts for over a year if the above steps are taken. (or so I'm told)


Pics coming!
 
So desiccant should last if the air is dried out first. ok, I thought it required a lot of replacement, like air masks. I've read somewhere you can 'recharge' the desiccant by baking it in the oven....
 
That's interesting. Quick Google search shows lots of how to's. Needs more research, but silica gel desiccant seems like the one you can bake. Depending on the dryer you have, the pellets can be pretty cheap to just replace though.
 
More pics:
ImageUploadedByTapatalk1458602798.022005.jpg


ImageUploadedByTapatalk1458602825.999404.jpg


Each of the 5 outlets has a filter/separator and a regulator.

Another pic of the now complete corner shows the line going behind the cooler.

JW


Sent from my iPhone.
 
They're not too expensive actually. And I didn't want to redo the system later so dished out. Having said that a reg or filter are only ~$20 each. It does add up quick but it's not too bad.

The amount I paid for the conpressor I figure I shouldn't be afraid to spend a couple bucks to get the most from it. Haha

And I learned a ton and got a huge amount of hands on experience with something new. That alone is worth its weight in gold.
 
Last edited:
Back
Top