• Scam Alert. Members are reminded to NOT send money to buy anything. Don't buy things remote and have it shipped - go get it yourself, pay in person, and take your equipment with you. Scammers have burned people on this forum. Urgency, secrecy, excuses, selling for friend, newish members, FUD, are RED FLAGS. A video conference call is not adequate assurance. Face to face interactions are required. Please report suspicions to the forum admins. Stay Safe - anyone can get scammed.

Blacksmith Guillotine tool WIP

Dan Dubeau

Ultra Member
Finally had some shop time today after a few weeks away. Cleaned up a bunch, Spent an hour cleaning the surface grinder (still no end in sight...) hung some new shelves on the east wall, and some over the man door at the front, and moved the stereo and shop computer over. Also rehung the dart board. Important stuff...
DAKLGtv.jpg

9q7L7jK.jpg


Nothing fancy or very permanent, just some plywood offcuts, and stamped steel shelf brackets. Quick and easy and on to more exciting things.

Like this. A double sided guillotine tool for the blacksmith shop. TBH It was a bit of a scrap pile Tetris project, but the punch and dies are from 3/4x1" stock. I settled on this size, purely because I had a bar of that size long enough to make a couple different styles (4) of punches and dies to start with :D

Roughed a slot out with the 1" inserted cutter, then switched to the EM to push the sides back 0.02" on each side for clearance. This cutout is needed to make it easier to remove the lower dies.
hsTA2sj.jpg

e32JXkU.jpg

CdkAQH9.jpg


Not much work, but that's as far as I got tonight. Too late for any welding out there, but it should come together pretty quick hopefully some night this week. I'll mill the dies down for clearance for a nice running fit instead of shimming out the weldment.

For those not familiar with them, the 3/4x1" stock gets split about where I drew the sharpie line, and you can machine both sides into various shapes, as well as a bunch of other shapes (they are interchangeable). You stick your stock between them, and strike the top one to impart that shape in your workpiece. Common for doing shoulders and tenons, but a few other shapes and operations can be done with them too. While I also want to make a bigger one, the smaller double sided one will be handier for some of the smaller projects I'm working on without having to swap dies for every operation.
 
Finally had some shop time today after a few weeks away. Cleaned up a bunch, Spent an hour cleaning the surface grinder (still no end in sight...) hung some new shelves on the east wall, and some over the man door at the front, and moved the stereo and shop computer over. Also rehung the dart board. Important stuff...
View attachment 46183
View attachment 46181

Nothing fancy or very permanent, just some plywood offcuts, and stamped steel shelf brackets. Quick and easy and on to more exciting things.

Like this. A double sided guillotine tool for the blacksmith shop. TBH It was a bit of a scrap pile Tetris project, but the punch and dies are from 3/4x1" stock. I settled on this size, purely because I had a bar of that size long enough to make a couple different styles (4) of punches and dies to start with :D

Roughed a slot out with the 1" inserted cutter, then switched to the EM to push the sides back 0.02" on each side for clearance. This cutout is needed to make it easier to remove the lower dies.
View attachment 46185
View attachment 46184
View attachment 46182

Not much work, but that's as far as I got tonight. Too late for any welding out there, but it should come together pretty quick hopefully some night this week. I'll mill the dies down for clearance for a nice running fit instead of shimming out the weldment.

For those not familiar with them, the 3/4x1" stock gets split about where I drew the sharpie line, and you can machine both sides into various shapes, as well as a bunch of other shapes (they are interchangeable). You stick your stock between them, and strike the top one to impart that shape in your workpiece. Common for doing shoulders and tenons, but a few other shapes and operations can be done with them too. While I also want to make a bigger one, the smaller double sided one will be handier for some of the smaller projects I'm working on without having to swap dies for every operation.
Kinda for small people.... No?


Okay, I went back and read the post. Nice.
 
Looking forward to see what are some of the dies options and what can be made with this tool. I have lots of small metal drop which I am always trying to find a use for.
Thanks for posting
I am also a habitual saver of small offcuts. That's the best part about combining blacksmithing with machining and fabrication, as when the pieces are too small for either of those things, you can heat them up and smoosh them into new shapes and items. Nothing goes to waste it just changes shape :D
 
Decided to forego the tools of the trade show today and finish this up.

Started off taking all the parts cut last weekend out back and cleaning them up with a grinder. Then started tacking stuff together, keeping it all square, and the spacing correct. Here you can see this was truly built from the scrap offcuts. I didn't even have a piece big enough, so I cobbled stuff together lol. That 2x0.75" piece in the middle is the last of a futon frame I salvaged over a decade ago. It lives on in many projects around here, but I just didn't have enough for this so I scabbed one square stock on the ends.
xySTudI.jpg

mfMnsmp.jpg

Rht60jg.jpg

6o7L1MP.jpg


And there it is. I tried the "Mig like Tig" process here for the first time. Not sure I did it right, but I think it came out looking like hot garbage. I typically like running straight stringers, but enjoy playing around sometimes and trying new things out. Willing to give this another try on other projects where I think it might fit a bit better. This being shop tooling I didn't really care too much about the aesthetics of it. Good time to experiment.

Next up was some machining to mill the punches down for 0.01" clearance all around.
FKhDw9v.jpg


I also had a visit from our new (to us) Cat Coco. After our last Cat of 17 year passed away Christmas night, we were a bit hesitant to search for another, but Coco found us. Ones of the Wife's, Coworker's MIL was being admitted to a long term care home and Coco needed some new humans to feed her and scoop her litter box, so we left the decision up to the kids, and they said yes. She's very curious about the shop. A good hunter too. Not as adventurous as Old Johnny, mostly sticks close to the house. Fitting into the family just fine though.
ivhJWg2.jpg


I had a couple idea for die shapes, but had to do a quick consult of the plans before cutting any shapes.
ePgvdv5.jpg


Now that I was on the right path, I started laying some out on the 4 pieces I had.

w1JXrB4.jpg


Cut them out with the portaband, and cleaned them up in the mill.
KAva6Wh.jpg


Also did some scrap pile digging to get creative with some off cut shapes.
dyiuO4t.jpg
BA3lC28.jpg


MH2g5HJ.jpg


Took a bit of a break to move this shoulder into the oven to finish after smoking for 4 hours. I'm a big convert to this process now, as it's much easier to manage when I'm busy doing other stuff. Almost effortless.
MYDfcpz.jpg


Back to the shop I was thinking about all the different shapes I would like to make, and how much more material I need to buy to make them. Then I thought, man If I gotta buy material anyway, I wish I just made it for 1x1" instead so I could use them in both directions.....A quick glance down at the table, and all the peices for this were just pretty much sitting there, so I just put it together.
E5QTdnE.jpg
euuJr7r.jpg


It holds the same punches and dies made from 0.75"x1", but just rotated 90*.

And here they both are together with all the punches and dies I made today. More to come, just need more material...

3eYAnDa.jpg
4tCJ3Ka.jpg


I was hoping to get this done and start using it today, as I really wanted to fire up the forge and try them out, but ran out of time. Another day......
 
Had the day to myself so I figured I'd spend a couple hours out in the garage making chips, and making some more tooling for this...

Had a dig through the tickle trunk for some suitable stock. Found some in a chunk of 2"x0.75" and some 3.5"x0.75" bar.
S8O06tw.jpg

PXADx3n.jpg


The 3.5" would yield 3 punches, so I cut almost all the way through, then flipped it in the saw, and cut the other side off. The partial cut was then very easily cut with the portaband.
GFpgknf.jpg

ex3PLxV.jpg
rGUGszM.jpg
Jf1ngHh.jpg


Worked great, and quicker than just a porta band. I need to make a table for this saw on the outfeed side, and a few other things to make stuff like this easier. Always planned on it, just never find the time for it....

Next was to mill them down to size. I put the motogp Austin COTA round on and started cranking handles......Caught the end of the moto3 race, and the whole moto2 race.
ait3wBW.jpg

nxmiwxa.jpg

dG57ljx.jpg
AEQGKVP.jpg

LYWAMUW.jpg


Took a break when the MotoGP class came on and watched it inside. If you're not a fan of MotoGP you should be :D, Great race.

Back out in the shop after the race and I just had to square the ends up. I didn't touch the thickness as I felt they fit great in the guillotines,
Er95Vb3.jpg

qgVYWi0.jpg


Had to break for dinner. Kids have been sick all week, and wanted to go out for sushi. I'm not wasting $20 for AYCE when they're not running on all cylinders yet :D, so we had sushi night at home.
fvWaiST.jpg


After dinner it was time to make some shapes.

I drilled out a couple for some tenoning dies (1/4",5/16",3/8"), and one with a #3 taper pin reamer. I have a specific thing I want to try with this, so we'll see how it works out. I don't think there's enough of a taper, but we'll see.

I paired them up, and found the centerline between them and centered on the width. I milled the lowers all to 1.900" so it was easy to flush them up to the vise jaw, and be right on center.
nrMEmSv.jpg

Ll6xYQq.jpg


There was a specific cross section I was looking for in a lower die. I was about to grind up a cutter for it, and do it on the shaper, when I found a 5/16 Bullnosed endmill already tooled up in a TTS holder that was perfect. It worked great. I made one at 5/16x1/8" deep, and another at 3/8x3/16 deep. I might have to play around with this shape, but I think it's close enough to start.
MYqtUs0.jpg

5TXB4AM.jpg


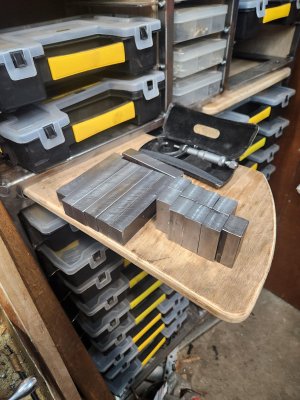
And here's the better part of the days work. Still have a bunch of sanding, shaping and punching sizes/info on them.
z3TjvRF.jpg


Still have a few blanks left over, and I drill/reamed one for 5/16 with a set screw so I can make some custom punch tooling for holes and other stuff.
XukwAg6.jpg


That's it, that's all. Pretty fun day. Next time you see this it'll be shaping metal in the smithy. I think I'm done making tooling for it for now, and have enough to smith the things I want to smith.....When? I have no idea....
 

Attachments

  • LQ4ixtF.jpg
    LQ4ixtF.jpg
    538.8 KB · Views: 2
Last edited:
That's what I call a very satisfying, productive day in the shop and to top it watching a GP race and sushi for dinner. Bonus!
Blacksmith guillotine, tenonning, taper pin dies , smith .......
All new toolng lingo to me. I will keep following with great interest.
Take it easy and enjoy the summer !

I had not notice your pull out table you incorporated in your storage system . I can see that being very useful! Well done.

Cheers!
 
Thanks, If everyday was like yesterday, I'd be a happy Man. Today I had to drive into the city and sit through health and safety training. Tomorrow too.. Actually for the next two weeks for various forms of training. By the end of the week, I'll be itching to heat stuff up and smash it with a hammer....:D

The tables turned out very handy, Not only for the sortmasters, but their position relative to the mill and lathe make them a perfect place for tools, and stuff while working. Here's my build thread on that if you're curious how I did it. https://canadianhobbymetalworkers.com/threads/sortmaster-hardware-rack.7452/#post-112130
 
Back
Top