SightlessSeer
Member
I have previously posted about the Atlas 10" lathe that I bought off of an older gentleman back in January. Since then, I have gotten it cleaned up, setup, and have used it on several minor projects.
Since, January in Canada isn't the most pleasant time to be outside in the garage, I decided that I was going to spend a bit of time while I waited for kinder weather cleaning up the the motor assembly, since it is the one major assembly of the lathe that I hadn't left out in the cold garage.
I started by removing the motor from the countershaft assembly. This was accomplished in the front hallway of my house... to my girlfriend's unending pleasure.

On showcase here we can see my beautiful temporary wiring job to test the motor


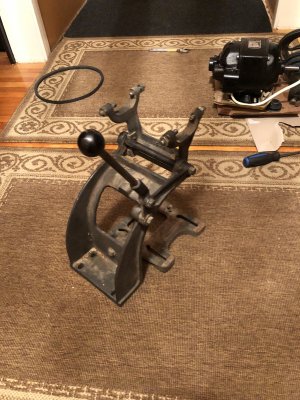
The frame that holds the conutershaft isn't too bad itself, but while I had things apart I cleaned it too


If I hadn't already known, the amount of caked on sawdust on the motor would have told me that the previous owner used my lathe primarily for woodworking.
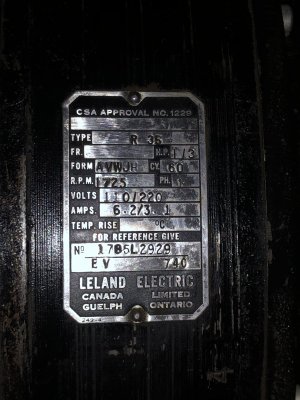
I started by cleaning up the motor. I had no intention of taking the thing apart, since all the bearings felt good and it ran nice and smooth during a test run... of course one thing lead to another and I took the whole thing apart anyway, but I was very pleased to see that the insides of the motor are immaculate. The motor is a 1/3 HP repulsion start induction run unit made by Leland Electric in Canada. From what I can find online this motor was probably made either in the 30s or the 40s.
I initially planned to replace this with a 1/2 HP General Electric motor that I have lying around, but that one turned out to be too big to fit under the frame for the coutershaft and has a larger motor shaft, so I stuck with this one for the time being.


The paint on the outside of the motor proved to be in remarkable shape underneath the oil/sawdust mixture. Hard to believe how good it looks considering this motor is about 80 years old with the original paint.

One thing that I did want to address with this motor was the (what I initially though was replaced, but turned out to just be broken) motor pulley. The 10" atlas lathes are supposed to have a two step pulley on the motor to achieve the full range of speeds. As you can see in the pictures, my motor pulley is conspicuously not stepped. I thought that the original Zamak one must have been broken at some point and this one was fitted as a replacement, or that the original motor had been replaced with the Leland one and the original pulley went with it, but when I looked at the pulley carefully while cleaning up the motor, I found a 9-42X part number (last digit is obscured by the broken edge). I had already been looking into new pulleys and had already found that P/N for the original 2 step motor pulley was 9-428.
I'm a little bit split as to whether this is the original motor from this lathe or not. I'm not sure if there was ever an option to buy a 10F without a motor from Atlas and add you own, but if there was this certainly could have been that motor. It's from the right era (my lathe is S/N 078677, which puts it at about 1946 according to the database) and is an appropriate size, but on the other hand the mounting holes don't align with any of the original ones on the Atlas motor mount, so there are extra holes drilled. Although, if there was a no motor option this isn't necessarily an argument against. On top of that, a bodged attempt at a removing a pulley from the original motor would explain the broken second pulley step. It doesn't really make a difference either way, but it was interesting to think about.
The next thing that I tackled was the countershaft itself. Similar to the motor, I didn't initially intend to take this apart (are you noticing a trend here?), but decided to after noticing that one of the bearings felt dry (spun freely instead of how a greased bearing should). I didn't take any pictures of it after cleaning and reassembly, but it wasn't as dramatic as the motor cleanup was. Suffice it to say that it was cleaner, but didn't shine like the motor did. The only parts that I replaced here were the felt washers that "seal" the grease into the bearings. I found a set that included both these and the felt oil pads for the carriage on ebay.


I made extensive use of an improvised bearing puller in disassembling the shaft

It turns out that there are two grub screws in the stepped pulley on the countershaft. I sure wish I knew that before I spent about an hour and a half driving it off. Fortunately the grub screw incident left only a slight mark on the countershaft itself.

I cleaned most of the grease off of the bearings with kerosene and a rag, but for the crusted on bits I left them to soak for about a week in a jar of kerosene. This partially worked, but I still resorted to mechanical removal for the last bits.

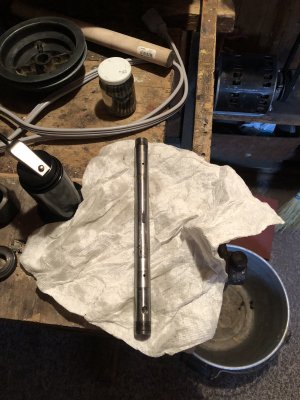
You can see the two holes on the countershaft to grease the bearings. The one at the top of this picture was crusted up solid with old grease that had dried out. That accounts for why that bearing felt dry. I'm definitely glad I went through the ordeal of disassembling this.
I had read in several different places that Clausing still provides limited support for the old Atlas lathes, so out of curiosity I sent an email to them with a list of part numbers. Some of it was simple stuff that I didn't really need from them specifically (replacement power switch and the mounting plate for it), but I also asked about carriage half nuts, leadscrew bearings, and the motor pulley. Every single part I asked about was in available and in stock! I'm really floored that you can still get new parts for a lathe that's 80 years old. I ended up picking up several things from them including the motor pulley. In case anybody is curious, the two step pulley was 104 USD, a half nut pair was 45 USD, and the leadscrew bearing was 60 USD. You can find all three of these on ebay, but when I looked all of them were cheaper through Clausing. Keep in mind that the pulley is a newly made aluminum one, not a Zamak original. I consider this to be an upgrade, but if you are looking to keep the original look them perhaps look elsewhere. One of the nice improvements with this pulley vs the original one is that the grub screw lands on the key so it won't mar the motor shaft.


With everything cleaned up, I reassembled everything with the addition of a linked belt and gave it a test run, which went off without a hitch.


I finished the cleanup in mid February and got it mounted to the workbench with my lathe by the first week of March, by which point it was getting warm enough that I made my first chips by the second week of March. Since then, I've done a couple little projects with it, but I won't get into those now. They can wait for another day.
Since, January in Canada isn't the most pleasant time to be outside in the garage, I decided that I was going to spend a bit of time while I waited for kinder weather cleaning up the the motor assembly, since it is the one major assembly of the lathe that I hadn't left out in the cold garage.
I started by removing the motor from the countershaft assembly. This was accomplished in the front hallway of my house... to my girlfriend's unending pleasure.
On showcase here we can see my beautiful temporary wiring job to test the motor
The frame that holds the conutershaft isn't too bad itself, but while I had things apart I cleaned it too
If I hadn't already known, the amount of caked on sawdust on the motor would have told me that the previous owner used my lathe primarily for woodworking.
I started by cleaning up the motor. I had no intention of taking the thing apart, since all the bearings felt good and it ran nice and smooth during a test run... of course one thing lead to another and I took the whole thing apart anyway, but I was very pleased to see that the insides of the motor are immaculate. The motor is a 1/3 HP repulsion start induction run unit made by Leland Electric in Canada. From what I can find online this motor was probably made either in the 30s or the 40s.
I initially planned to replace this with a 1/2 HP General Electric motor that I have lying around, but that one turned out to be too big to fit under the frame for the coutershaft and has a larger motor shaft, so I stuck with this one for the time being.
The paint on the outside of the motor proved to be in remarkable shape underneath the oil/sawdust mixture. Hard to believe how good it looks considering this motor is about 80 years old with the original paint.
One thing that I did want to address with this motor was the (what I initially though was replaced, but turned out to just be broken) motor pulley. The 10" atlas lathes are supposed to have a two step pulley on the motor to achieve the full range of speeds. As you can see in the pictures, my motor pulley is conspicuously not stepped. I thought that the original Zamak one must have been broken at some point and this one was fitted as a replacement, or that the original motor had been replaced with the Leland one and the original pulley went with it, but when I looked at the pulley carefully while cleaning up the motor, I found a 9-42X part number (last digit is obscured by the broken edge). I had already been looking into new pulleys and had already found that P/N for the original 2 step motor pulley was 9-428.
I'm a little bit split as to whether this is the original motor from this lathe or not. I'm not sure if there was ever an option to buy a 10F without a motor from Atlas and add you own, but if there was this certainly could have been that motor. It's from the right era (my lathe is S/N 078677, which puts it at about 1946 according to the database) and is an appropriate size, but on the other hand the mounting holes don't align with any of the original ones on the Atlas motor mount, so there are extra holes drilled. Although, if there was a no motor option this isn't necessarily an argument against. On top of that, a bodged attempt at a removing a pulley from the original motor would explain the broken second pulley step. It doesn't really make a difference either way, but it was interesting to think about.
The next thing that I tackled was the countershaft itself. Similar to the motor, I didn't initially intend to take this apart (are you noticing a trend here?), but decided to after noticing that one of the bearings felt dry (spun freely instead of how a greased bearing should). I didn't take any pictures of it after cleaning and reassembly, but it wasn't as dramatic as the motor cleanup was. Suffice it to say that it was cleaner, but didn't shine like the motor did. The only parts that I replaced here were the felt washers that "seal" the grease into the bearings. I found a set that included both these and the felt oil pads for the carriage on ebay.
I made extensive use of an improvised bearing puller in disassembling the shaft
It turns out that there are two grub screws in the stepped pulley on the countershaft. I sure wish I knew that before I spent about an hour and a half driving it off. Fortunately the grub screw incident left only a slight mark on the countershaft itself.
I cleaned most of the grease off of the bearings with kerosene and a rag, but for the crusted on bits I left them to soak for about a week in a jar of kerosene. This partially worked, but I still resorted to mechanical removal for the last bits.
You can see the two holes on the countershaft to grease the bearings. The one at the top of this picture was crusted up solid with old grease that had dried out. That accounts for why that bearing felt dry. I'm definitely glad I went through the ordeal of disassembling this.
I had read in several different places that Clausing still provides limited support for the old Atlas lathes, so out of curiosity I sent an email to them with a list of part numbers. Some of it was simple stuff that I didn't really need from them specifically (replacement power switch and the mounting plate for it), but I also asked about carriage half nuts, leadscrew bearings, and the motor pulley. Every single part I asked about was in available and in stock! I'm really floored that you can still get new parts for a lathe that's 80 years old. I ended up picking up several things from them including the motor pulley. In case anybody is curious, the two step pulley was 104 USD, a half nut pair was 45 USD, and the leadscrew bearing was 60 USD. You can find all three of these on ebay, but when I looked all of them were cheaper through Clausing. Keep in mind that the pulley is a newly made aluminum one, not a Zamak original. I consider this to be an upgrade, but if you are looking to keep the original look them perhaps look elsewhere. One of the nice improvements with this pulley vs the original one is that the grub screw lands on the key so it won't mar the motor shaft.
With everything cleaned up, I reassembled everything with the addition of a linked belt and gave it a test run, which went off without a hitch.
I finished the cleanup in mid February and got it mounted to the workbench with my lathe by the first week of March, by which point it was getting warm enough that I made my first chips by the second week of March. Since then, I've done a couple little projects with it, but I won't get into those now. They can wait for another day.


