• Scam Alert. Members are reminded to NOT send money to buy anything. Don't buy things remote and have it shipped - go get it yourself, pay in person, and take your equipment with you. Scammers have burned people on this forum. Urgency, secrecy, excuses, selling for friend, newish members, FUD, are RED FLAGS. A video conference call is not adequate assurance. Face to face interactions are required. Please report suspicions to the forum admins. Stay Safe - anyone can get scammed.

Anyone with a close-tolerance lathe want to experiment with a alignment bars I bought?

Jimbojones

Active Member
I bought some tools from overseas (direct) and wanted to test them out for accuracy.; especially MT2 & 3 alignment bars.

Seller claimed they are accurate to 1micron...I'm uncertain of his claim so I want to test them on a lathe that someone here has that is known to have close tolerances and see if they indeed indicate the alignment of a lathe correctly.

Would like to give this a try early this week; if someone has an available evening the next few nights (ideally south-half of Calgary) I'll bring them over and do a bit of examination.

Not absolutely necessary but handy if same person has a D1-4 mount so I could also bring a chuck to test

Anyone up for that?
 
I have an indicator that reads to 2 microns. (the barrel is quite large, so we'd have to improvise) We could check for radial runout on any lathe - between centres it doesn't matter...
 
I'm having trouble understanding the test intent. Are these cylindrical test bars with MT taper on one end? Can you post a pic?

I can visualize if the bar had their center drills on either end used for their grinding/lapping manufacture, you could support on dead center cones & measure TIR. But a single graduation of a 10-th reading DTI indicator (0.0001") is still 2.5X too coarse to measure a micron (0.000039"). Johns instrument sounds like the tool for the job, borderline lab equipment.

Once you put the MT end in the lathe spindle I would think that's a different animal. It will be influenced by the socket fit & headstock spindle bearing influence.

And now you want to utilize this to relate to a chuck, or is that unrelated?
 
1519674857781.webp


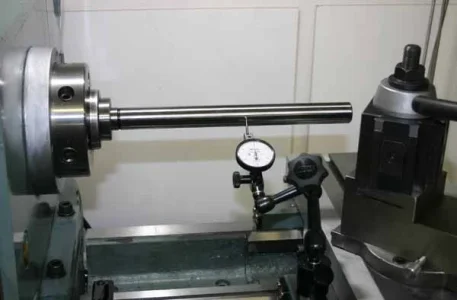
Idea is to insert the tapered side in to tailstock and see how it aligns with chuck jaws. Could also clamp the jaws on the straight section and view alighment other way w/taper loose. It is drilled on both ends so you can also mount it center-to-center...with or without the chuck involved.
 
Last edited:
I believe in order to test the bar by itself, you need to have an accurate surface plate, good v-blocks and a millionth indicator. If you want to test concentricity of the centers on each end, you need a special test fixture with known good centers and a millionth indicator.

As PeterT is suggesting, in any other case you are seeing either the taper (in)accuracies or the bearing run out (or both) of the spindle.

If you chuck it up in your test chuck, you will see the combined error in your spindle + error in your chuck + error in your test bar - if there are any.

How about contacting Robin Renzetti (robrenz) or Tom Lipton (oxtoolco, both from youtube) to see what they think and/or if they would be willing to test your bar?

It could well be that the bar is as good as stated; once you know that, then you can use it to measure TIR of other parts like a MT spindle taper, or scroll chuck, etc.

I don’t have any instruments that read to those levels. Best I have is 0.0001.

If you want to try it in a lightly used SM1120 with D1-4 spindle, MT3 tapers, you are welcome to it.

Cheers, Rudy
 
Ok that’s what I figured you had. I’ve used the same thing, they are useful.

You can insert the MT end into tailstock as you alluded, rotate a chuck mounted DTI about the end & measure deviation relative to head stock spindle axis. But there are a few important steps that should precede this, otherwise the test could be somewhat invalid. I’ll explain what I did & why, see if makes sense. If you spot logic flaws, let me know.

Test-1. Putting aside micron level specs for now, let’s just assume test bar is sufficiently accurate for lathe setup work, which it probably is. Insert test bar MT end into your headstock socket. If headstock is MT5 you need an accurately ground MT5/MT3 adapter sleeve, everything squeaky clean, no scratches or debris etc. Attach mag base to lathe way & DTI ball on outer portion of test bar. Rotate spindle. Any needle deflection tells you ‘something’ about spindle bearings & health of female MT socket. Unfortunately 'something' it’s a combo of factors, but ideally should be quite small on a tight lathe. Some may even suggest it’s not valid on a cold lathe, the bearings should be at running temp & pre-load.

Test-2, very important for actual turning work. Attach mag base to carriage, DTI ball on outboard portion of test bar for maximum resolution, centered at 9:00 position viewing test bar from end. Bar is stationary in this test. Traverse carriage full length of cylindrical test bar section. Any DTI needle deflection is showing you head stock misalignment relative to the way axis, which means your lathe will be cutting a slight taper even assuming perfect work holding. Correct this. My lathe has adjuster jack screws. If you breathe on them wrong it’s back to the drawing board. If the lathe is an integrated head / bed uni-casting, that might be the end of the trail. This is also where people get into evaluating lathe bed twist by jacking the feet, sometimes called lathe leveling (which is kind of a misnomer). Bed twist can interact the same way in terms of yielding tapered cutting. But headstock misalignment in plan view is the more dominant issue to correct. Similarly if the DTI ball is on top of the bar at 12-oclock position & carriage traversed, this indicates headstock axis is pointing up or down relative to bed. I’m not sure how to correct this aside from very subtle shimming. It will also cut a taper but a lesser amount.

Test-3. With headstock aligned and/or bed leveled as much as possible, NOW you can proceed to tailstock. So yes, you can put test bar MT end into TS socket, rotate a DTI about this & it will indicate TS axis misalignment in both up/down & left/right axis. Up/down is less problematic but left/right should be resolved otherwise you are drilling, reaming, supporting work off center - all bad. There is another gadget that does this between centers (made by Edge). That’s a static measurement, so eliminates headstock bearing stuff. Make sure the TS & barrel is locked down. Also do the test at retracted & extended positions. Now consider test-2 again. If the headstock was out & TS axis was perfectly aligned to bed, this combination would also show DTI needle deflection... but for the wrong reason. So there is a sequential order.

All this & we still haven’t talked about chucks yet. That’s because the underlying axis geometry must be validated first; the chuck is going along for the ride. Assuming chuck fits spindle nose correct & no issues with D1-4 or whatever the retention mechanism is, we get to chuck gripping. A 3-jaw scroll chuck might have like 0-1 thou TIR on freshly ground jaws or a Set-Tru type setup. An ordinary chuck on an ordinary lathe might be 2-3 thou. A worn out Betsy… maybe 4+ thou. But even gripping a perfect TIR hardened dowel in a 3J, you could get different repeat TIRs of +/- 0.0005” based on the stock diameter, clamping force, unequal torque on each key socket & other variables. Collet chucks are better than this, but sub-1-thou is considered pretty good for a hobby machine.

So…. this is why I was asking about your intended tests. If you are wanting to validate the micron accuracy of the bar, that’s might be lab level stuff. If you are wanting to use bar for lathe setup, there are likely bigger tolerances at play. Micron level is great but not necessary because you are magnifying alignment via the length of the bar. Therefore the bigger question is how straight is it?
 
I have a surface plate and the straight section of the bar appears to be quite straight; however, havent thought of a good way to check the tapered end nor both section combined other than the DTI/center mount option on a known aligned mount...hence my original request.

some awesome input and methodolgy; my approach is limited to my tooling & knowledge...MT5 to MT3 HQ sleeve would be a necessity to reproduce
 
This is like the one I used & same country of origin.
https://www.ebay.ca/itm/3MT-LATHE-A...5mm-13-3-16-/172957455576?hash=item28451154d8

It says: "Max. Run-Out : 0.0001" and sure enough "Accuracy within 1 micron". The physical run out seemed very good in my socket on a tenths DTI. It's hard to know what 'accuracy' means but my spidey sense says maybe not dimensional, but related to surface finish? 1 micron is 14,000 grit if that show the scale works, but I don't know what that would look like 'shiny metal' wise.
https://www.gessweincanada.com/category-s/11328.htm

This chart puts in the better than lapping range which is pretty decent. hey what do you want for 50 bucks? LOL
https://www.cnccookbook.com/surface-finish-chart-symbols-measure-calculators/
 

Attachments

  • 2018-02-26_19-32-21.jpg
    2018-02-26_19-32-21.jpg
    66.8 KB · Views: 4
Peter,
I've been wanting to buy a bar like that one you linked to on ebay but have been unsure....i want to be able to align my tailstock. My headstock is mt3 and my tailstock is mt2....is that bar the right one? As in the taper end goes in headstock? Are you pleased with yours?
Don
 
Don, my headstock is MT5 socket but my lathe came with MT5/MT3 insert reduction sleeve. My tailstock is MT3, so one bar with MT3 did the trick. Unfortunately you have 2 different tapers if I understand. Another option if your headstock alignment is good, you can align tailstock with a different gadget, the Edge device. Depending on where you get it, price might work out same. I've also seen some people make them by center drilling bar stock & turning the datum band close to the chuck, flip & repeat. The trick is identical diameters & finish. Might be worth a try.

Personally I prefer the Edge over MT blank in tailstock because it works off of centers in headstock/tailstock. I also learned a lot about my tailstock using it, which was 'out' for longer than I care to admit by an amount I am ashamed to admit. Lets just say breaking tiny bits & carbide center drills coincidentally ceased thereafter LOL. What I like is the DTI is resting on the ring and you are monitoring it as you remove TS offset. What I hadn't appreciated is tightening up the adjustment set screws actually can introduce a couple thou cinching it up (on my particular lathe). So I feel its a good thing to spot check this often especially if you've been doing some heavy drilling or <coughnotme> inadvertently planted a drill into some bronze.


Attachments

  • IMG_5708_edited-1.webp
    IMG_5708_edited-1.webp
    21.7 KB · Views: 7
Hats-off to Dabbler for info session last night. Found that the alignment bar needs some attention on the taper-side and my tailstock could use a cleanup pass so will hunt around for a MT3 taper reamer. Everything else - thumbs up!
 
You mean the test bar taper is out or the test bar identified that your lathe MT socket is out?
 
We discovered two problems.

1) The taper slope on the test bar is too abrupt by about .002" ove the 3" of length- It can be blued in by lapping if relieved in the centre.

2) The tailstock socket has a tiny amount of damage (likely die to swarf) which can be stoned out or cleaned up with a reamer. Jimbo prefers to ream it which is just fine... All of Jim's other MT3 tooling fits quite well, but you can feel two distinct burrs in it that should be fixed.
 
Hmmm.... 0.002" over 3" seems like a lot. That doesn't sit well with the overall advertised specs of a test bar when they throw out specs like "Max. Run-Out : 0.0001" and "Accuracy within 1 micron".

FWIW, the bar I had was blued & tested in both my head & tail MT sockets against my 'besty-est & shiny-est' 3MT shanks. It highlighted pretty much the exact same story from a qualitative rub-off standpoint. Actually my ID tapers are in pretty nice shape but it was re-assuring. I was kind of worried about my tailstock because it had a slight score probably from inadvertently ramming in a chip, but it doesn't seem to be bell-mouthed or mis-tapered.

I don't have experience reaming TS barrels. I assumed they were pretty hard & factory ground?
 
Back
Top