• Scam Alert. Members are reminded to NOT send money to buy anything. Don't buy things remote and have it shipped - go get it yourself, pay in person, and take your equipment with you. Scammers have burned people on this forum. Urgency, secrecy, excuses, selling for friend, newish members, FUD, are RED FLAGS. A video conference call is not adequate assurance. Face to face interactions are required. Please report suspicions to the forum admins. Stay Safe - anyone can get scammed.

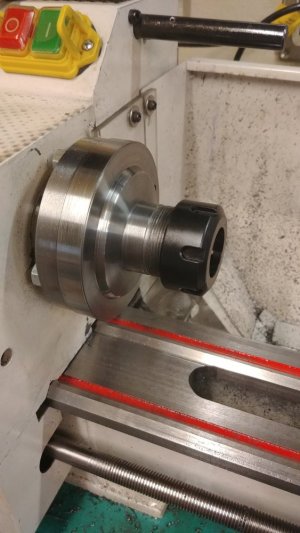
4" ER32 lathe collet chuck

I reground my HSS bit and tried in combination with the speed/feed rate on the calculator on LMS and sadly it still just brned the tip and didn't cut at all. ...
Did you try to test if the piece is work-hardened? Or if it has previously been fully hardened? IE will a file cut or skate?

At this point, you don't have much to lose by trying to anneal it. Heat it to cherry red and let it cool slowly.

The other possibility is that the HSS is crap. Where did it come from? Even the cheap tool blanks from Busy Bee are pretty good.

Craig
I did try with a file and it cut quite nicely. I got the HSS off amazon so I'm thinking it's just crappy HSS.
I will be just using it on aluminum and softer materials. I'm going to start searching for some better stock.
 
Well, the project is complete. It had a few struggles along the way. Learned a little more about turning harder material on a mini lathe and was my first project with turning threads. (its really a pain when you break a threading insert and have to re-align everything)
I must say that I'm pretty happy with how it all turned out. The register on the spindle side is a very nice tight fit and the fit for the collets and collet nut are virtually perfect. I guess a little patience pays off.
 

Attachments

  • lathe collet chuck.jpg
    lathe collet chuck.jpg
    91.8 KB · Views: 10
I started with a small center drill after I faced it off and scribed all the reference circles from there (for the register and the bolt holes). I didn't remove it from the chuck until I was completely done and ready to mount it on the spindle. I felt that was the best way to ensure concentricity.
once I had marked the holes I simply held the chuck in my vise and carefully located, drilled and tapped the holes. I had a few challenges with the lack of real estate in my little mill, but, it worked. I chose to go with the four bolt pattern since that was much easier to mark and I feel it holds better than 3
 
Anneal it!

Looking back that would have been a great idea. However, with the lack of experience I have, it never crossed my mind. I was successful using the "blue nano" inserts (after burning up 3 or four "regular" ones). They cut quite nicely and I did notice the load on the lathe was reduced.
I am planning to put the left over piece in my forge and anneal it so its ready for the next project that comes up.
 
So the collet chuck bore must have a taper to it correct? You bored that taper using the compound slide?

The more I think about what you did here, the more impressed I am.

Good job!
 
So the collet chuck bore must have a taper to it correct? You bored that taper using the compound slide?

The more I think about what you did here, the more impressed I am.

Good job!
Yes it has an 8 deg taper. I very slowly and carefully turned it with the compound slide. I went from the dimensions I found on the internet and a collet holder I have for my mill
 
So the moment of truth....
T.I.R on the inside of the collet chuck is .0005",
T.I.R on the body is .001"
I chucked up a 10mm reamer and I'm getting almost .015" run out...

Advice, where do I start looking to correct this? I don't have any pin gauges, or drill rod that I know for sure is "perfectly" straight.

I have not removed the piece from the lathe since I started turning it. I felt this was the best option to alleviate repeat-ability issues. I will do this once I have a bench mark to compare it too. I have a witness mark on the spindle and the holder so I can remove and reinstall in the same orientation going forward.

I feel I need to test other sizes, to see if there is some kind of pattern. What is the most effective way of doing this? Since I have not yet acquired an imperial set of collets to use a simple set of drill bits (theoretically these should be reasonably true).

I tried rotating the collet in the body and rotating the reamer in the collet and didn't get any significant changes, better or worse.

Yes, these are chinesium and I have heard read some posts on the quality issue, is it simply poor collets?
 
0.015" sounds like a lot especially when you have those good body dimensions.
- ensure you are measuring runout right immediately by the nose of the collet, not at some extended distance away. Your reamer shank should be accurate but... ya never know
- make sure there is no crud in the snap ring thingy where the collet nose engages & it pops in positively
- most people underestimate the recommended tightening torque of these collets before they are considered properly clamped. Table attached. I have to admit when I used mine in the mill I gave it a slight tug. the EM seemed tight but it was nowhere near these values. It almost seems like overkill, but that's what they say
- I'd try some other collets & different shanked endmills if you don't have dowel pins. Be careful of drills especially cheapo's. Often times I have seen raised lettering where the size is stamped on the shank in vs being engraved in.
- possibly you shifted the chuck when tightening the collet? Did you check runout of the body after the bad collet runout reading
- and yes, sometimes you get some duds in the offshore sets. Look to see if there is any grinding grit in the slits that might prevent equal closure
 

Attachments

  • SNAG-8-26-2019 0000.jpg
    SNAG-8-26-2019 0000.jpg
    52.7 KB · Views: 7
0.015" sounds like a lot especially when you have those good body dimensions.
- ensure you are measuring runout right immediately by the nose of the collet, not at some extended distance away. Your reamer shank should be accurate but... ya never know
- make sure there is no crud in the snap ring thingy where the collet nose engages & it pops in positively
- most people underestimate the recommended tightening torque of these collets before they are considered properly clamped. Table attached. I have to admit when I used mine in the mill I gave it a slight tug. the EM seemed tight but it was nowhere near these values. It almost seems like overkill, but that's what they say
- I'd try some other collets & different shanked endmills if you don't have dowel pins. Be careful of drills especially cheapo's. Often times I have seen raised lettering where the size is stamped on the shank in vs being engraved in.
- possibly you shifted the chuck when tightening the collet? Did you check runout of the body after the bad collet runout reading
- and yes, sometimes you get some duds in the offshore sets. Look to see if there is any grinding grit in the slits that might prevent equal closure

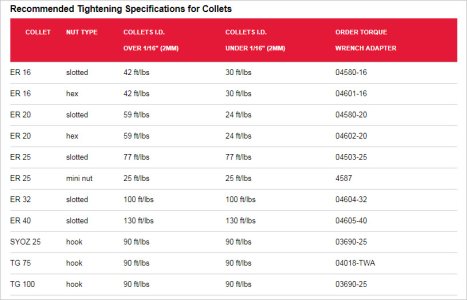
WOW 100 ft/lbs...Yeah that seems a bit excessive.

Thanks for the advice. I'll spend a bit of time tomorrow playing around with a few different things. I only got the collet set recently and never thought to thoroughly clean them. I'll try that too
 
That is one thing I have been wondering about if I need a torque wrench for my cat 40 collets, so far I have been using a wrench type and small snipe so far so good!
 
Back
Top